毎月、GOWUKAKUは1500人以上の受験者が試験準備を助けて、試験に合格するために受験者にご協力します
VMware Certified Advanced Professional 6 - Network Virtualization Deployment Exam 試験
最新更新時間: 2026/09/27
【秋学習応援セール|10月限定キャンペーン】:3V0-643 最新真題を買う時、日本語版と英語版両方を同時に獲得できます。
実際の問題集を練習し、試験のポイントを了解し、テストに申し込むするかどうかを決めることができます。
さらに試験準備時間の35%を節約するには、3V0-643 問題集を使用してください。
Question No : 1
168.190.0/29
Uplink IP address of the application tier should be the first available IP address.
Downlink from the tenant router will use the second available IP addresses.
The password for new edge device(s) must be VMware1!VMware1!
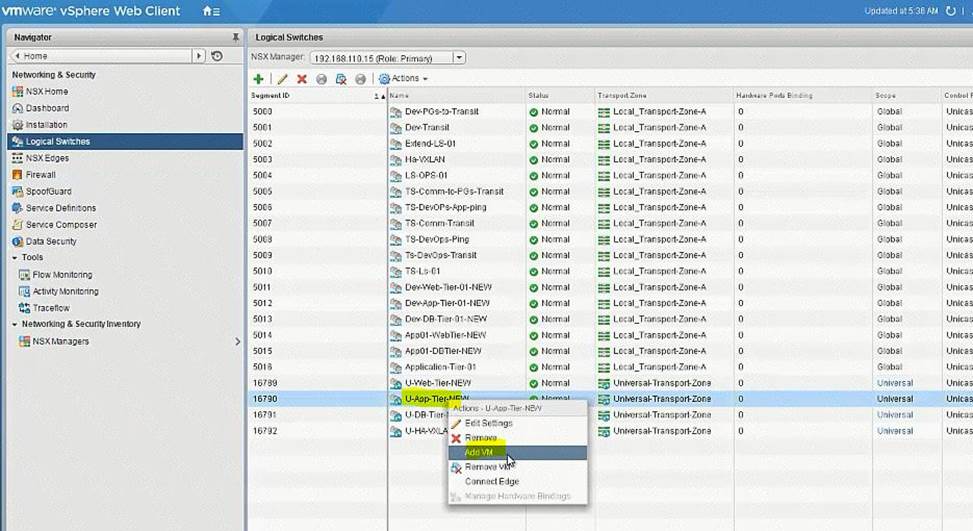
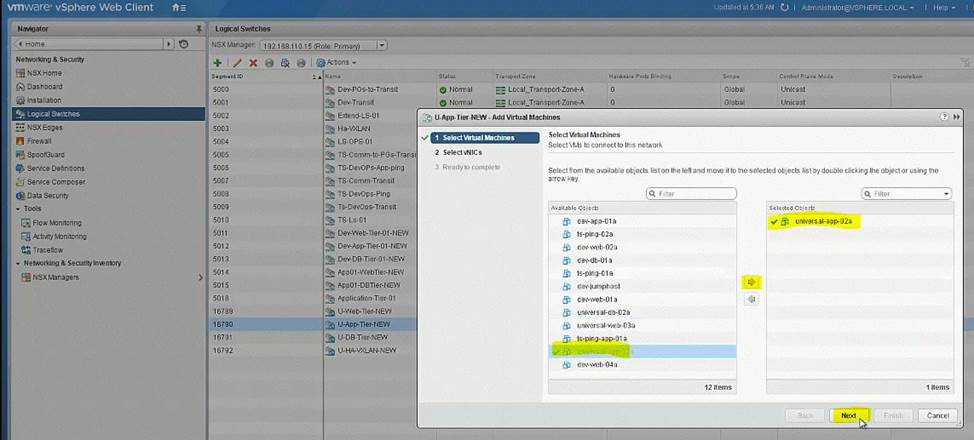
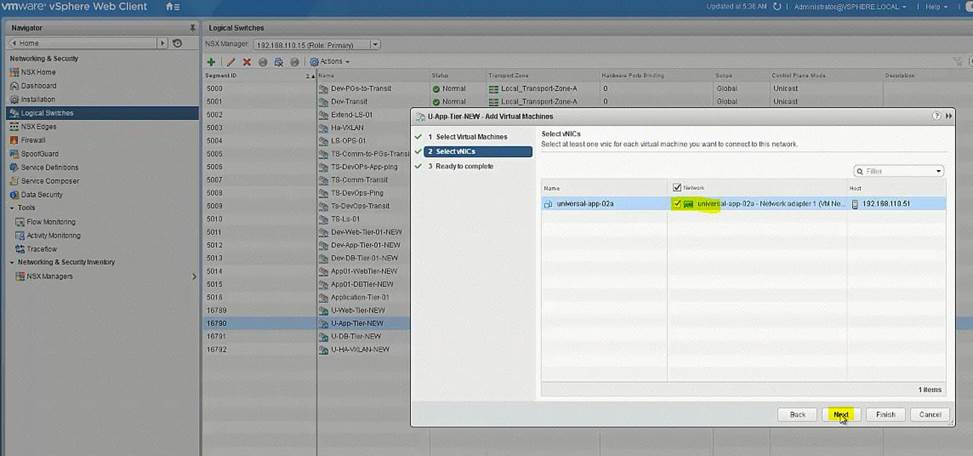
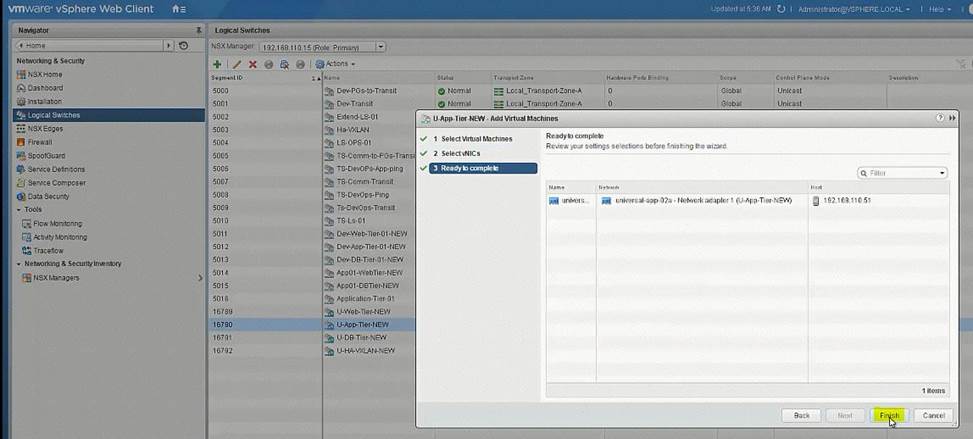
Add all virtual machines with a prefix “universal-“ to their respective segments.
Ensure all LIFs are reachable from ControlCenter.
HOL LAB for Practice:
See the explanation part for complete solution.
正解: SOLUTION:
universal transport zone
logical switches
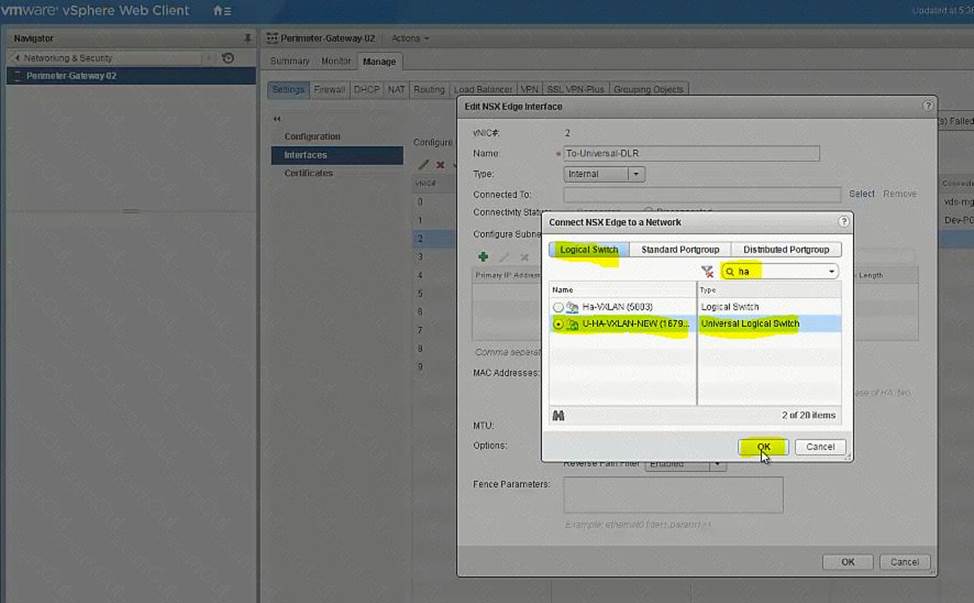
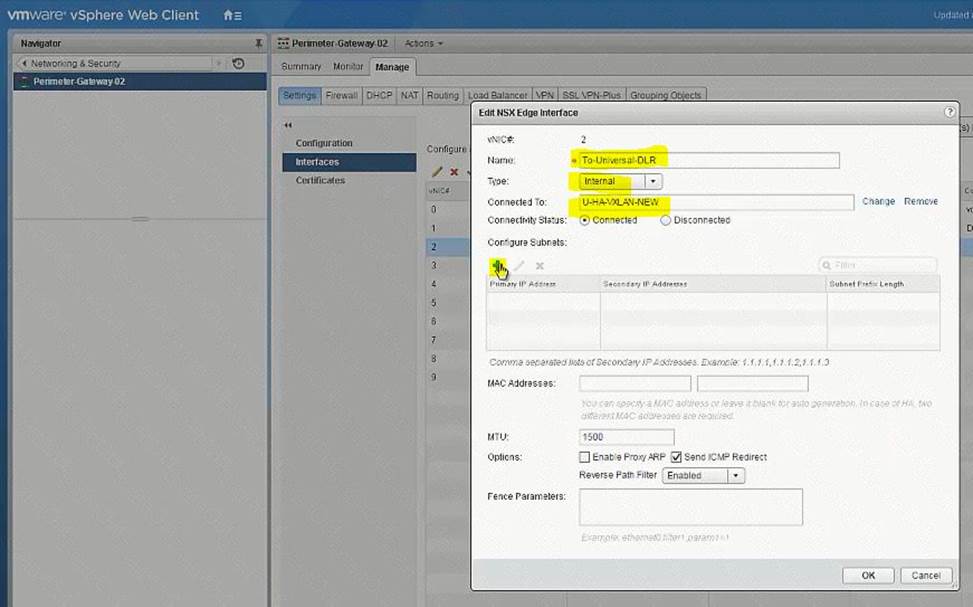
U-HA-VXLAN-NEW
U-Transit-NEW
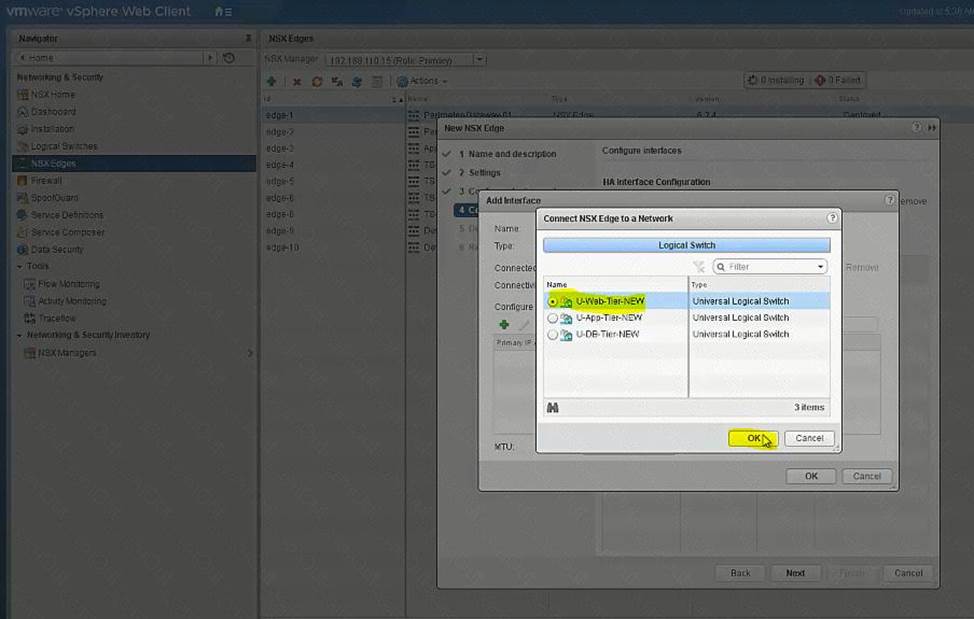
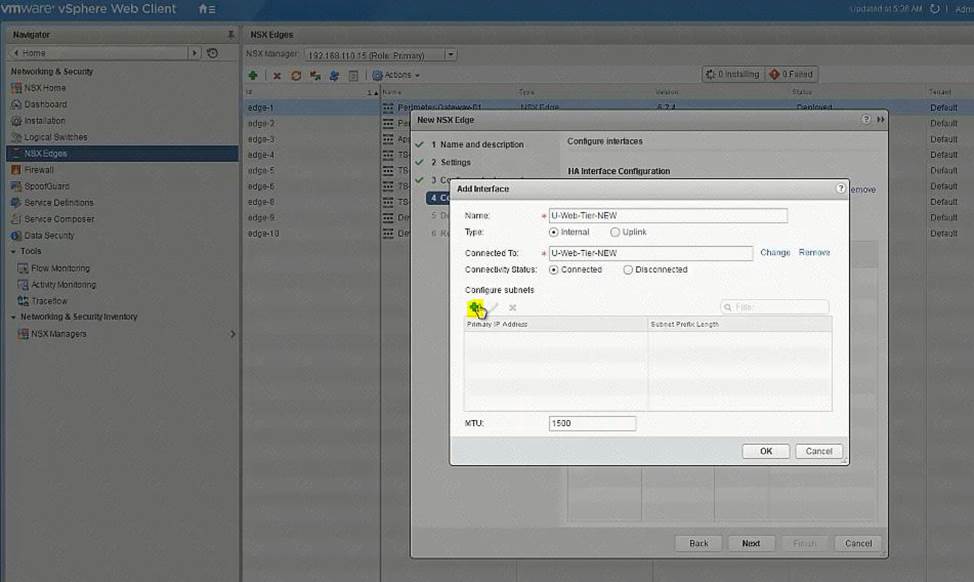
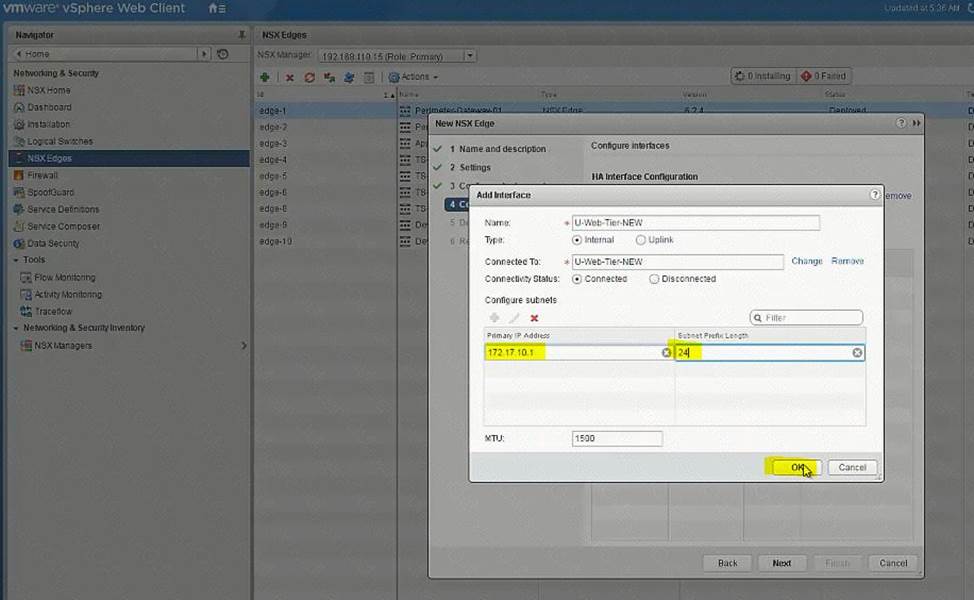
U-Web-Tier-NEW
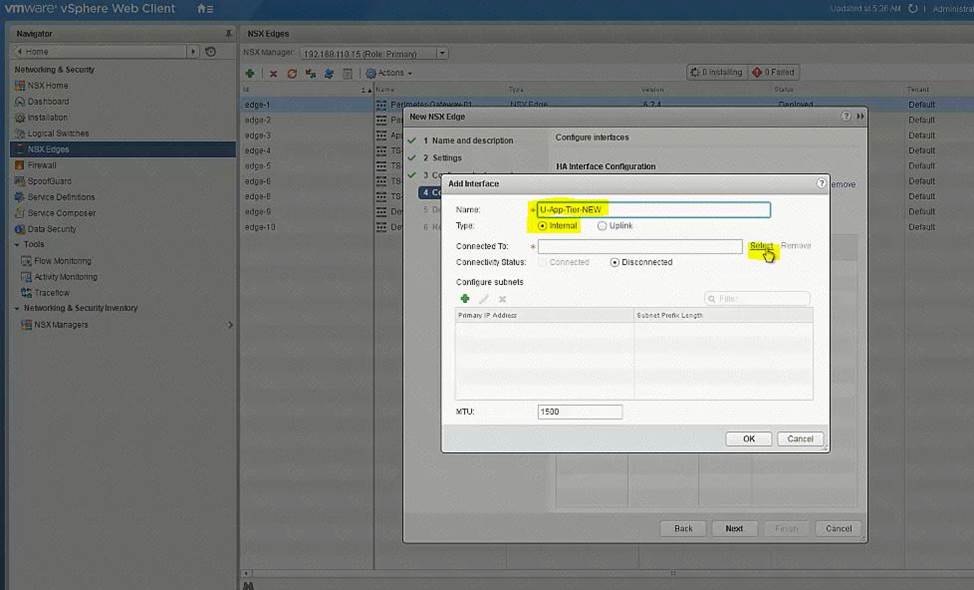
U-App-Tier-New
U-DB-Tier-New
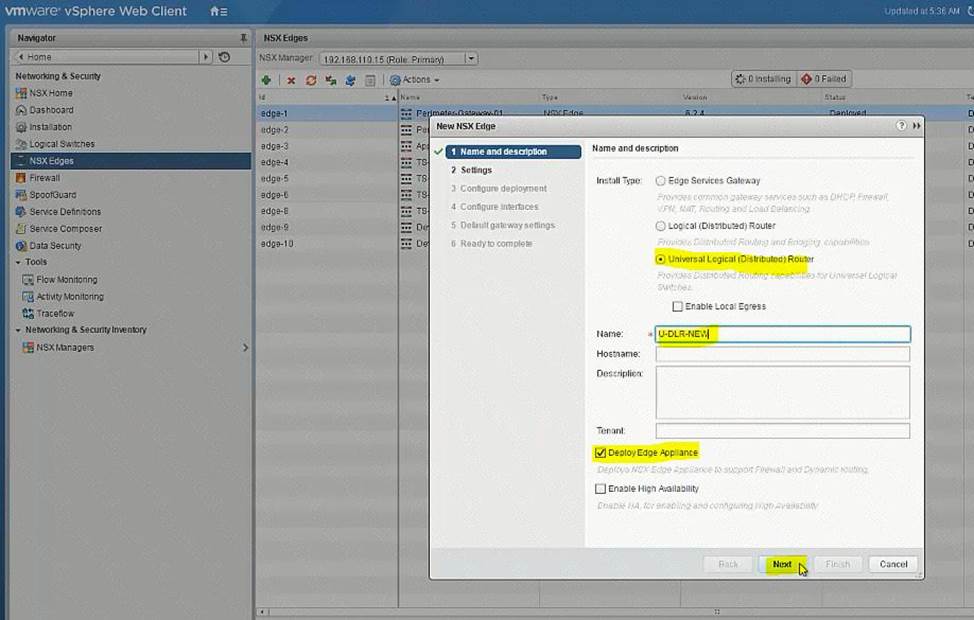
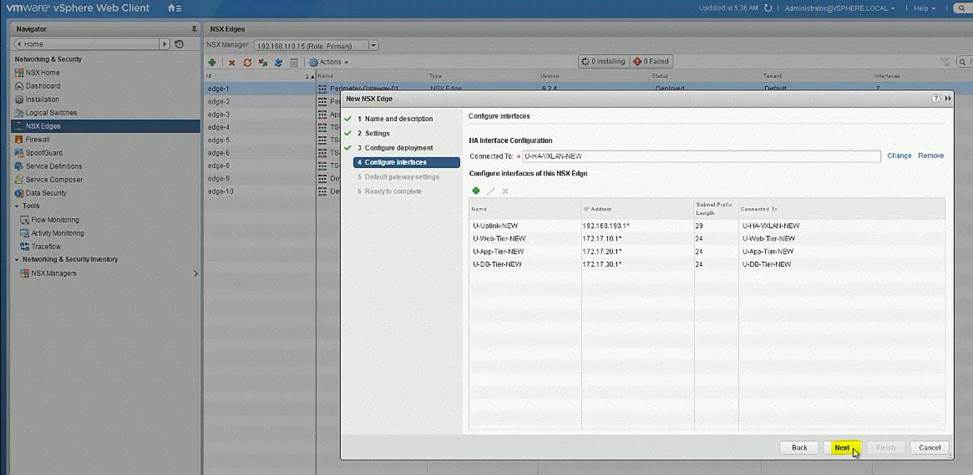
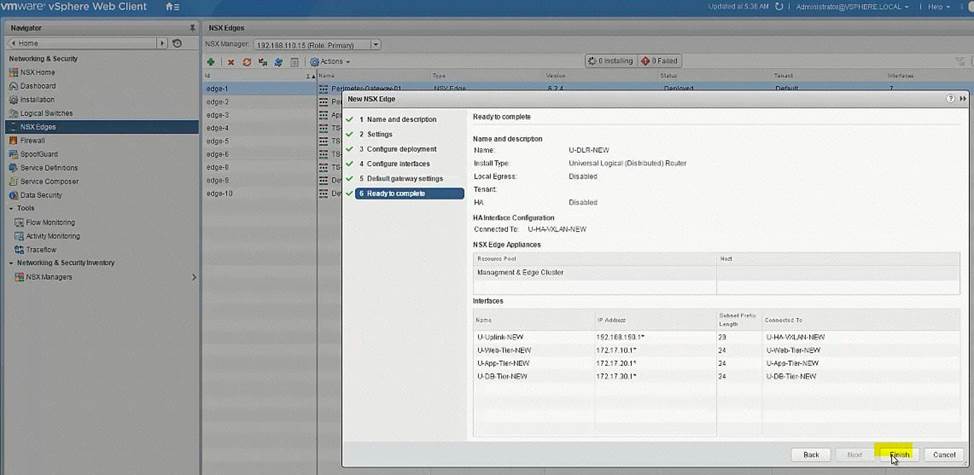
New DLR U-DLR-NEW
HA Interface - U-HA-VXLAN-NEW
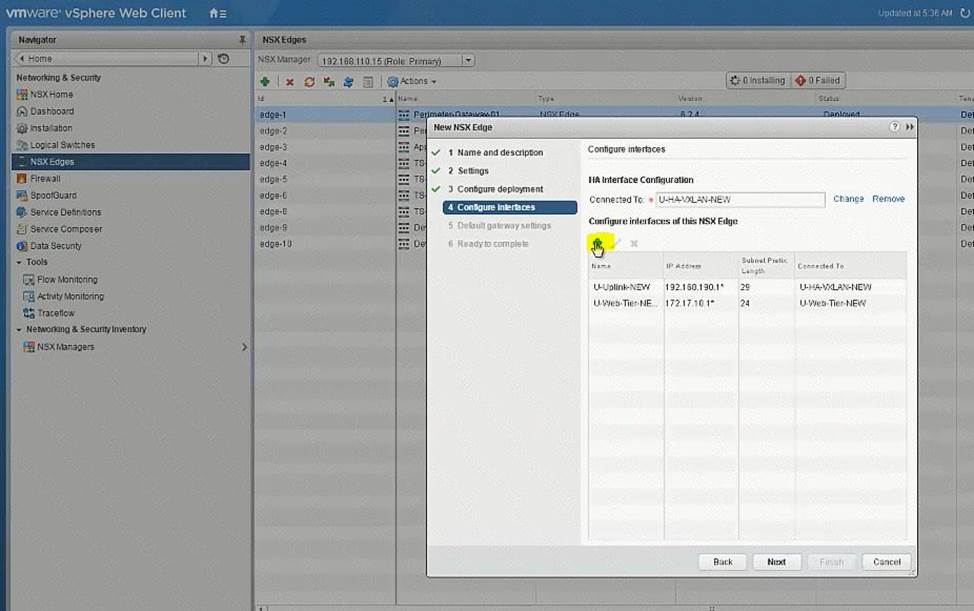
Interface below
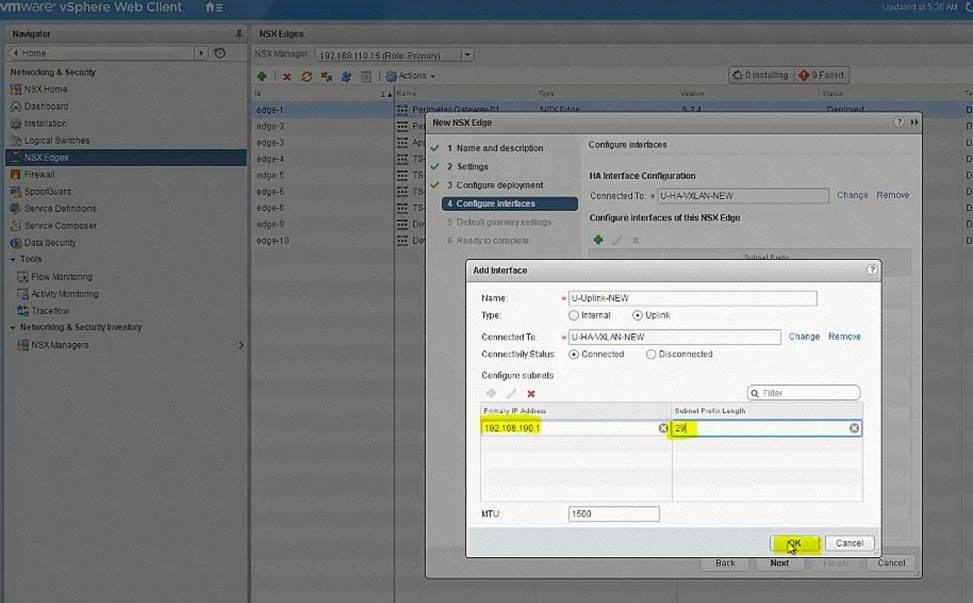
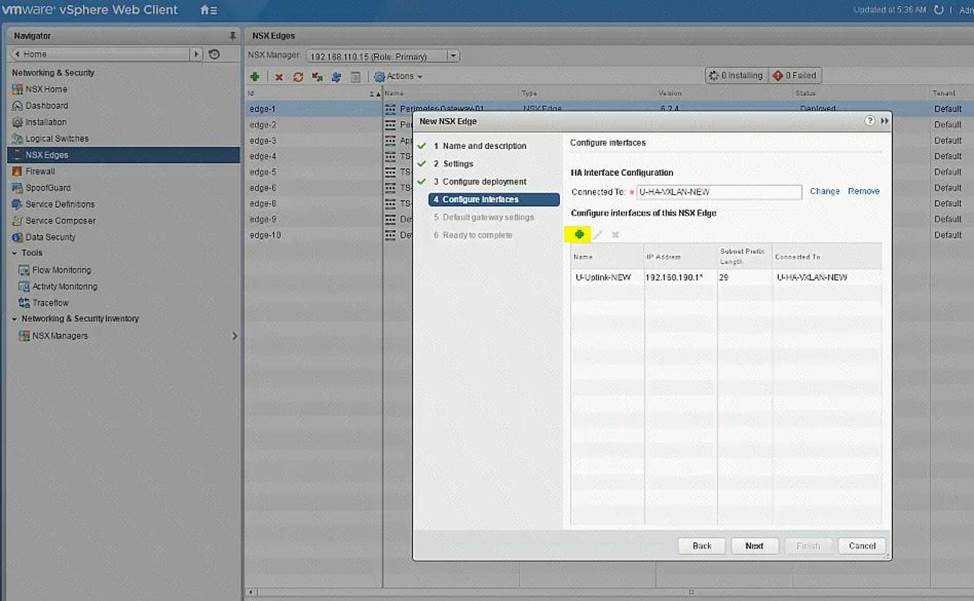
- U-Transit-NEW uplink 192.168.190.1
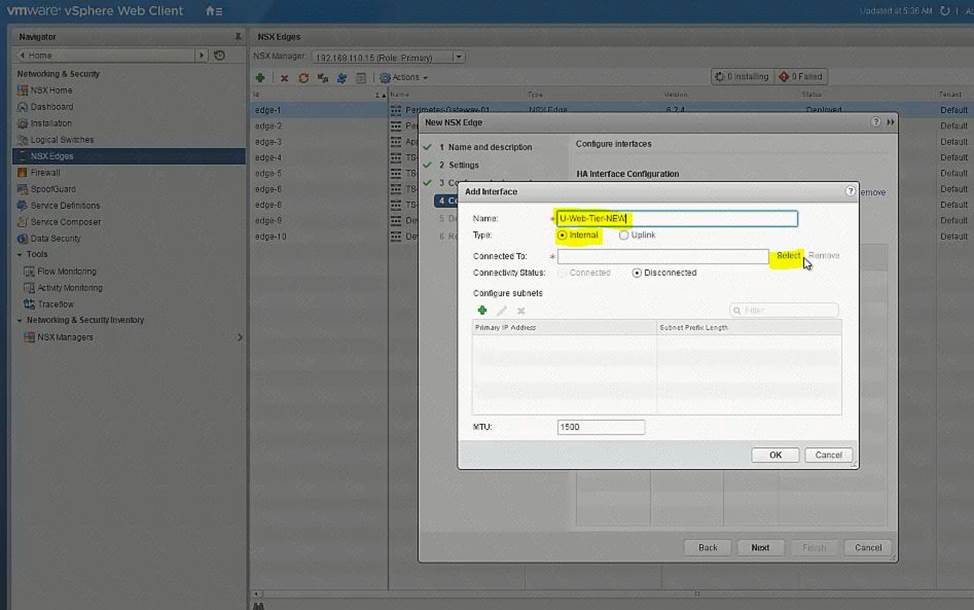
- U-Web-Tier-NEW internal 172.17.10.1
- U-App-Tier-NEW internal 172.17.20.1
- U-Db-Tier-NEW internal 172.17.30.1
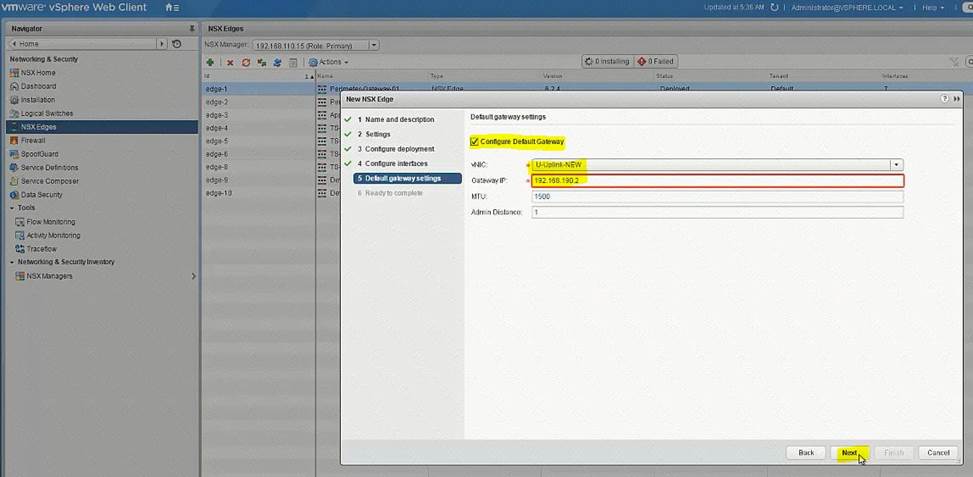
Gateway
-U-Transit-NEW
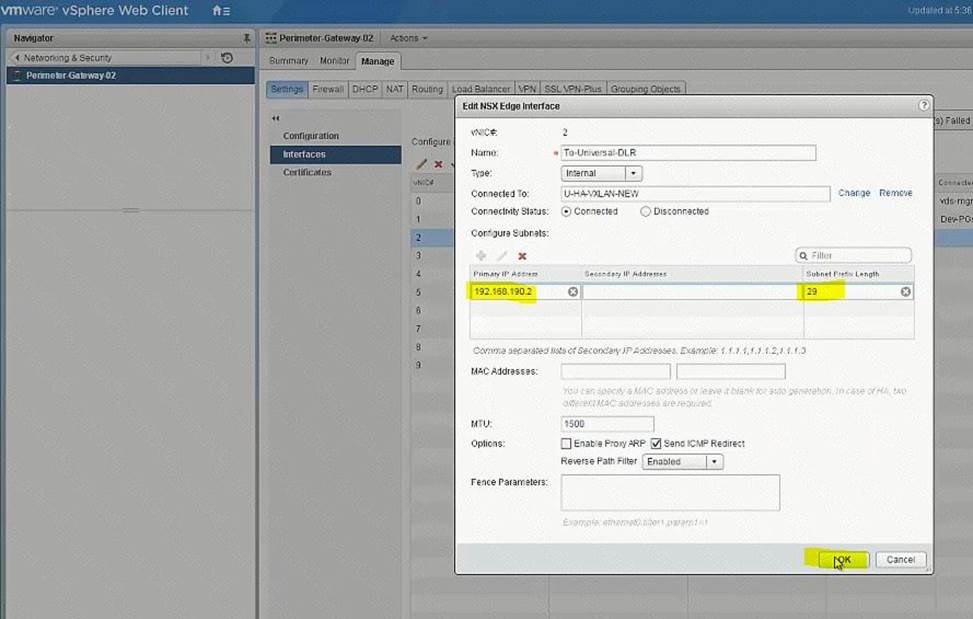
Ip 192.168.190.2
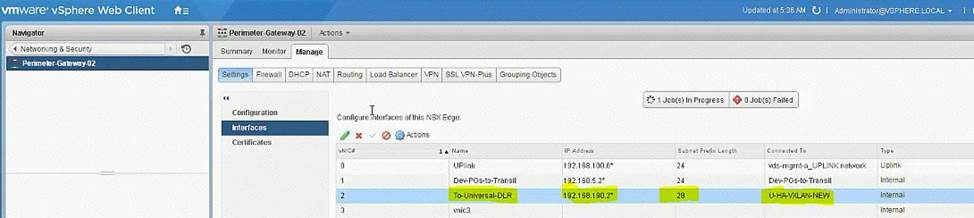
PGW02 vnic4 U-Transit-NEW 192.168.190.2
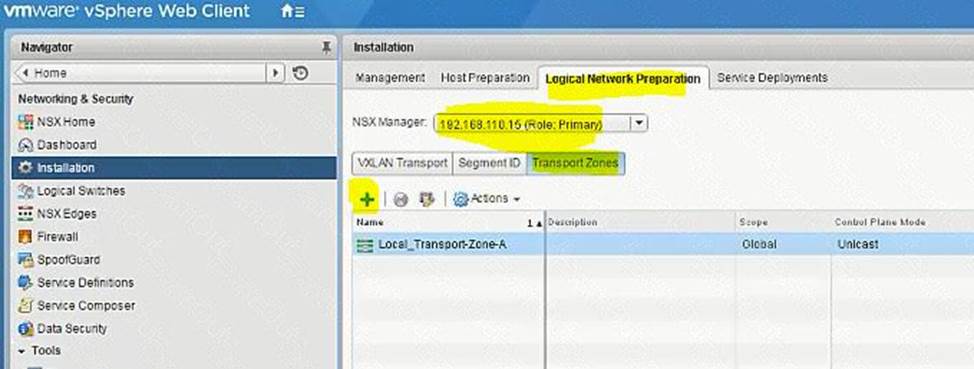
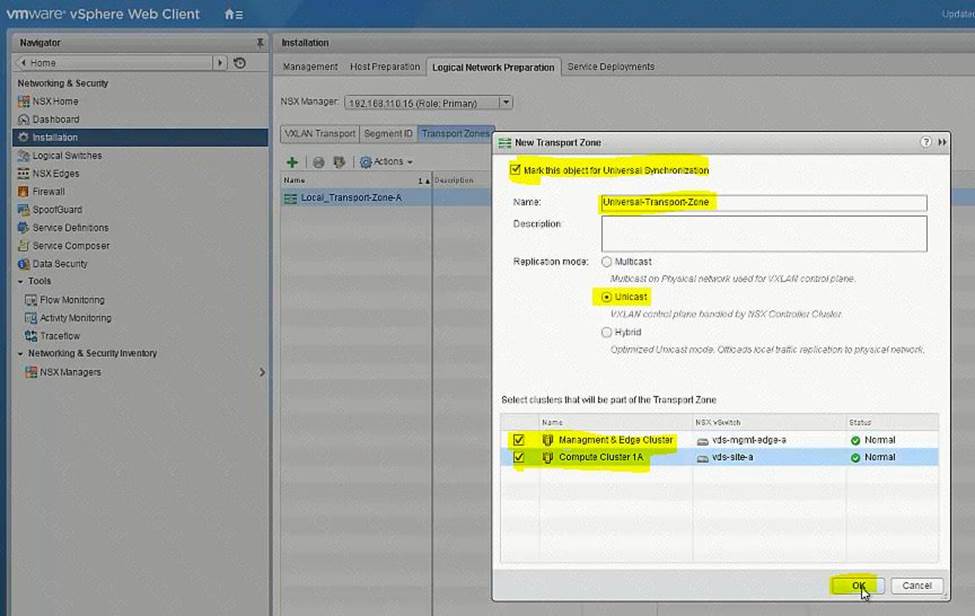
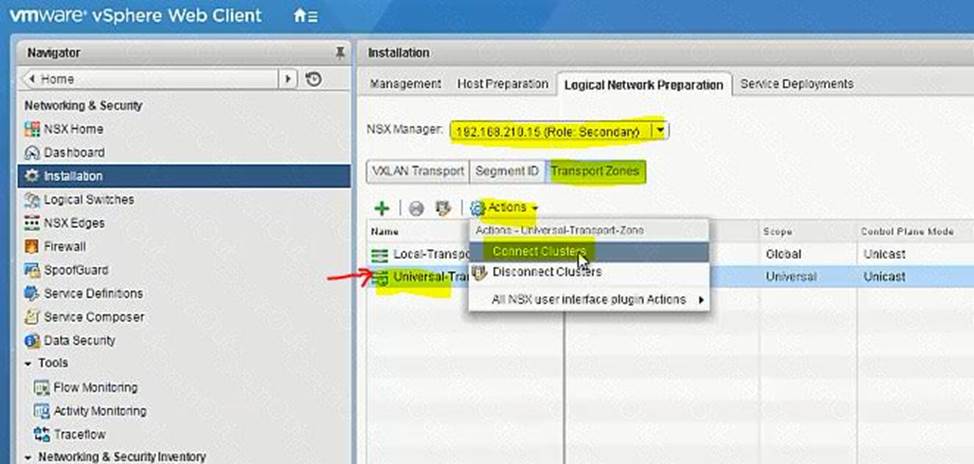
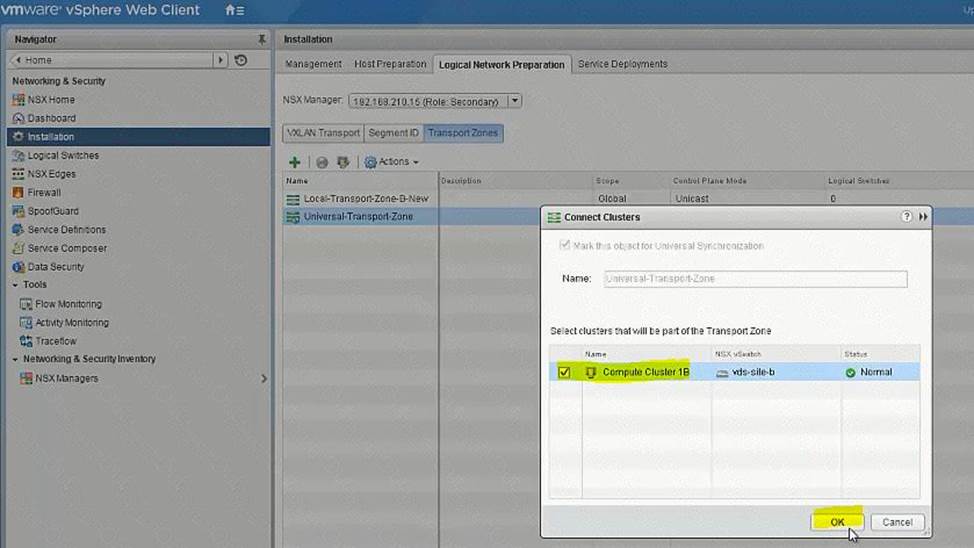
Create 5 logical switches
U-Transit-NEW
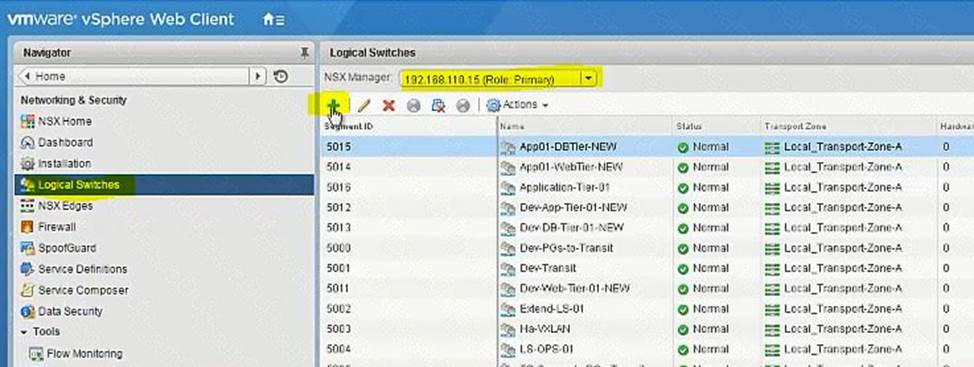
U-Web-Tier-NEW
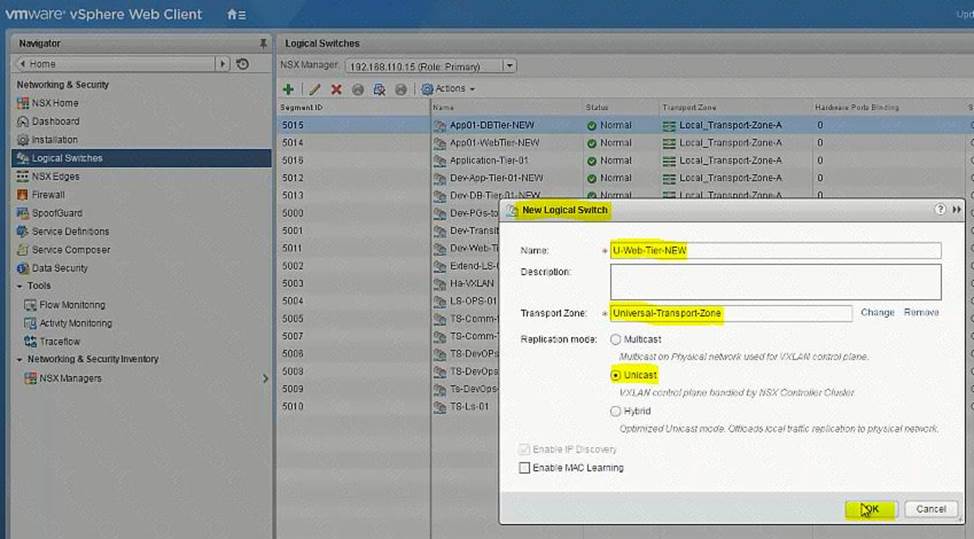
U-App-Tier-NEW
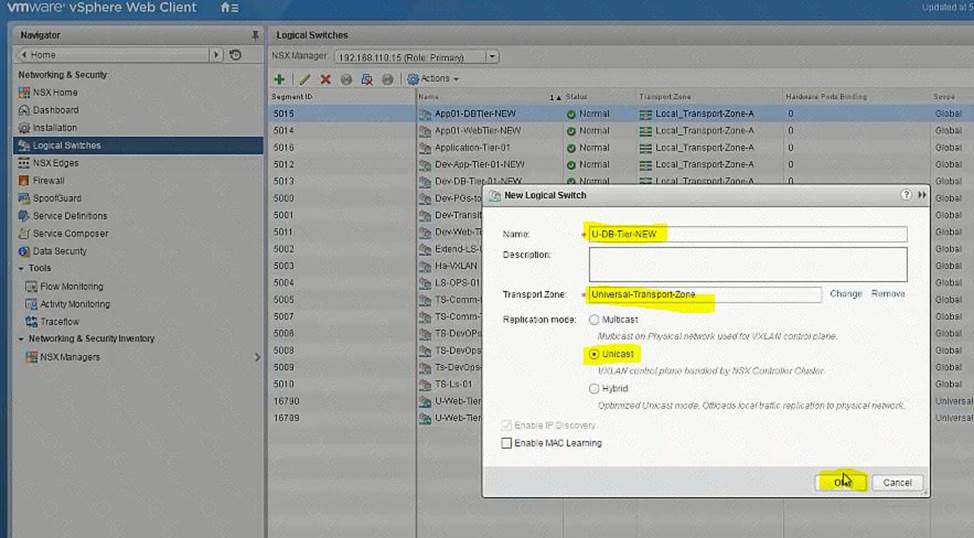
U-DB-Tier-NEW
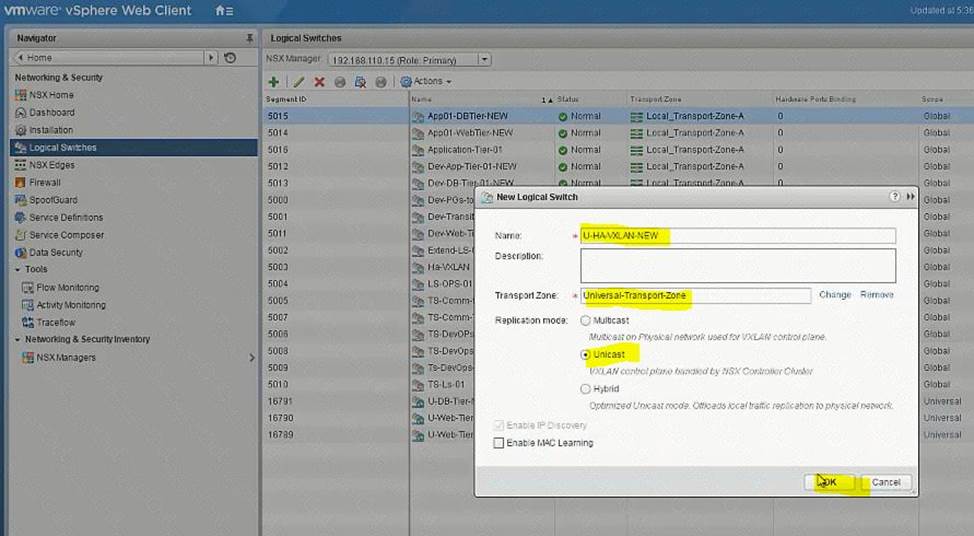
Add VMs to relevant newly created Logical Switches.
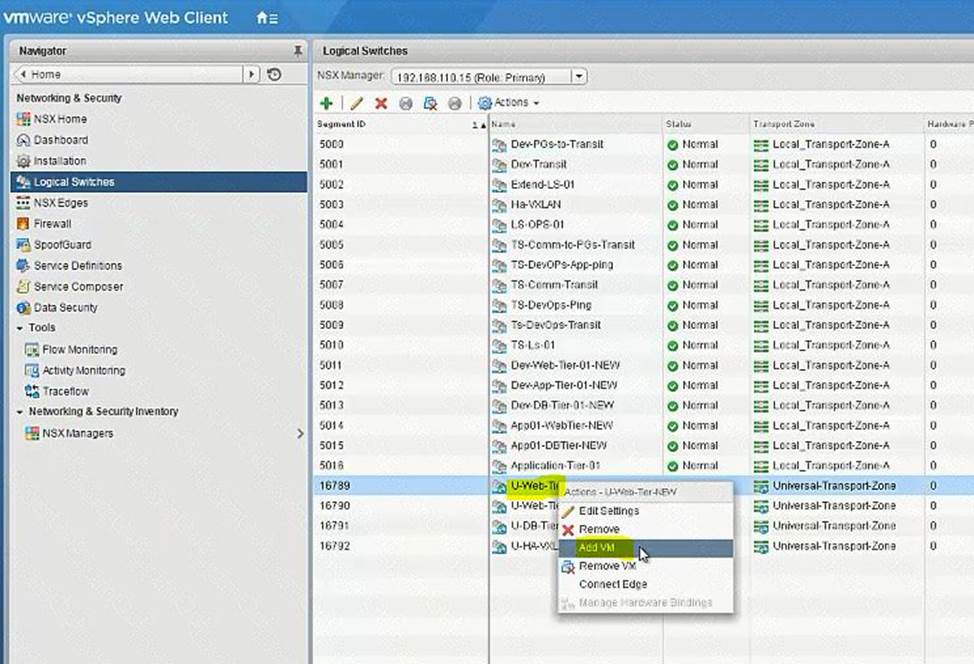
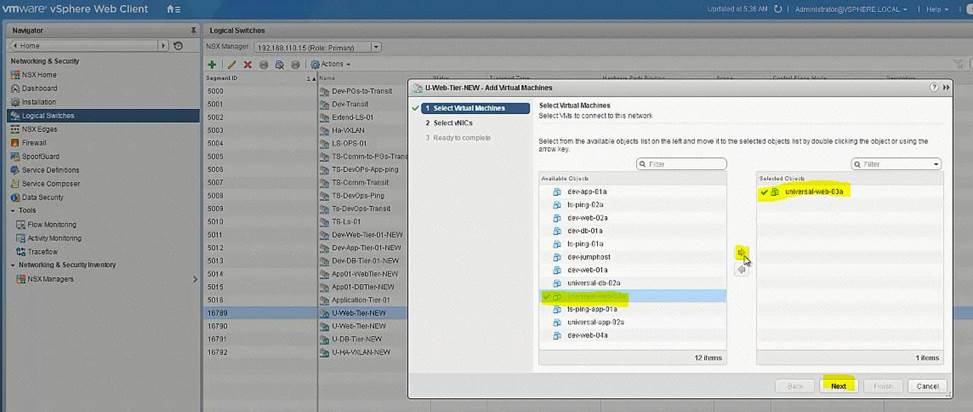
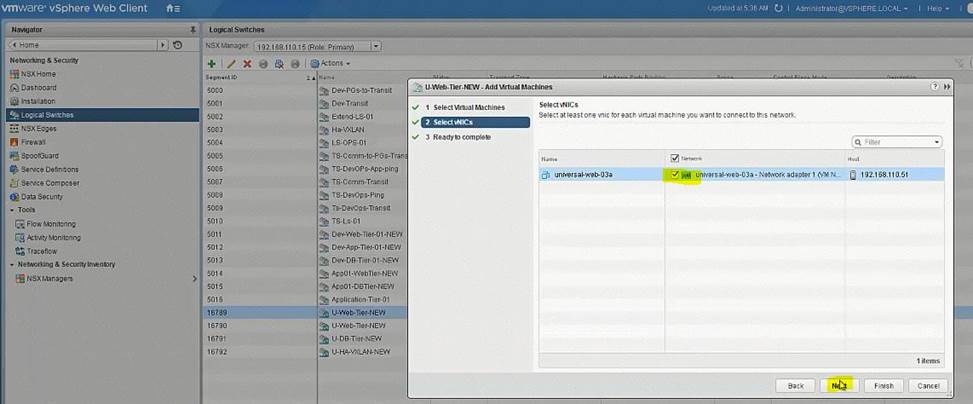
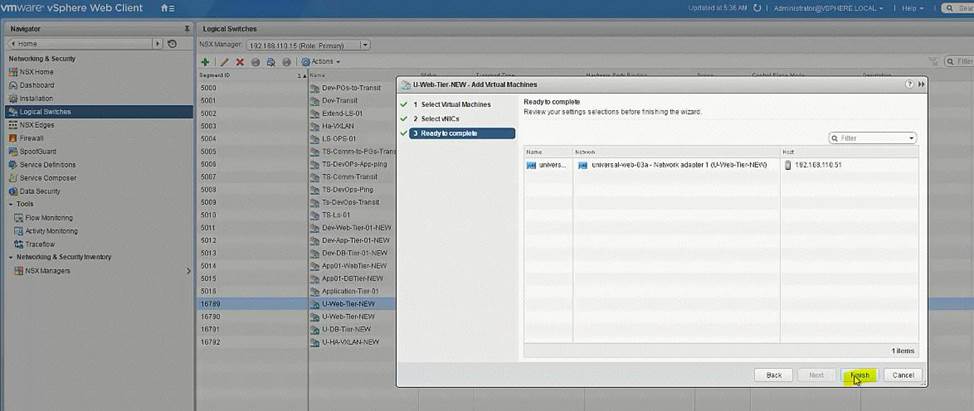
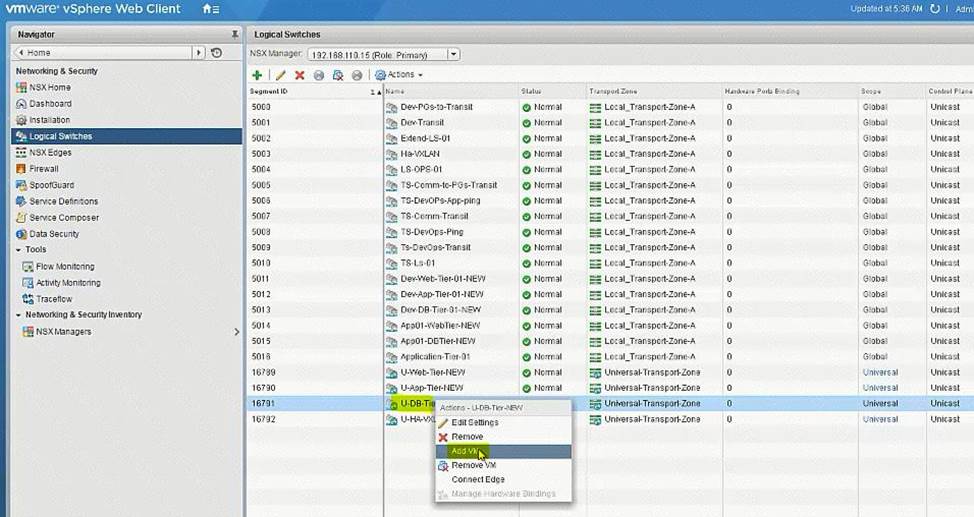
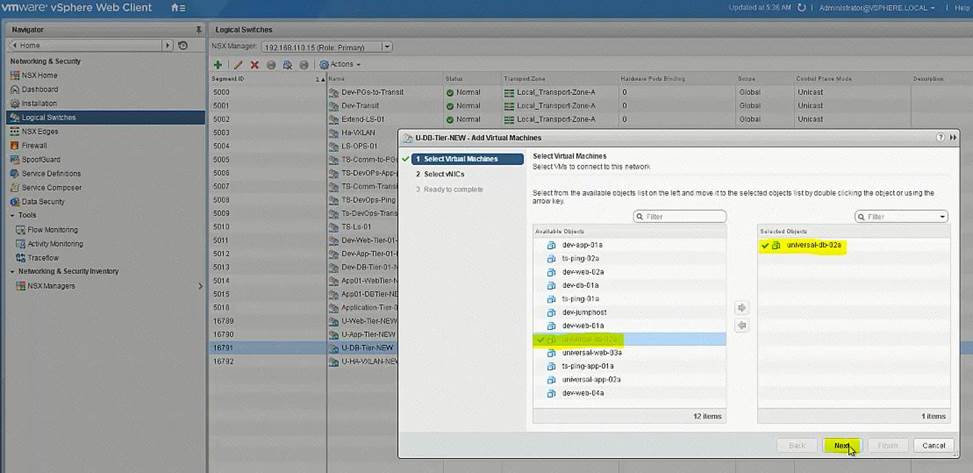
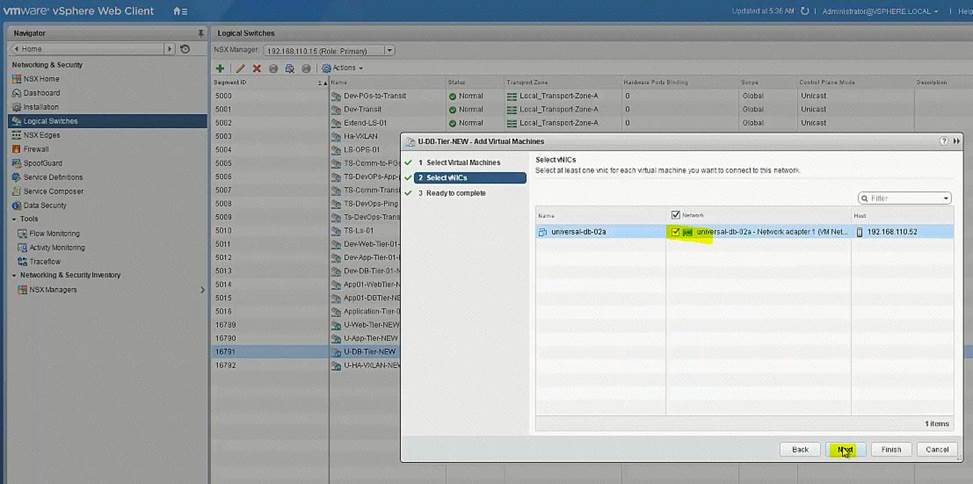
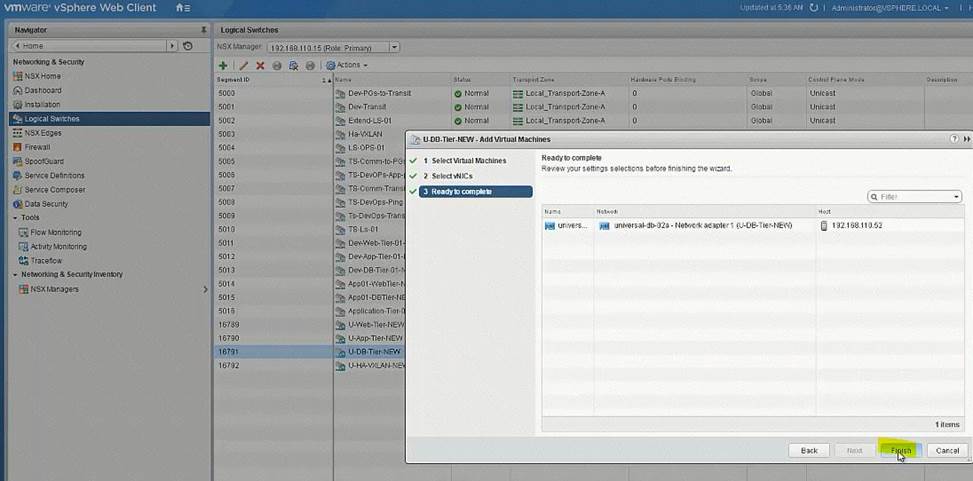
No need
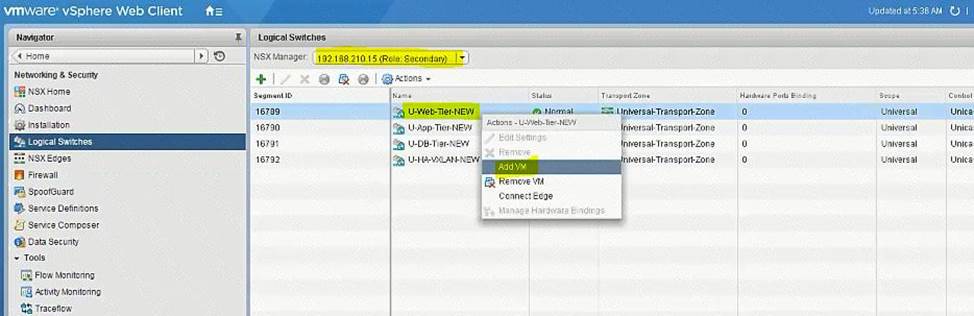
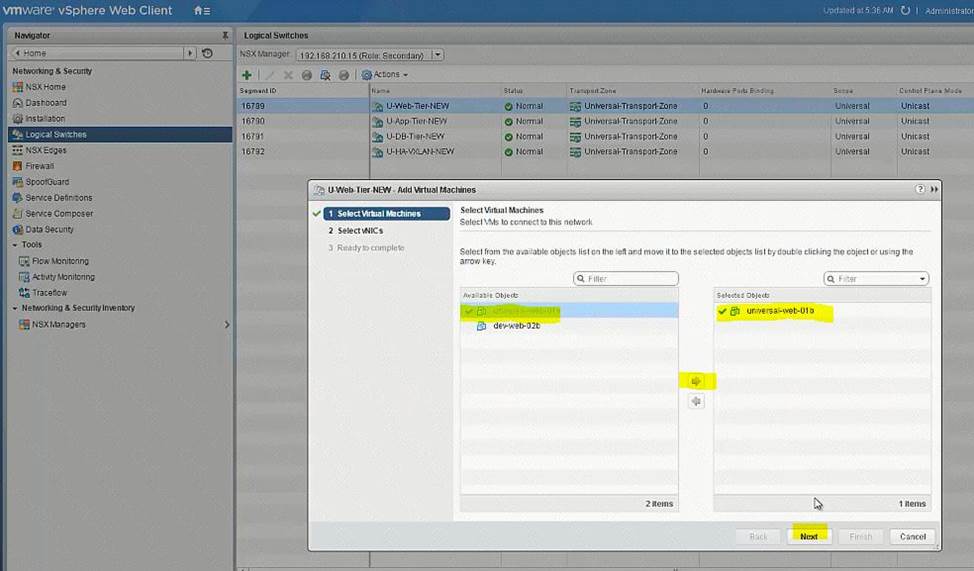
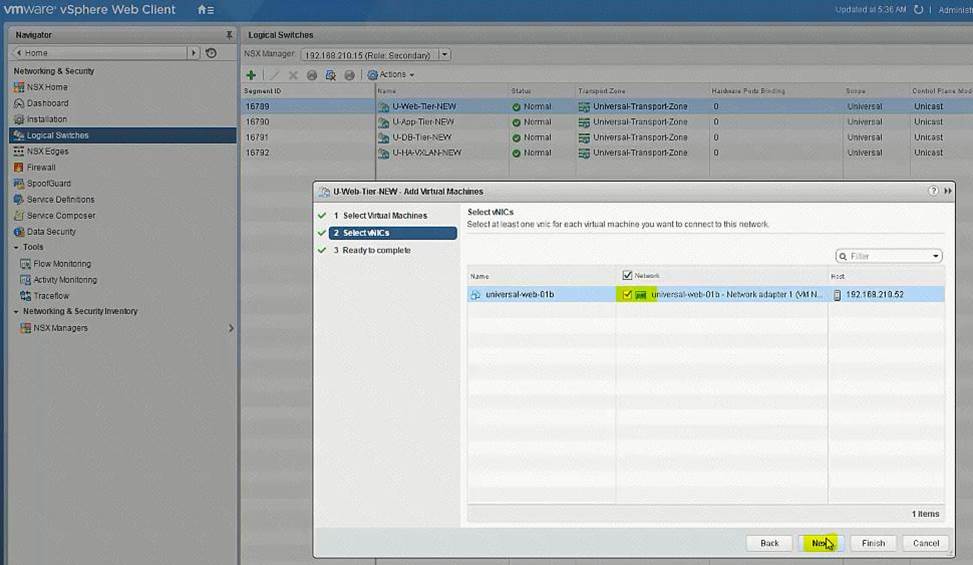
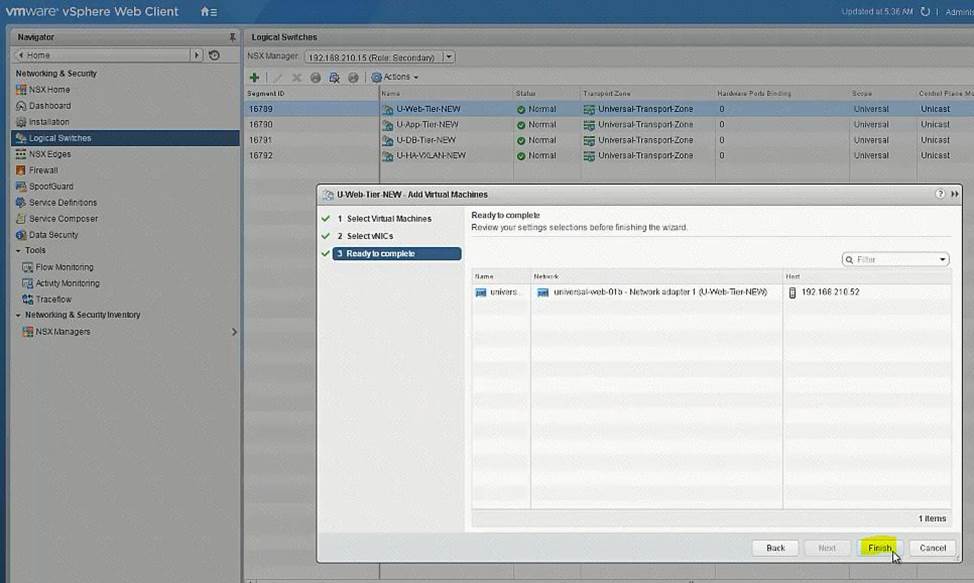
Create new Universal Logical (Distributed) Router:
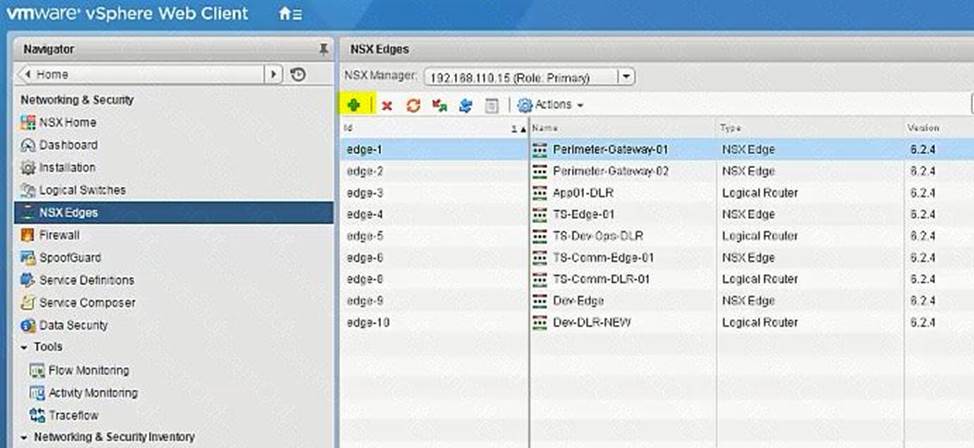
U-DLR-NEW
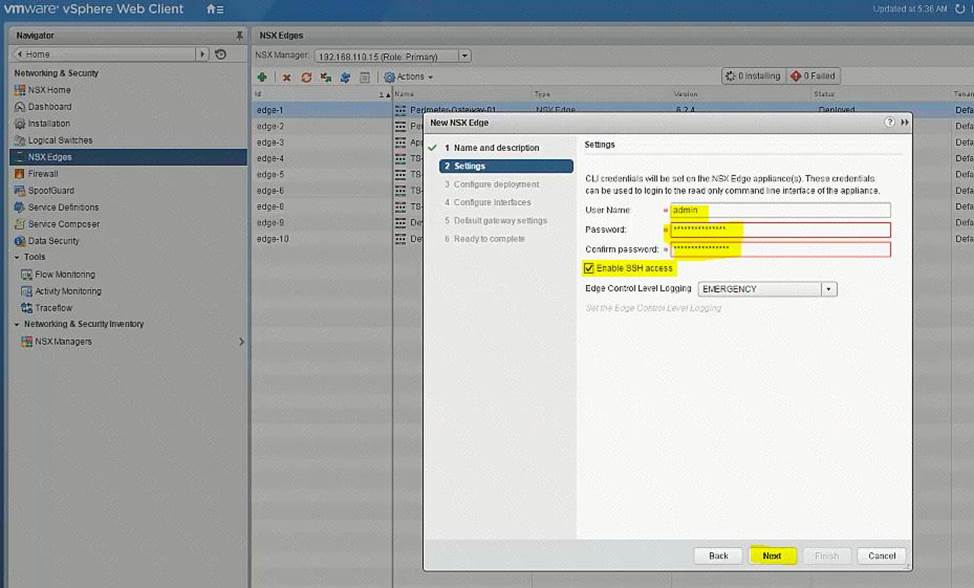
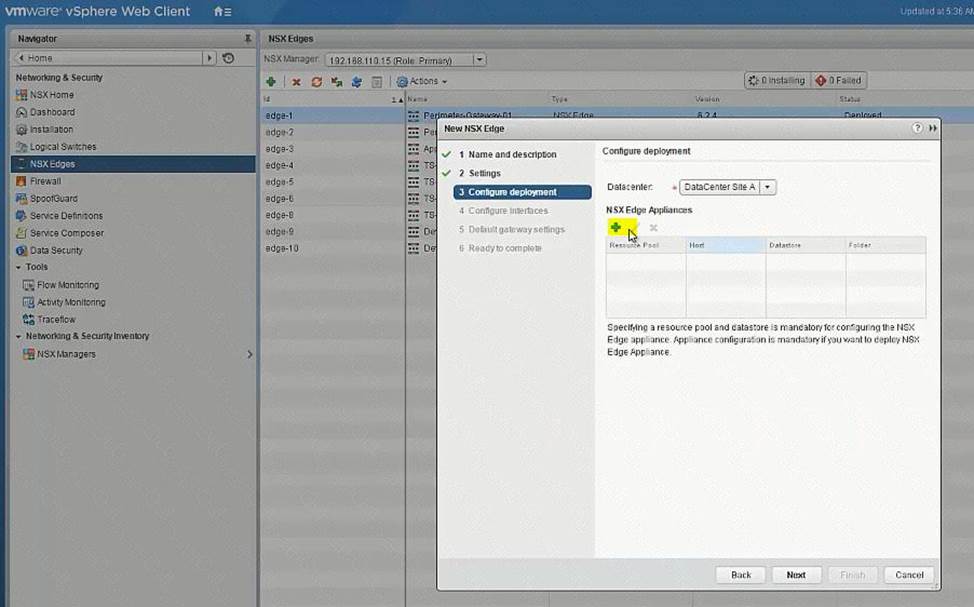
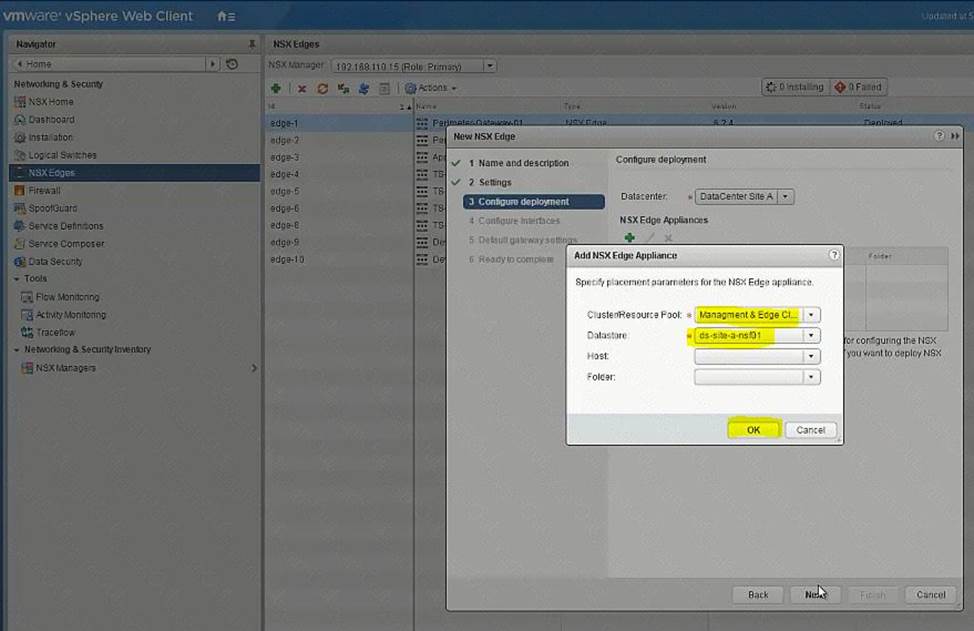
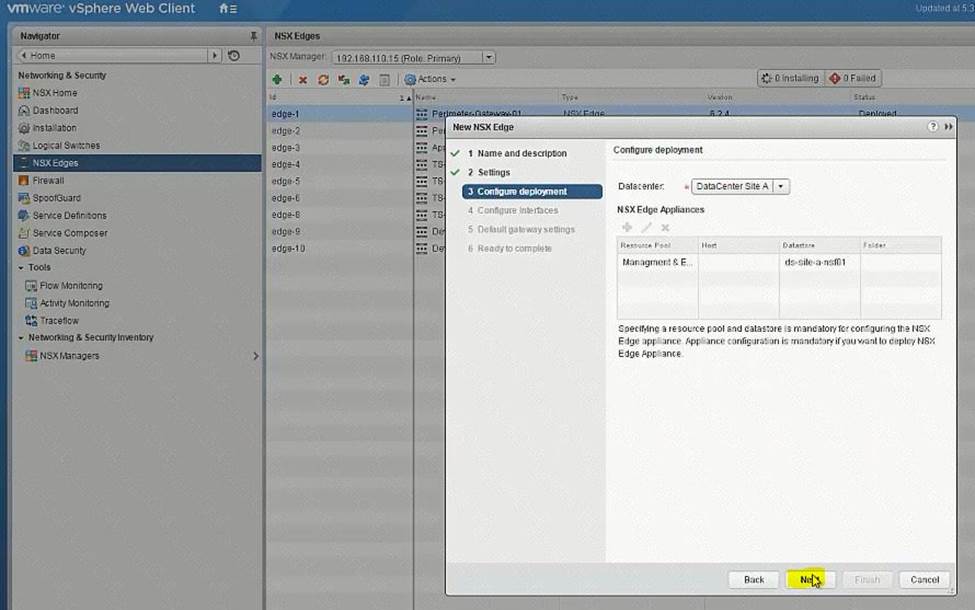
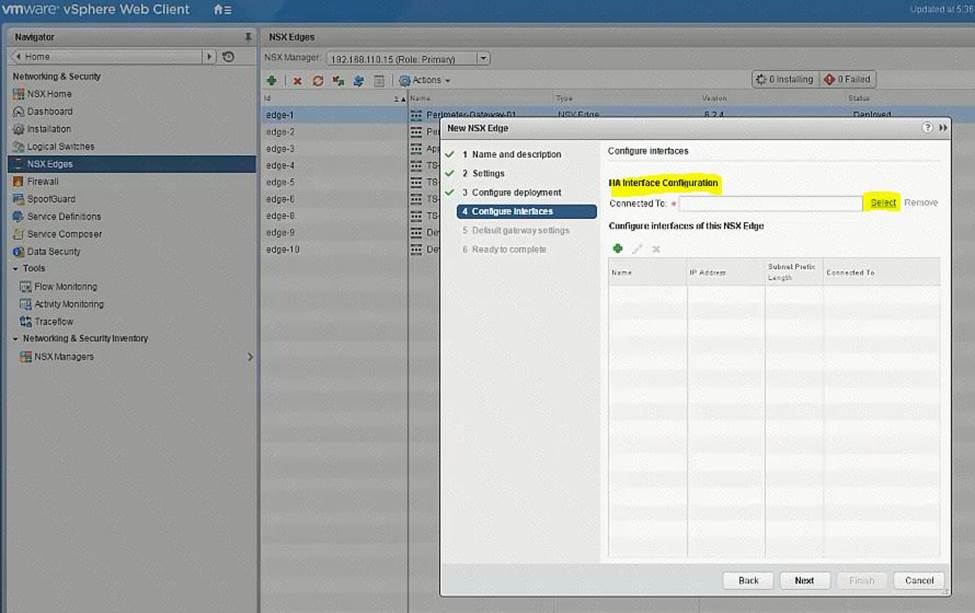
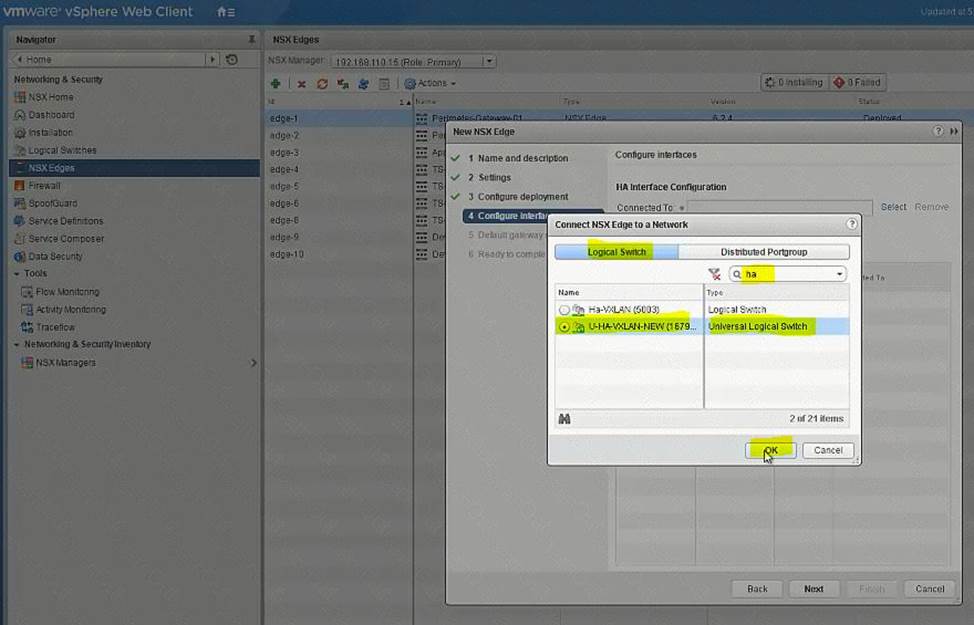
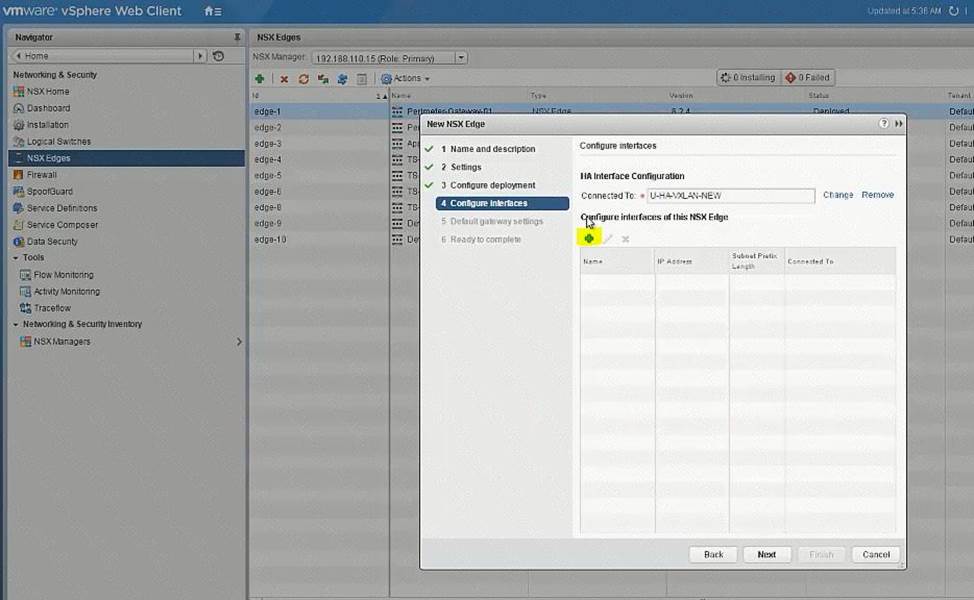
U-Uplink-NEW(U-Transit-NEW)
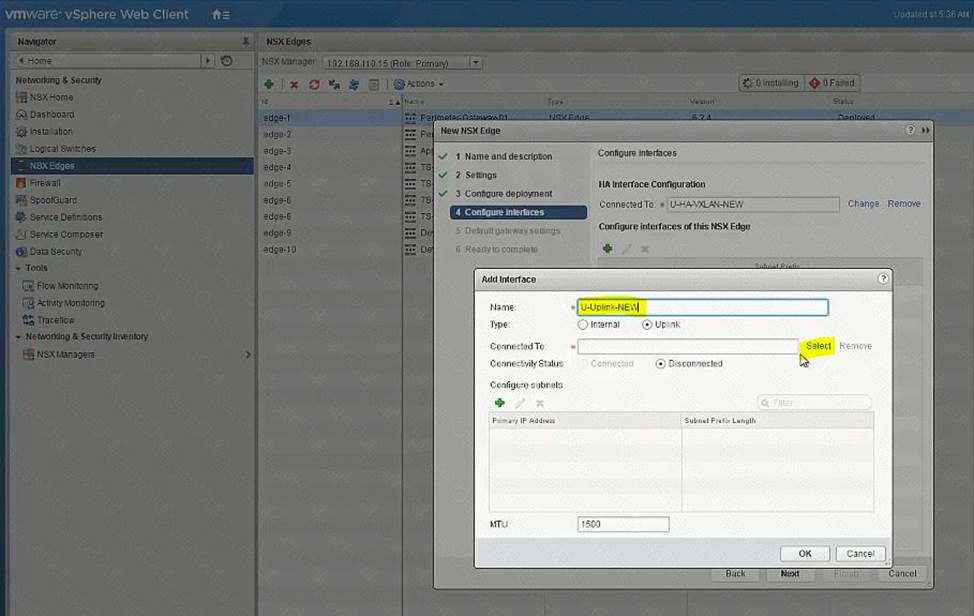
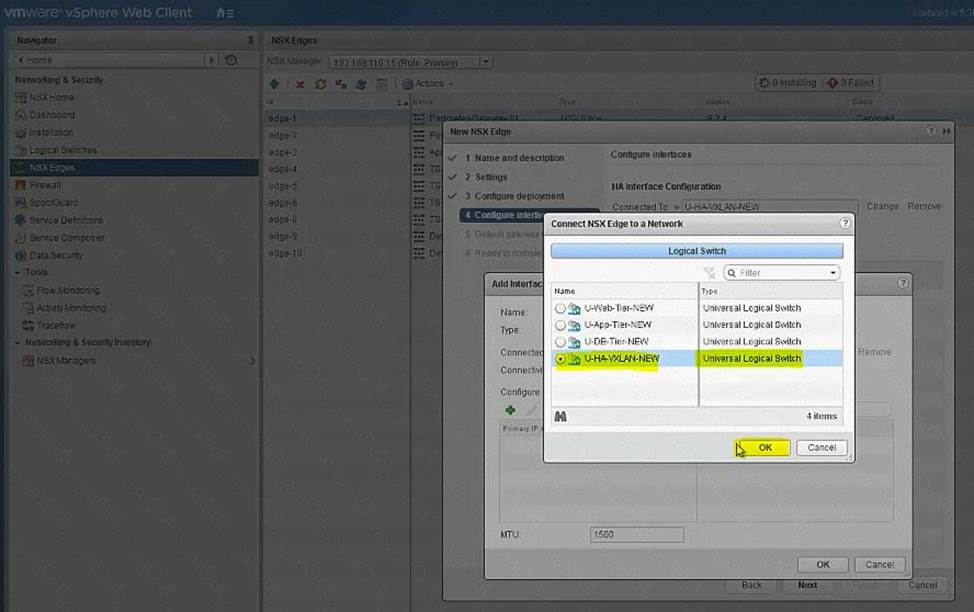
Select U-Transit-NEW logical swicth here
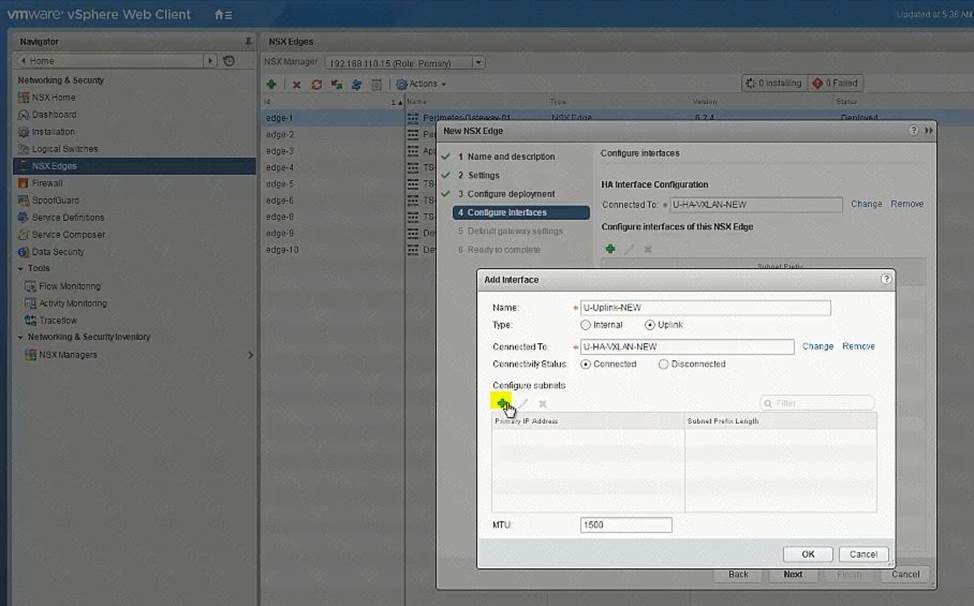
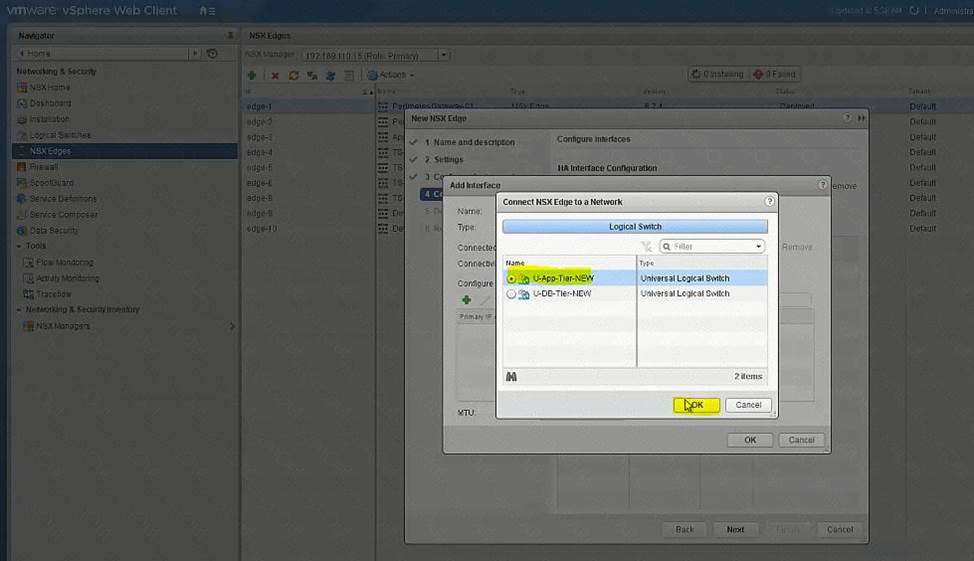
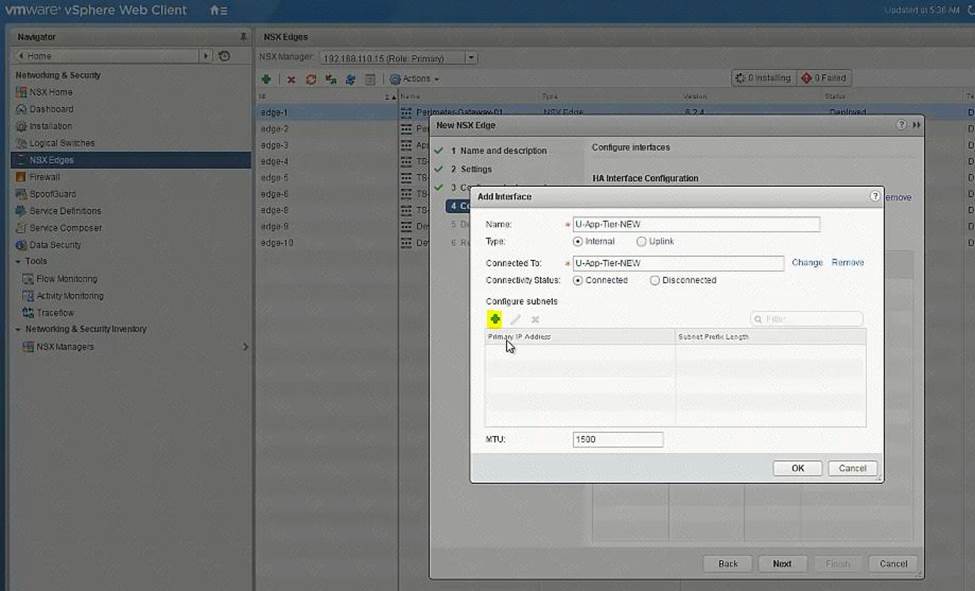
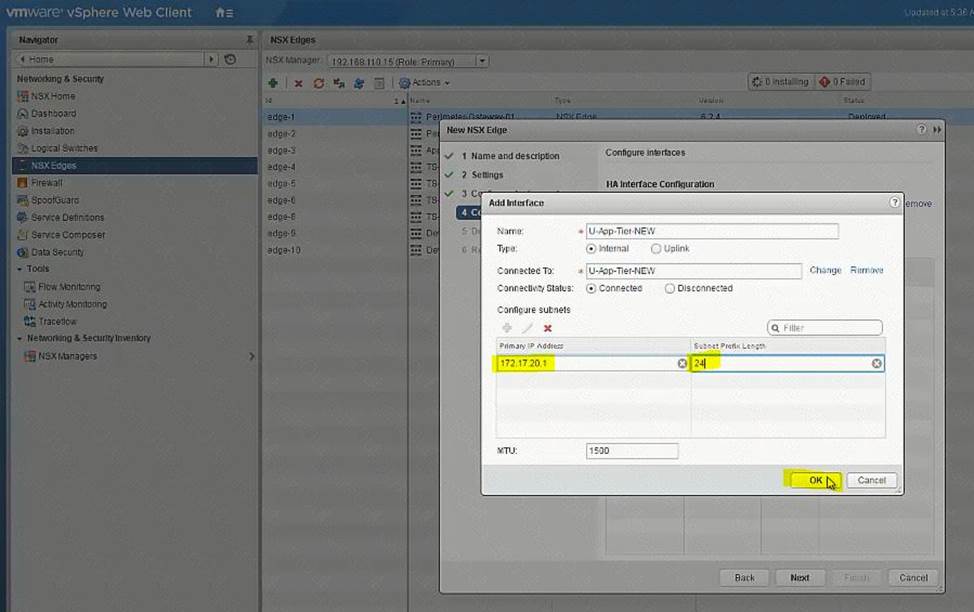
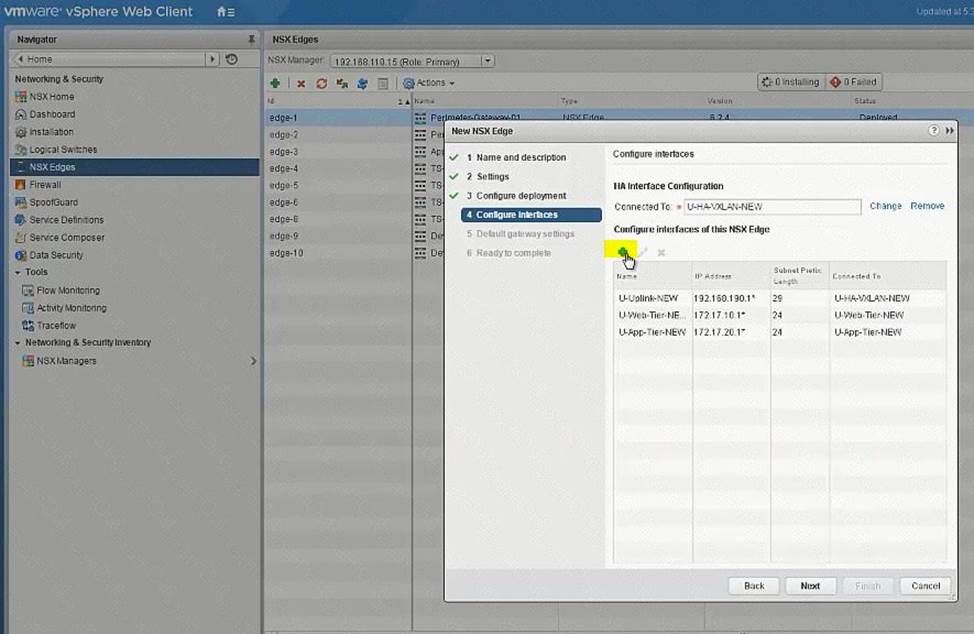
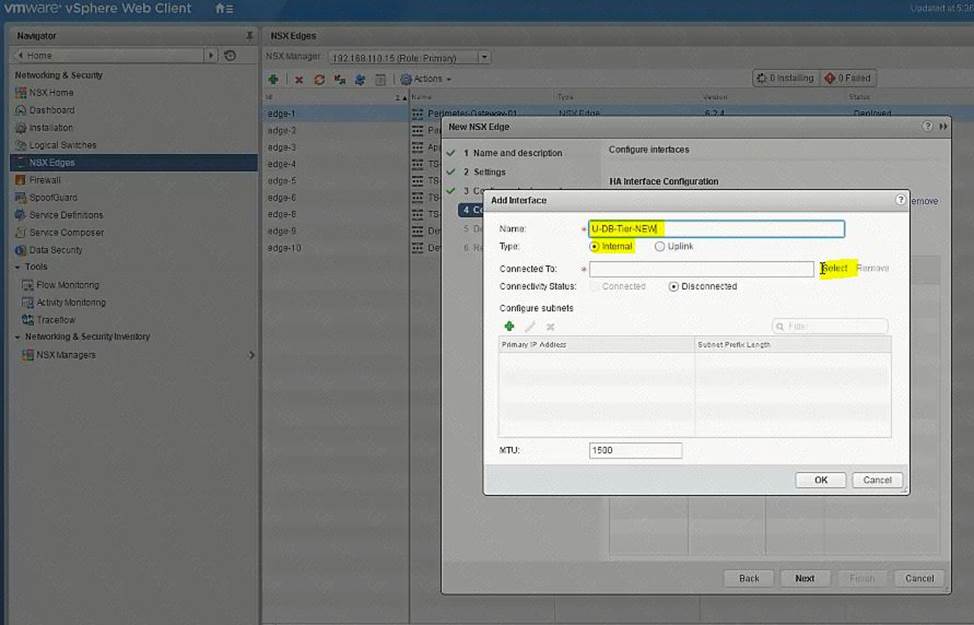
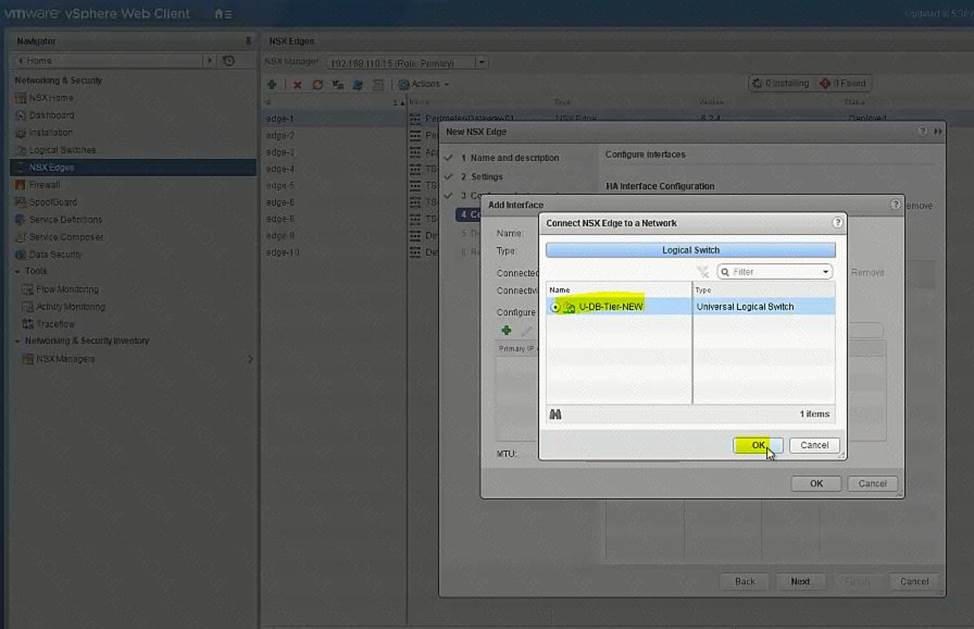
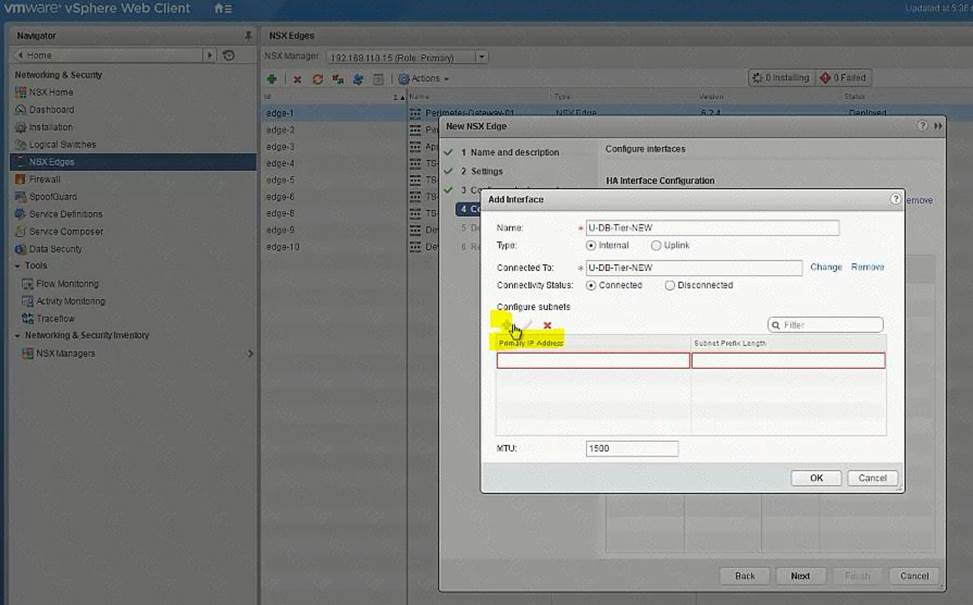
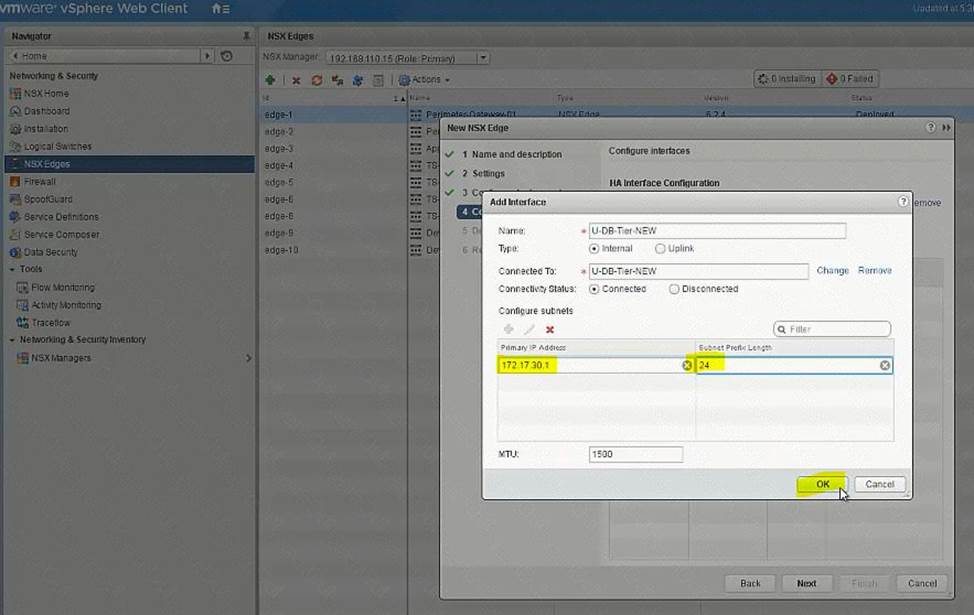
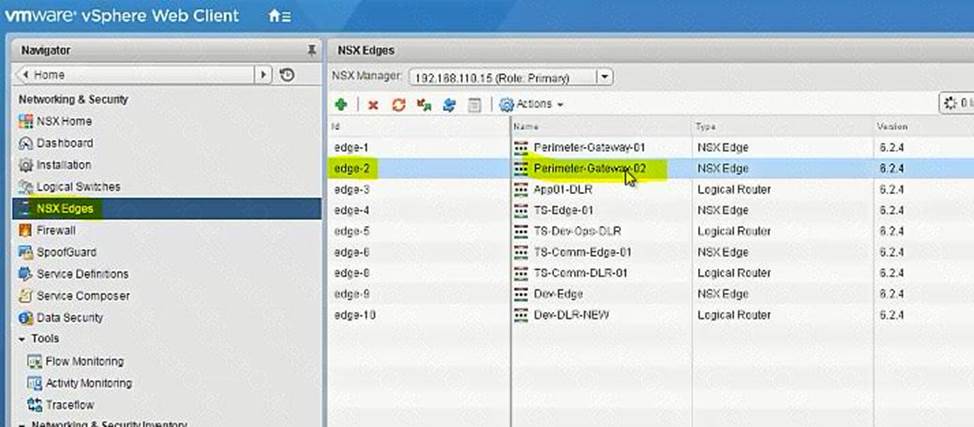
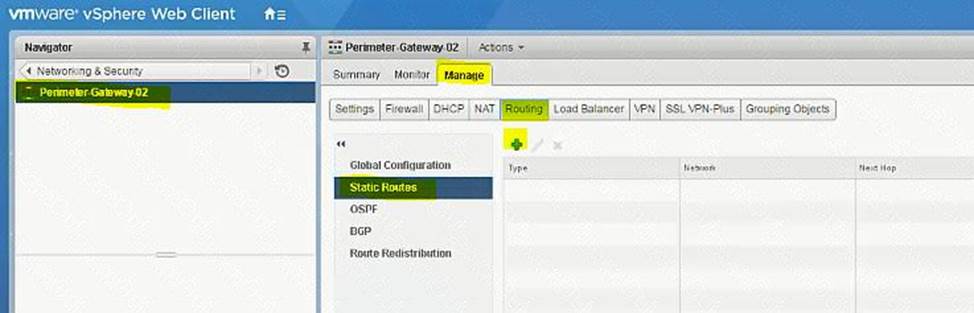
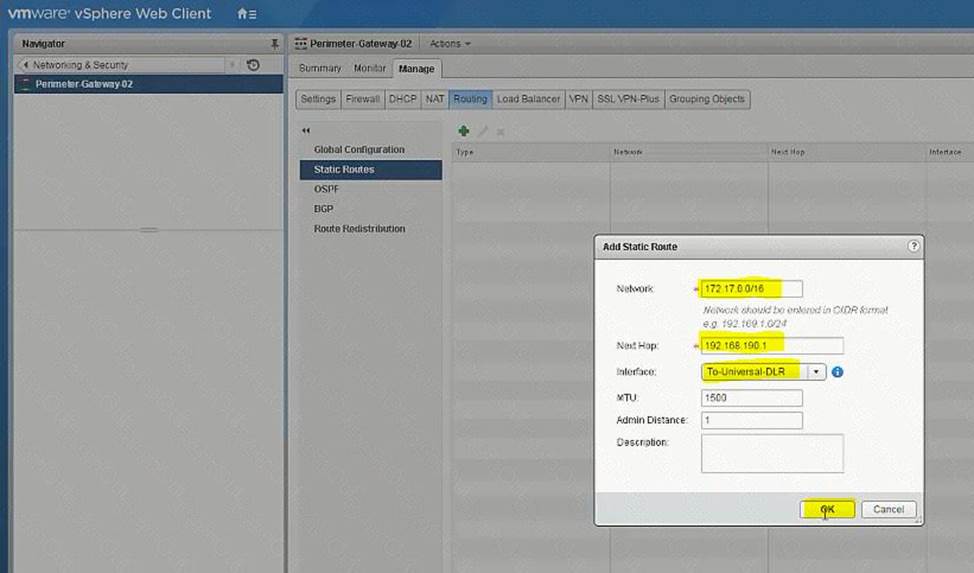
Perimeter-Gateway-02
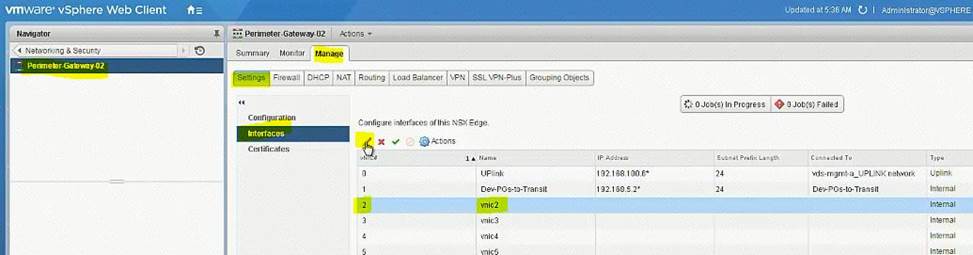
To-Universal-DLR
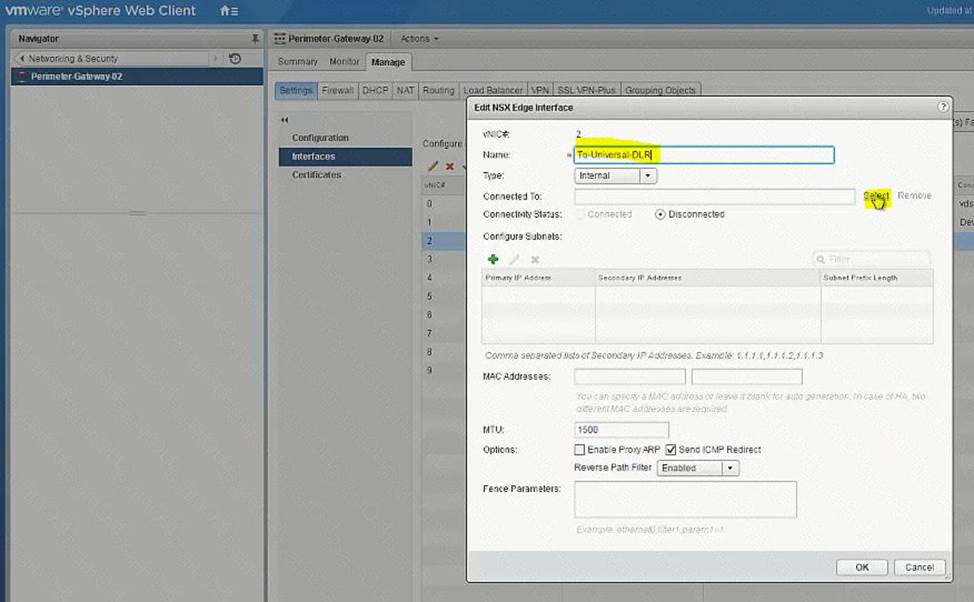
Select U-Transit-NEW

Question No : 2
(Exam Topic 1)
Routing through TS-Edge-01 is not working. The service provider (SP) has confirmed their configuration is correct.
Requirements:
vCenter: vcsa01a.corp.local
Credential: [email protected] / VMware1!
Edge: TS-Edge-01
Credential: admin / VMware1!VMware1!
Problem Edge: TS-Edge01
Local IP Address: 192.168.100.202
SP provided configuration:
Area ID: 10
Type: Normal
Authentication: None
Ensure the OSPF session is established.
Ensure all learned OSPF routes appear.
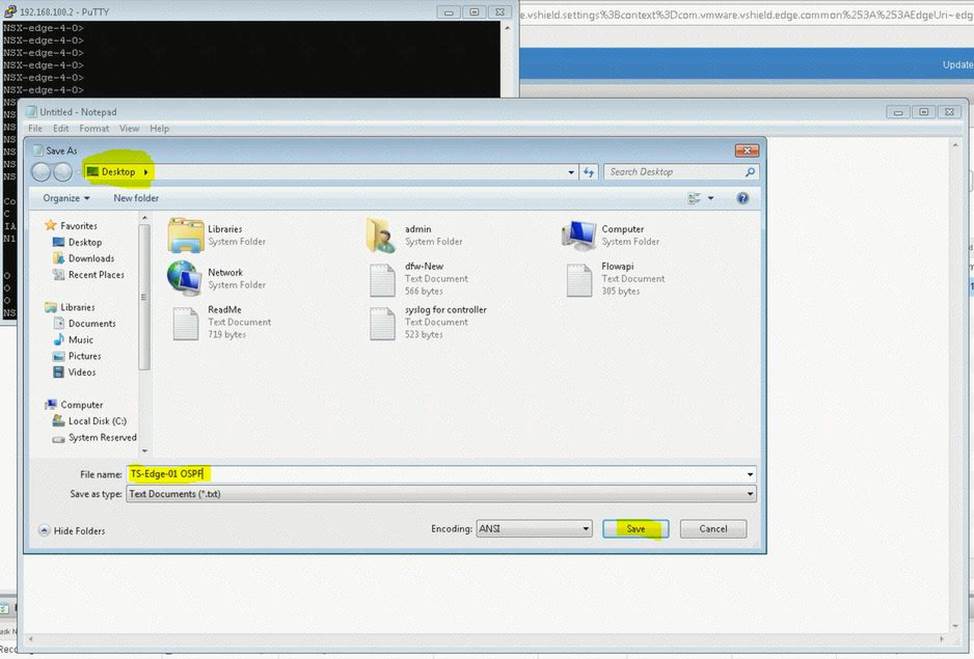
Copy OSPF routing table information and output to file on ControlCenter Desktop named
TS-Edge-01_OSPF.txt
NOTE:
Do not use static route or configure Default Gateway on any Edge.
HOL LAB for Practice:
See the explanation part for complete solution.
正解: SOLUTION:
(1) select Home. select Network & Security. select NsX Edge. select Nsx Manager-a.
select TS-EDGE-01. select manage tab and select settings.
select interface. check ip address and mask of the vnic.
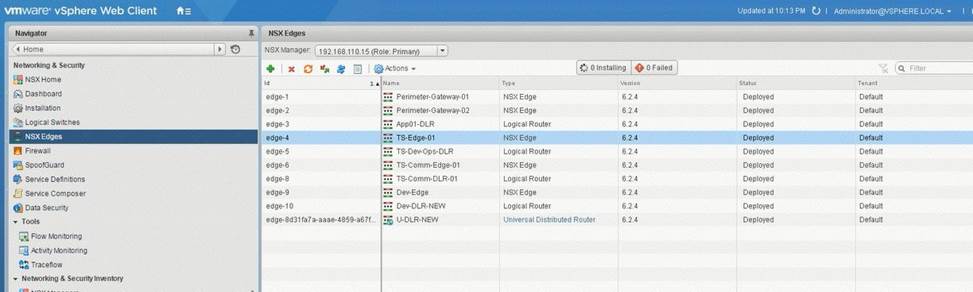
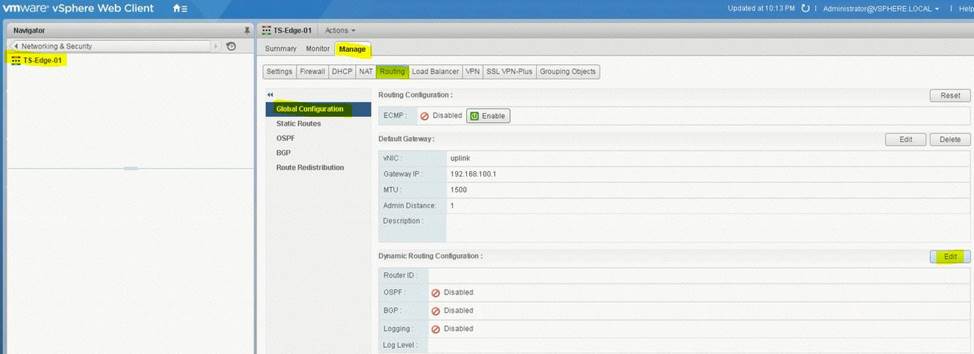
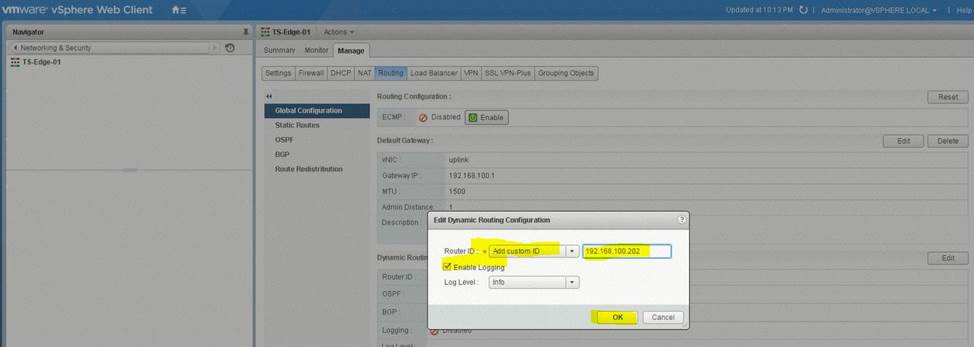
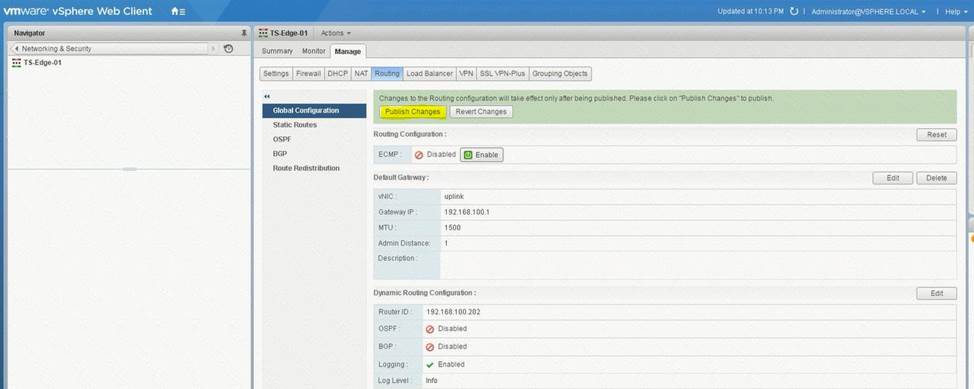
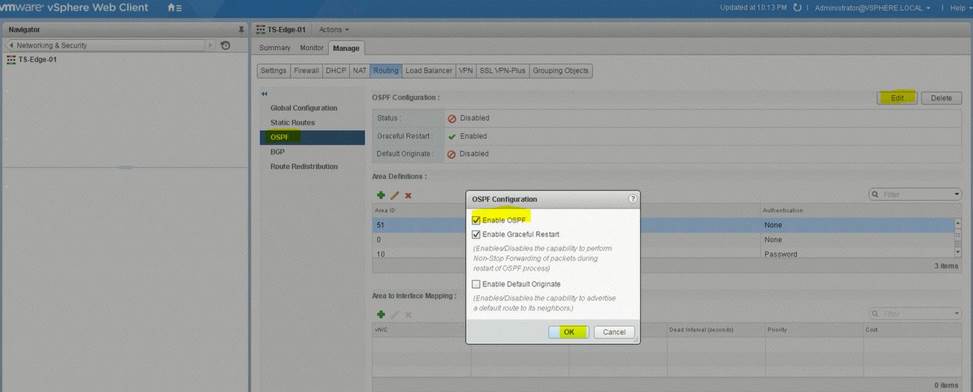
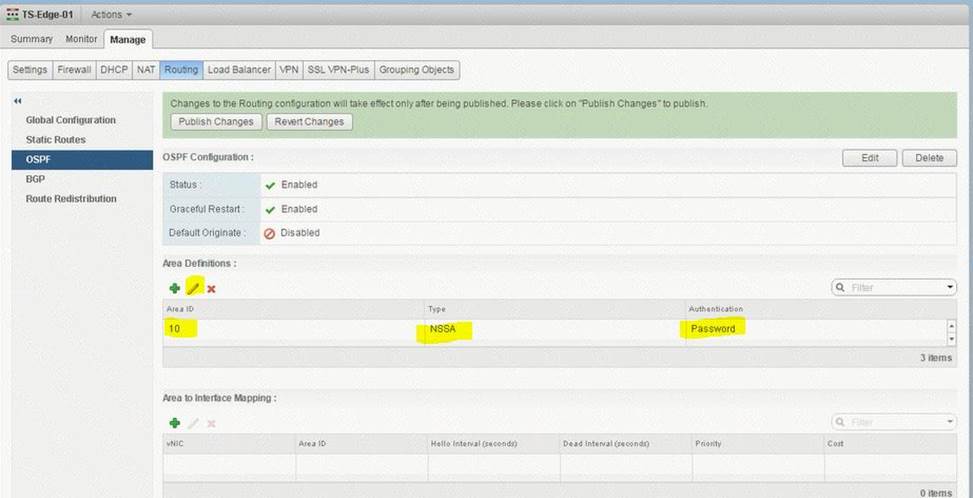
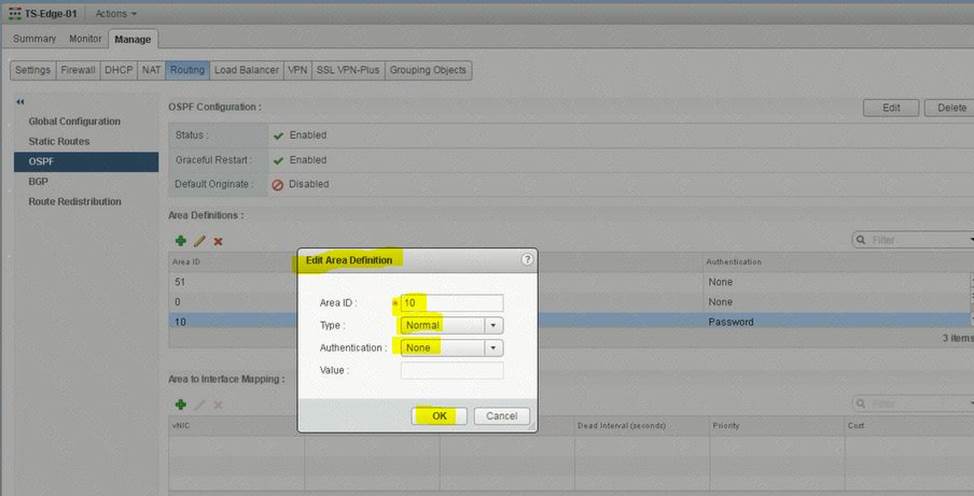
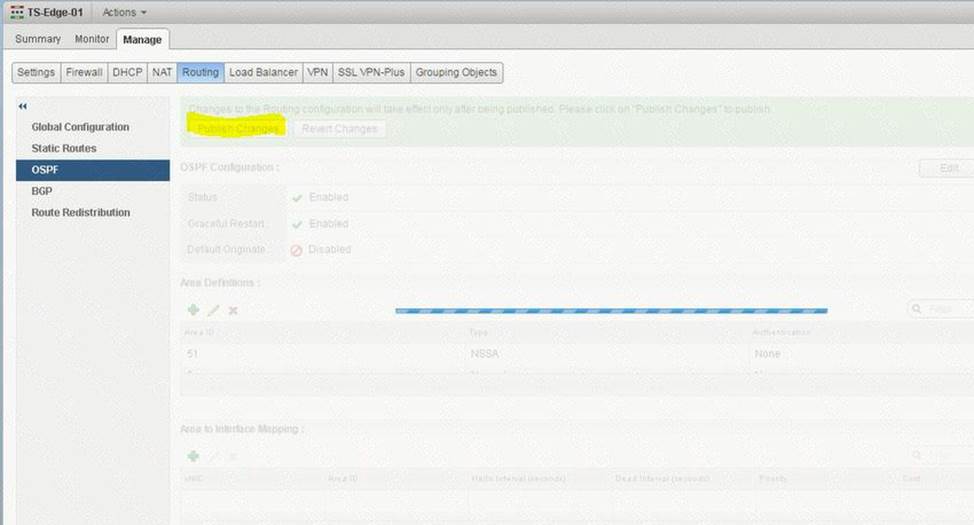
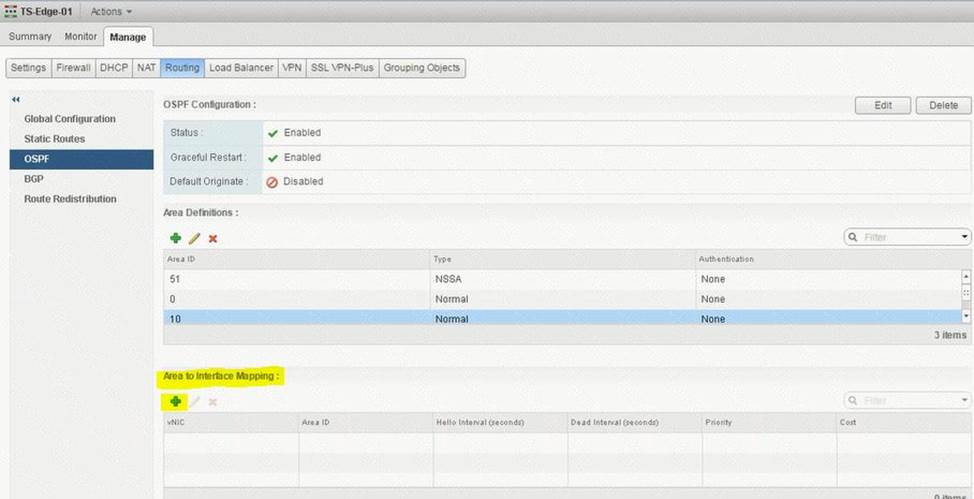
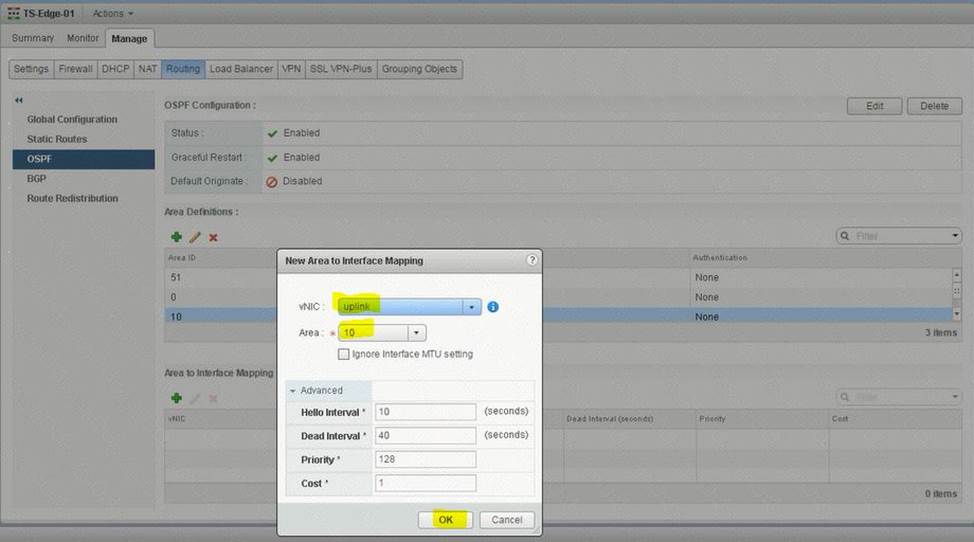
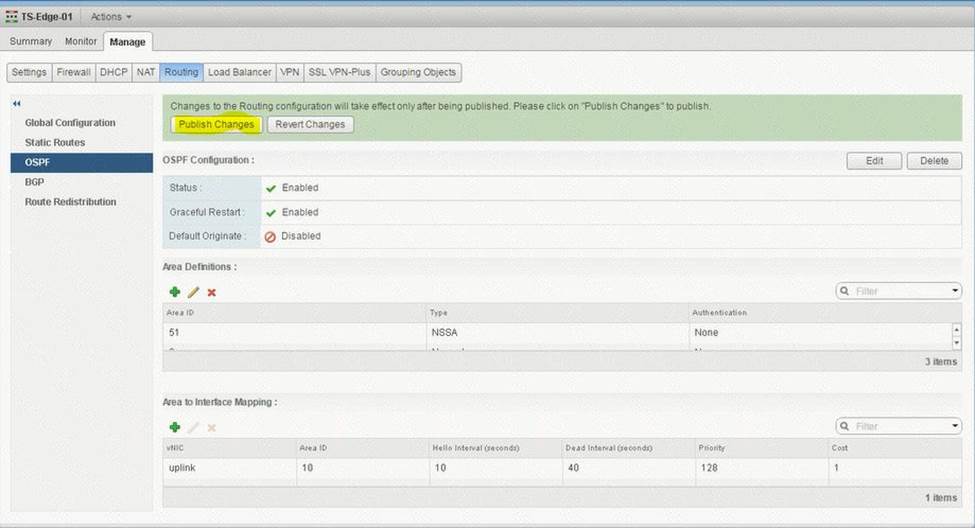
open putty. enter ip address 192.168.100.202.
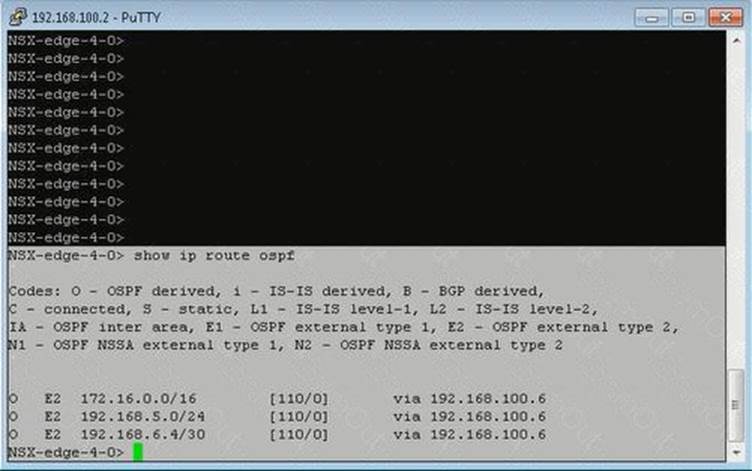
enter command show ip route ospf. copy the ouput and save in a text file name
TS-Edge-01.txt.
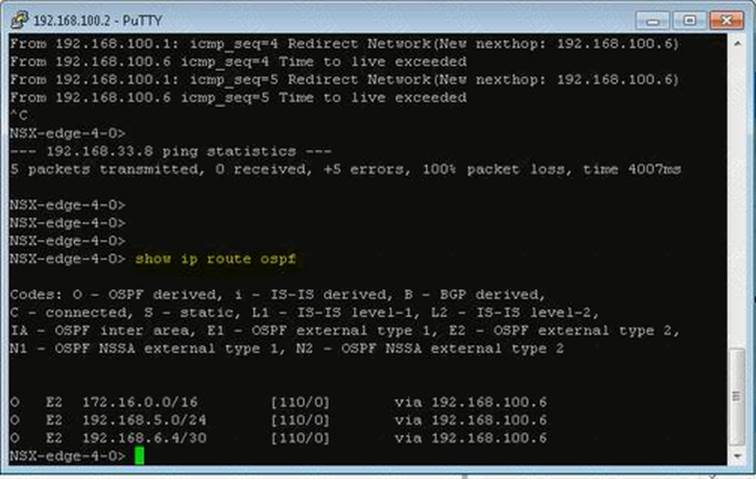
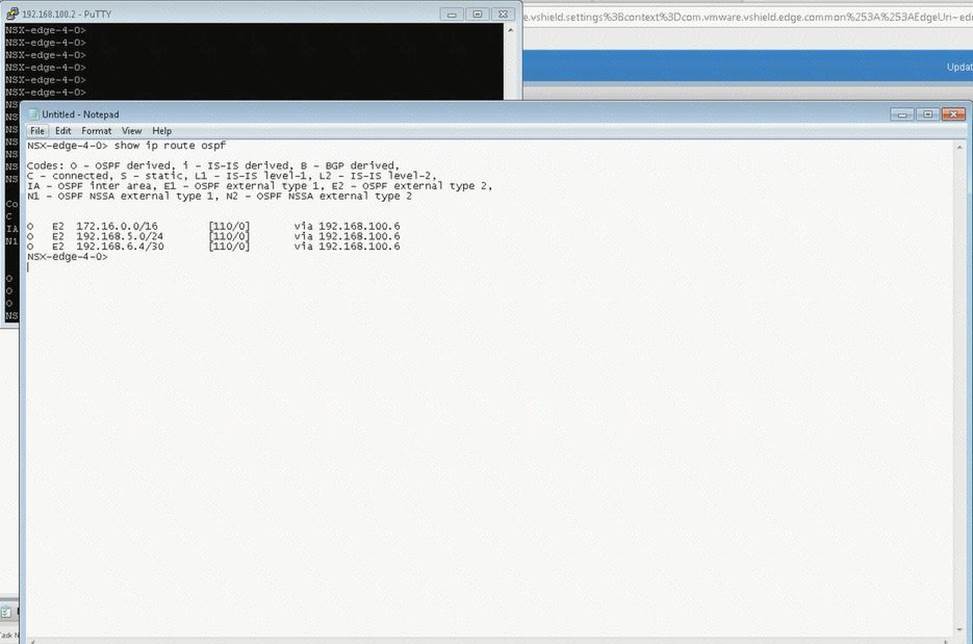
Copy and save OSPF route table in notepad.
Question No : 3
(Exam Topic 1)
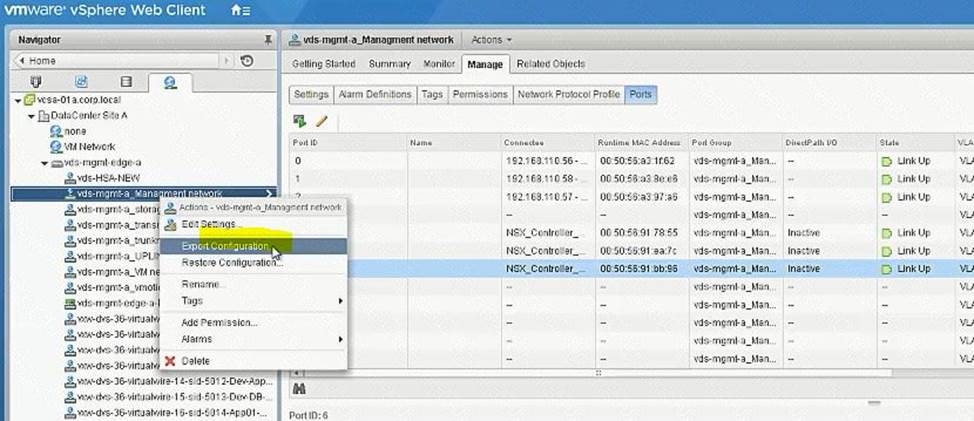
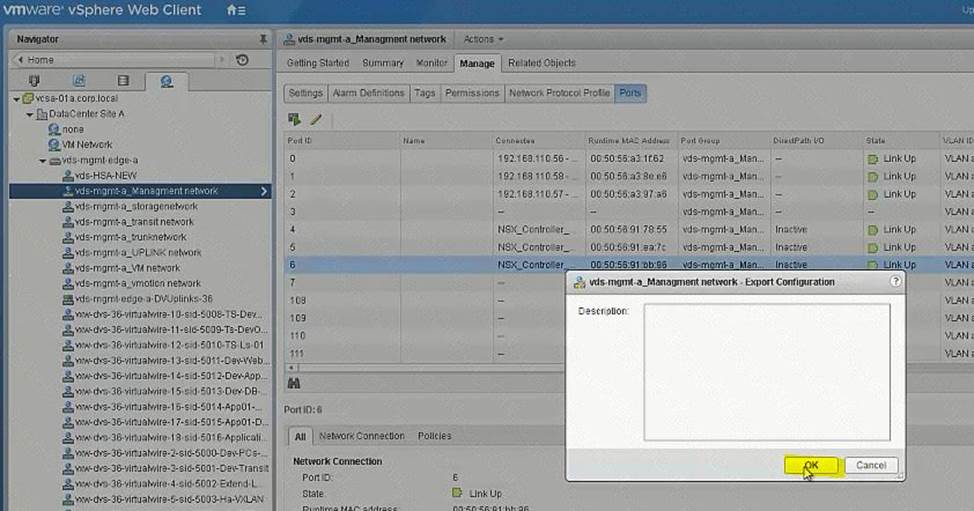
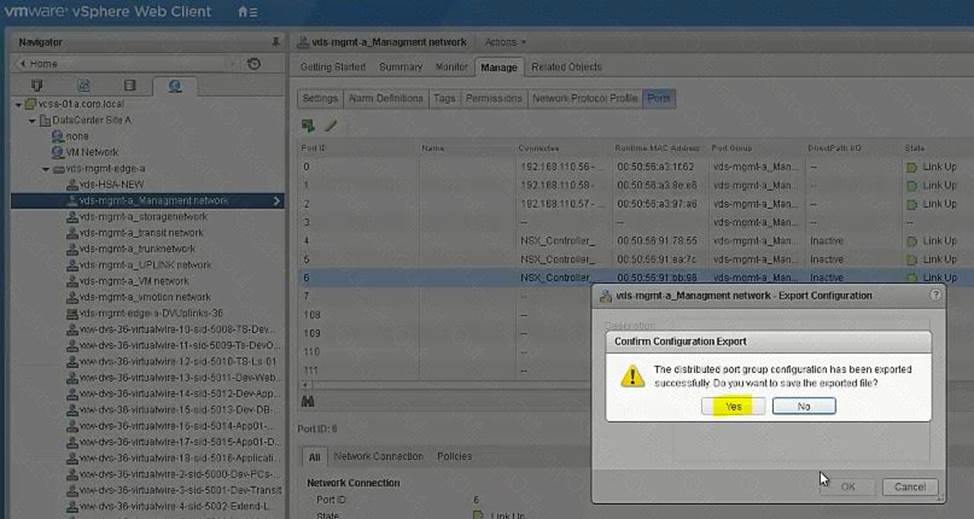
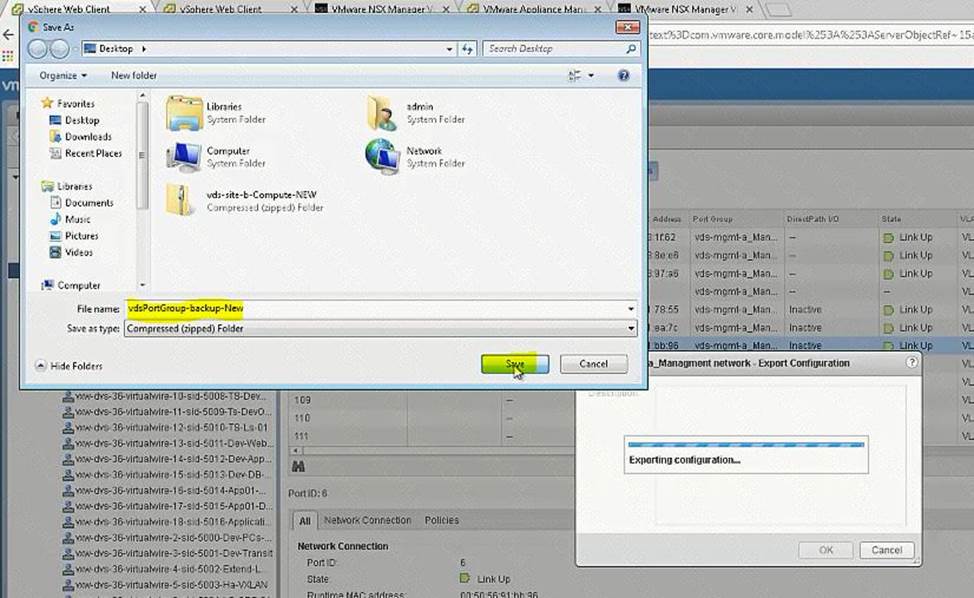
Create a backup of only the vDS portgroup the NSX controllers utilize along with the NSX Firewall configuration. Also, the security team had identified a missing security policy that needs to be added.
Requirements:
vCenter: vcsa-01a.corp.local
Credentials: [email protected] / VMware1!
Components to backup:
vDS Portgroup that the controllers utilize.
NSX Firewall configuration.
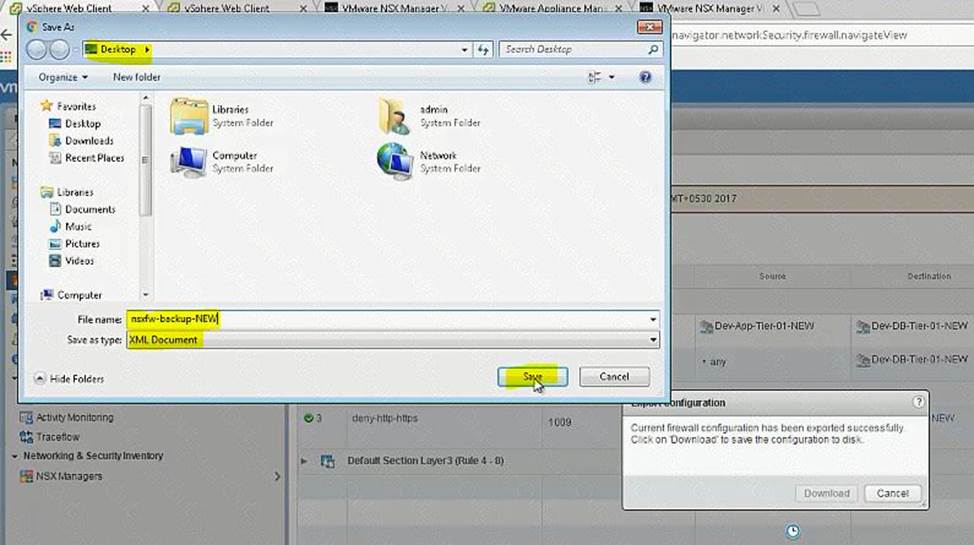
Backup file name: vdsPortGroup-backup-NEW.zip, nsxfw-backup-NEW.xml
Backup file location: Desktop of the ControlCenter.
Security Policy:
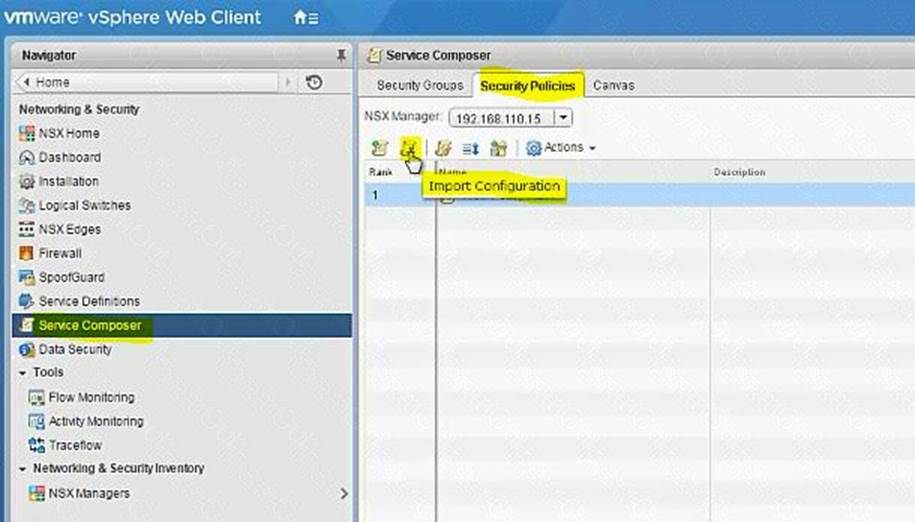
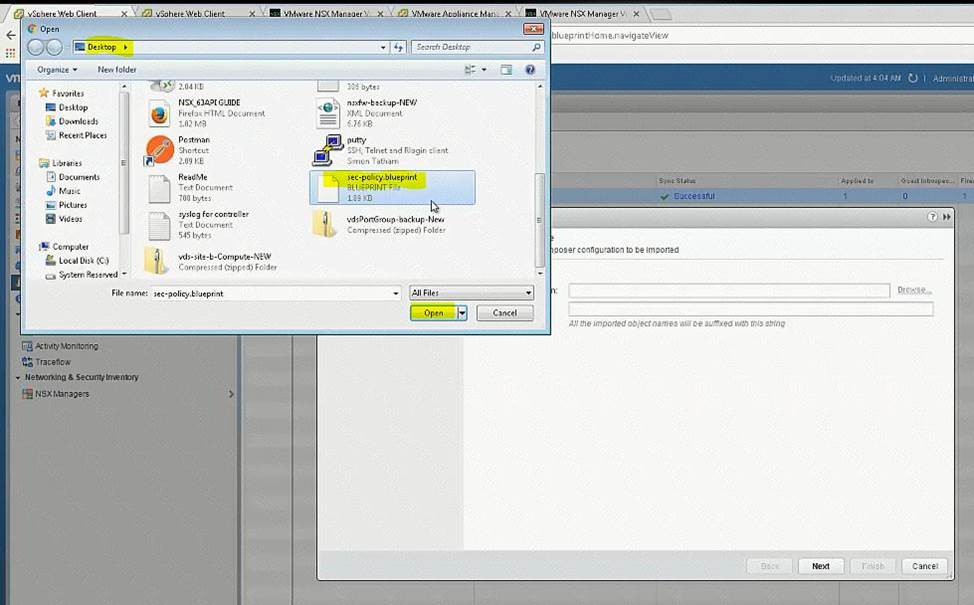
File to import: sec-policy-blueprint located on the desktop of the ControlCenter.

Backup only the vDS portgroup that the NSX Controllers utilize.
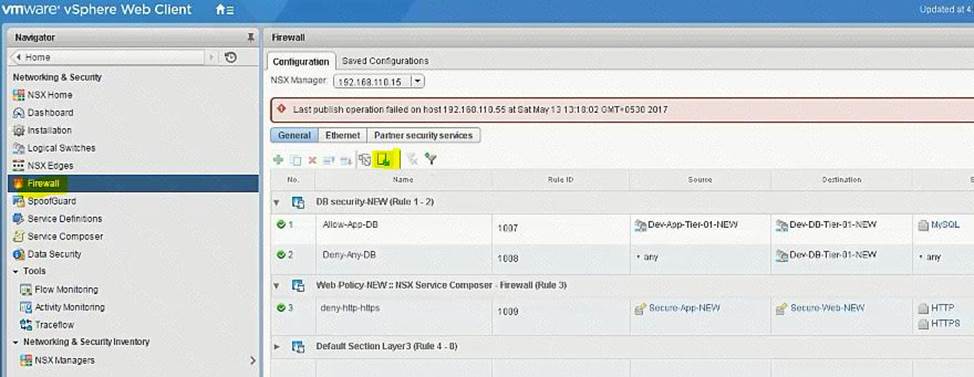
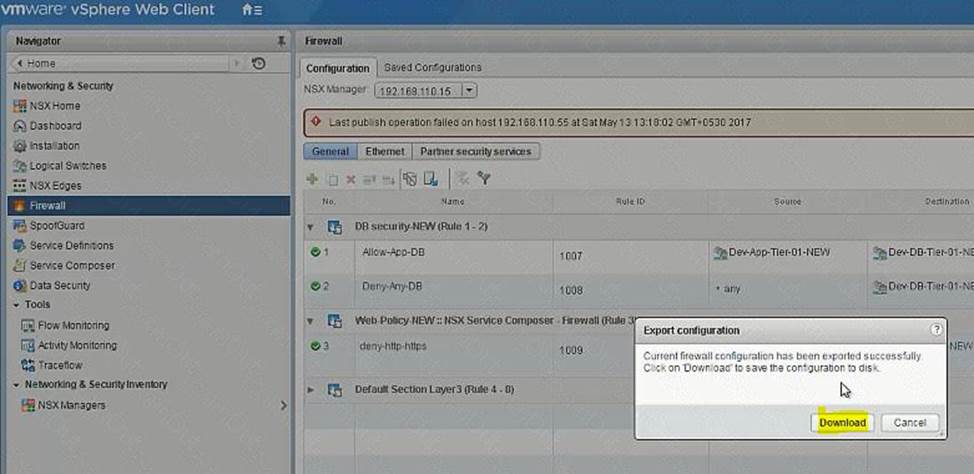
Backup the NSX Firewall configuration.
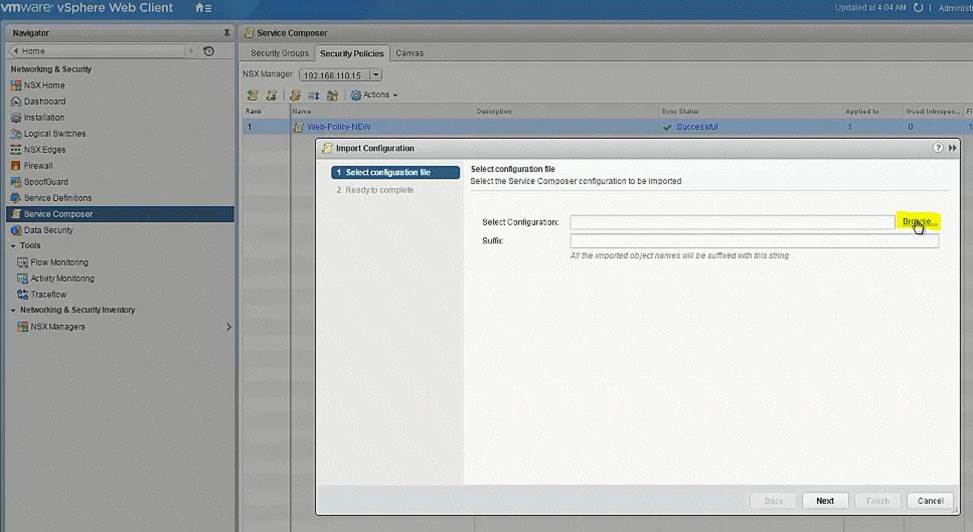
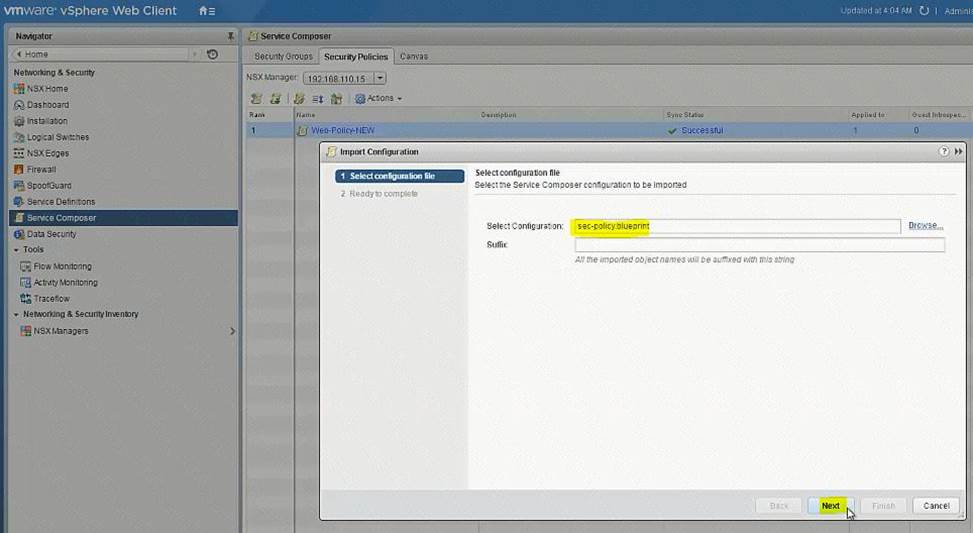
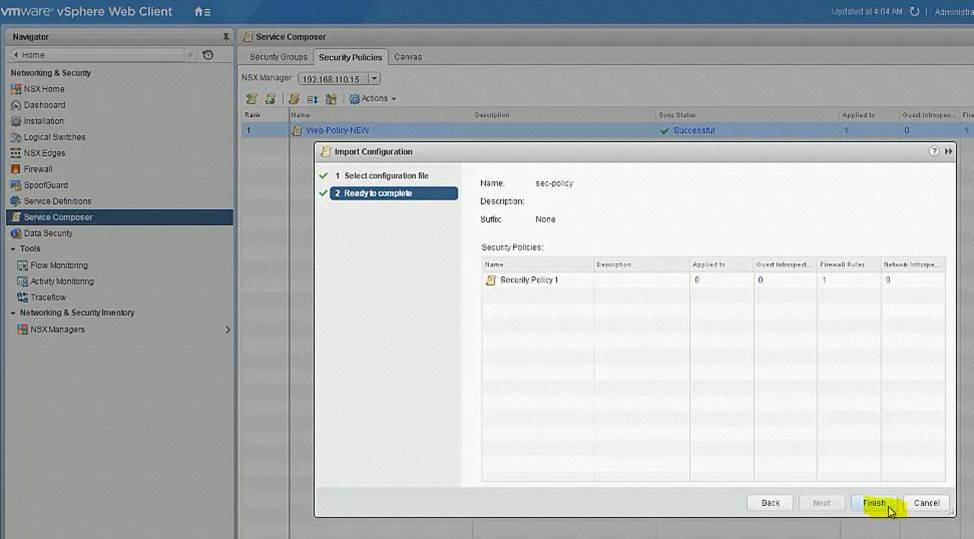
Import the sec-policy.blueprint file
Ensure requirements are met.
HOL LAB for Practice:
See the explanation part for complete solution.
正解: SOLUTION:
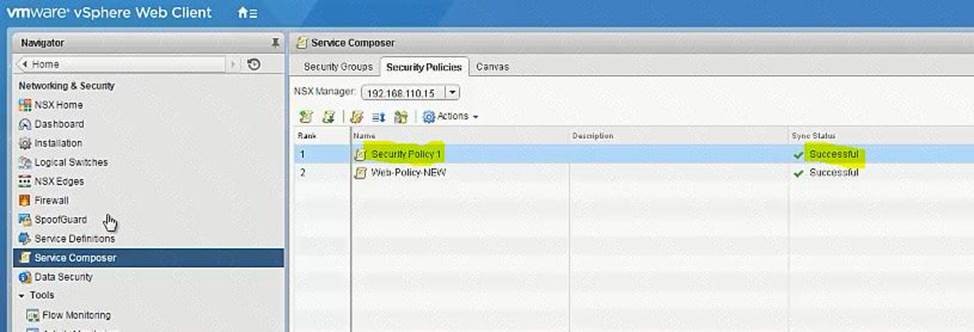
select Network & Security. select service composer. select 192.168.110.15.
select security policy tab. click on + sign enter name sec-policy-blueprint.
click next 3 times. click finish. select sec-policy-blueprint. click right mouse
button select export configuration. enter name sec-policy-blueprint. click next
select sec-policy-blueprint. click next. click finish. select desktop location.
enter name sec-policy-blueprint. click save. select sec-policy-web and delete it.
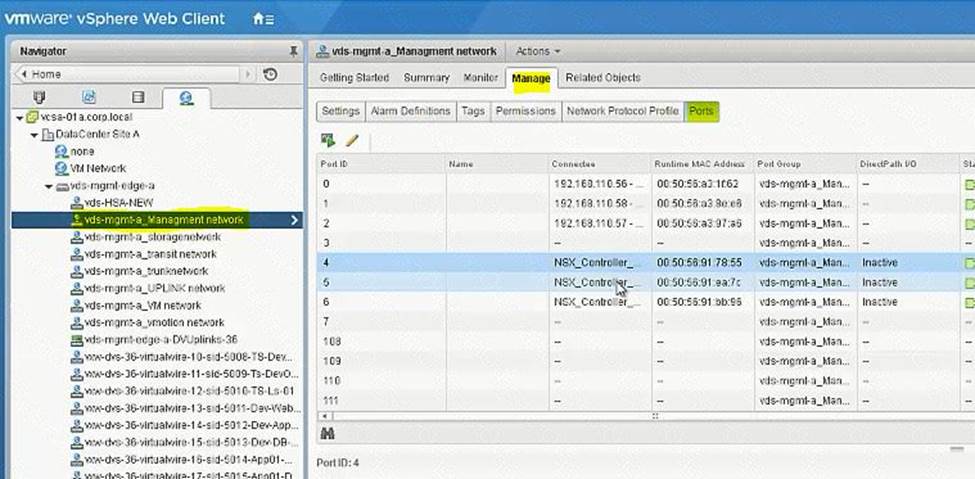
Verify NSX Controllers’ vDS Portgroup
Vds-mgmt-a_Management network (under site A vcenter networking)
Question No : 4
(Exam Topic 1)
The security team has requested that [email protected] have the ability to fully manage NSX Manager (192.168.210.15) for Site B.
Requirements:
vCenter: vcsa-01b.corp.local
Credentials: [email protected] / VMware1!
Ensure [email protected] has the ability to fully manage NSX Manager in SiteB.
NOTE:
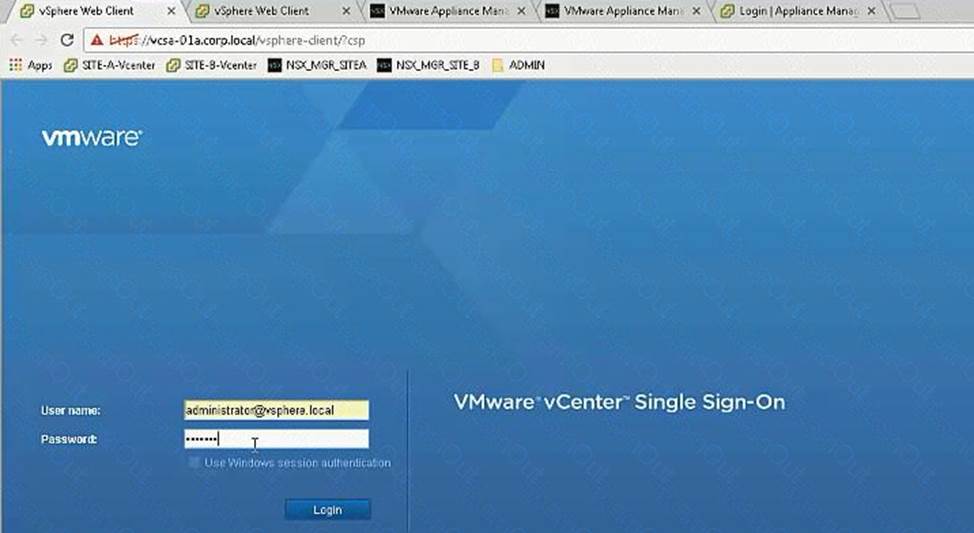
You may have to log out of the web client and back in for 192.168.210.15 to show in web client.
HOL LAB for Practice:
See the explanation part for complete solution.
正解: SOLUTION:
NSX Manager in SiteB
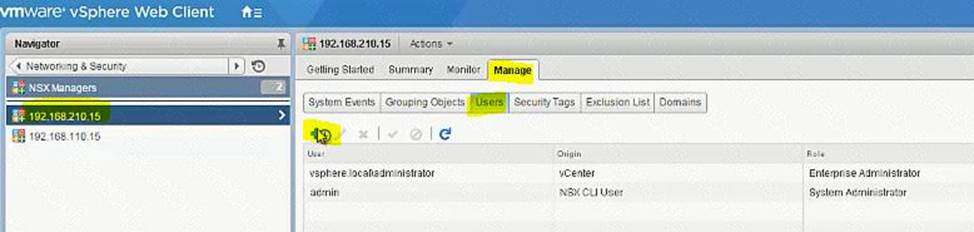
[email protected]
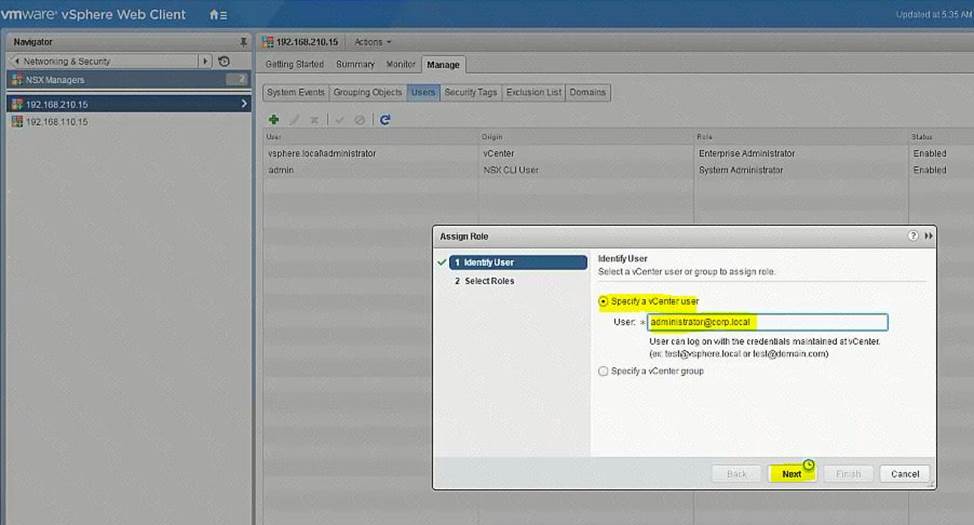
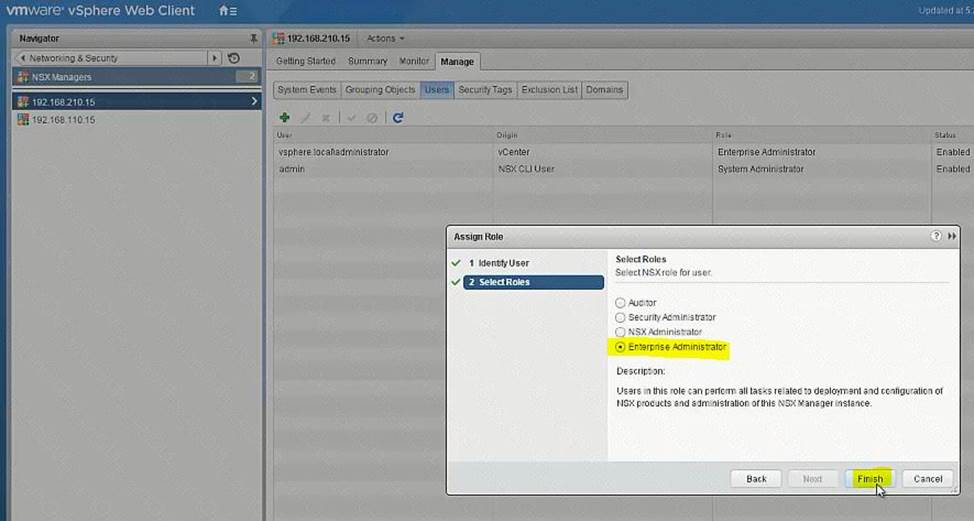
go to Nsx manager - b. select Manage Vcenter registration. check if lookup service
is configured if not configured it will the details.
lookup service ip = Nsx Manager - a IP Address
Lookup service port = 7444
Lookup service= https://192.168.110.15:7444/lookupservice/sdk
SSO administrator = [email protected]
password = VMware1!
click on ok. click on yes.
NOTE: it will show u connected. if not connected. logout and login again
Question No : 5
(Exam Topic 1)
Management has approved an expansion of the virtual infrastructure. You have been tasked to prepare Cross vCenter configuration with the second vCenter Server. Another administrator has provided a pre-configured vDS configuration file located on the Control Center Server. All identifiers must be maintained.
Requirements:
vCenterB server: vcsa-01b.corp.local
Credentials: [email protected] / VMware1!
vCenterB VAMI Credentials: root / VMware1!
Cluster: Computer Cluster 1B
ESXI Hosts: esx-01b.corp.local, esx-02.corp.local
Platform service controller: psc-01a.corp.local(192.168.110.9)
NSX Manager: nsmgr-01b.corp.local (192.168.210.15)
Credentials: admin / VMware1!
Time Zone: US/Pacific
*Configure nsmgr-01b.corp.local for vCenterB and psc-01a.corp.local
*Ensure nsxmgr-01b.corp.local uses the same NTP server as psc-01a.corp.local with a US/Pacific TimeZone.
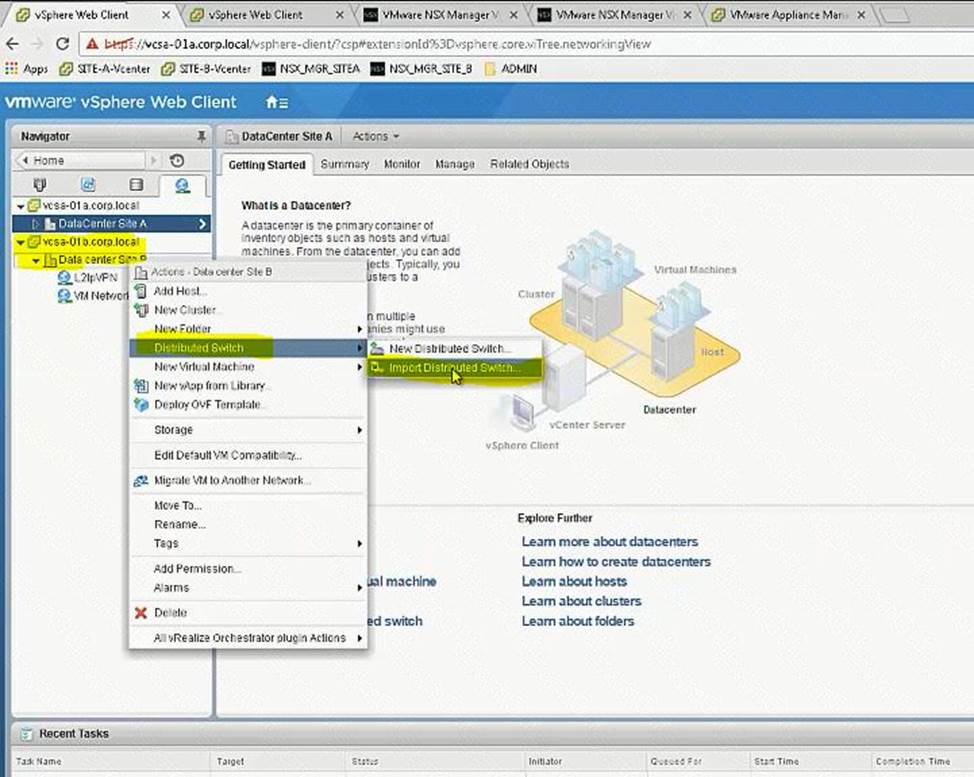
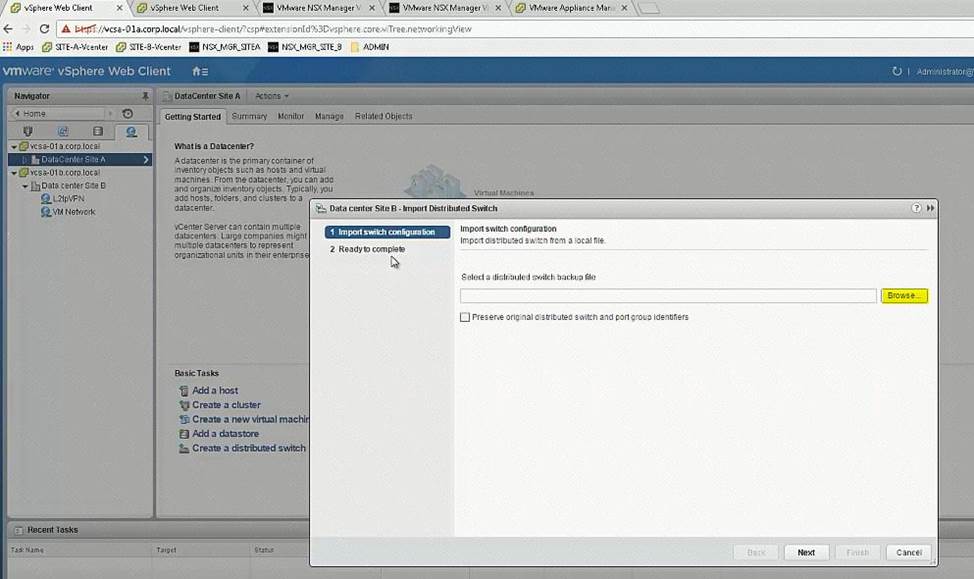
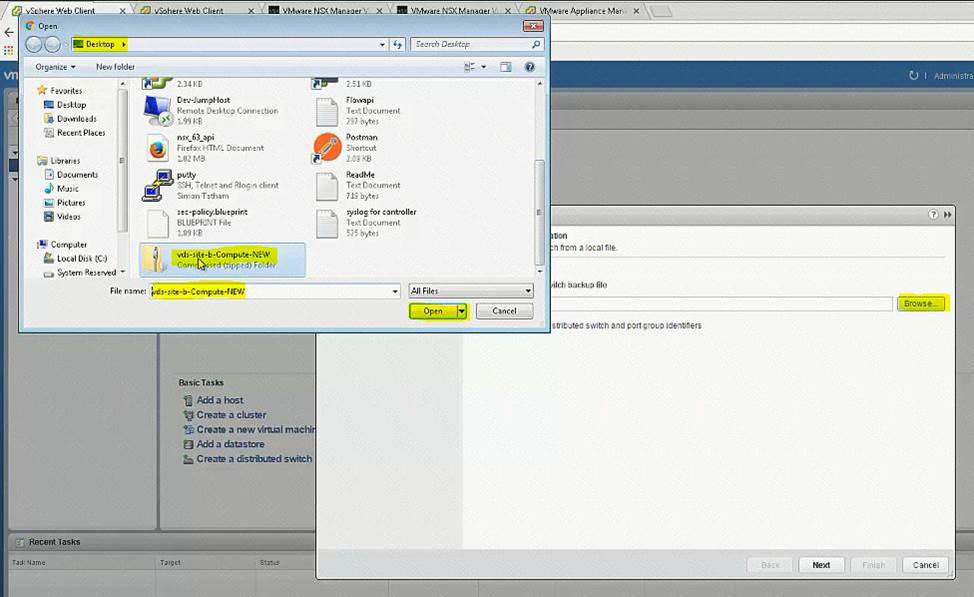
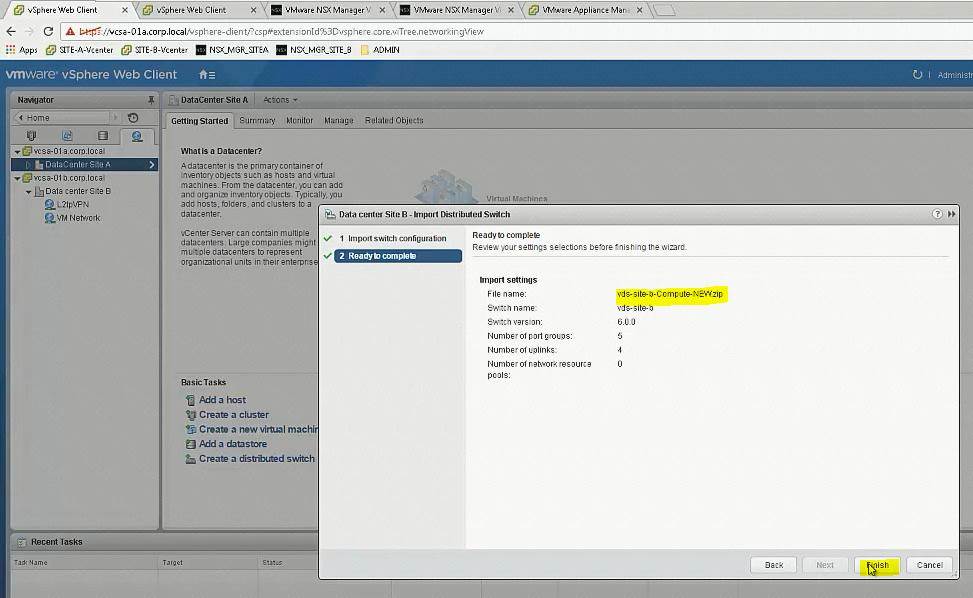
*Import the new vDS configuration vds-site-b-Compute-New.zip
All identifiers must be maintained.
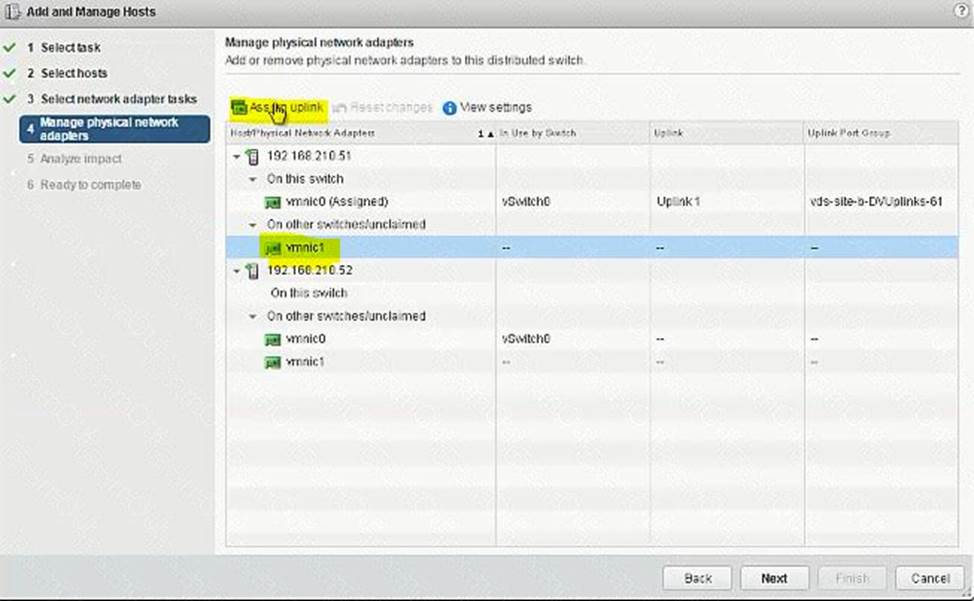
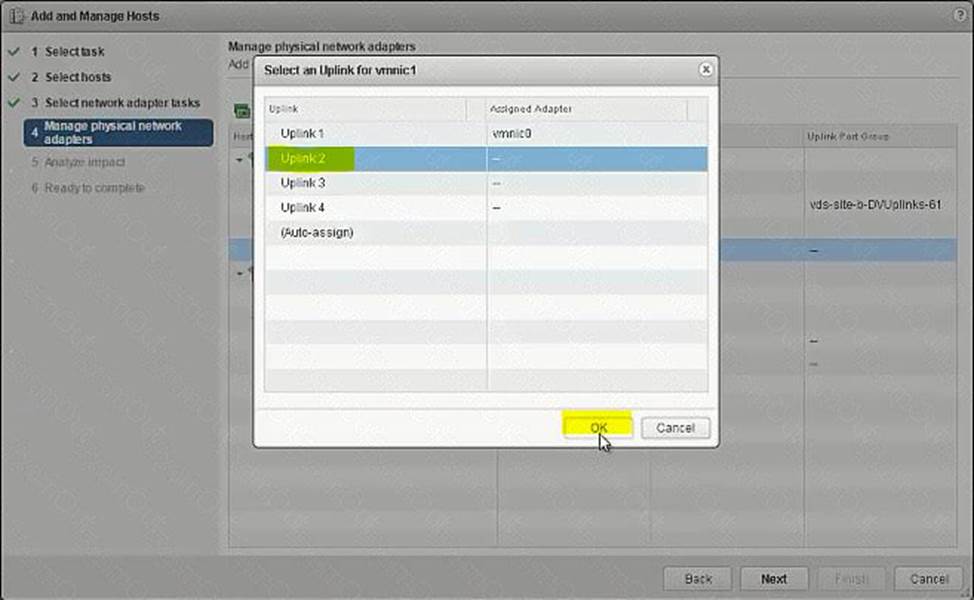
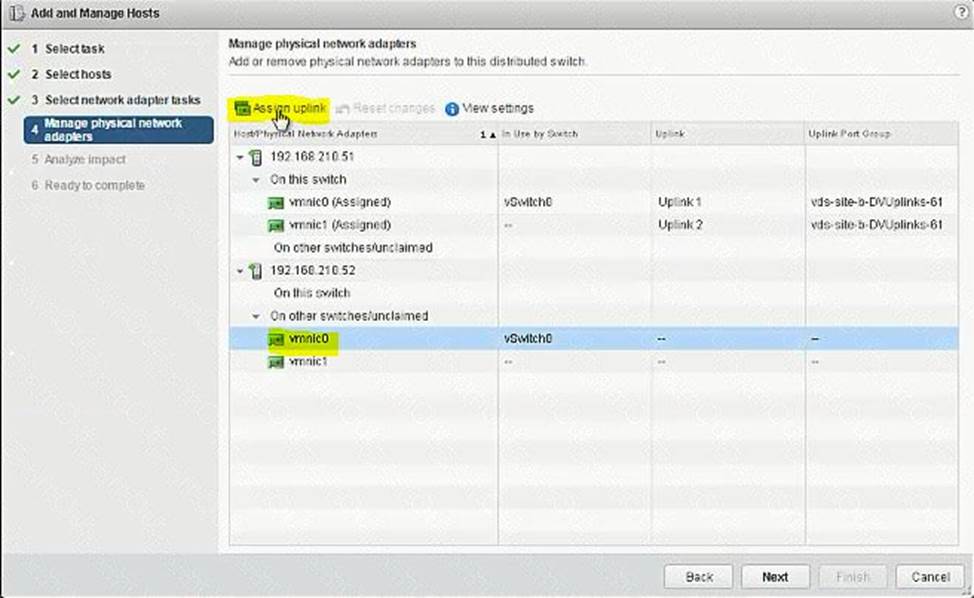
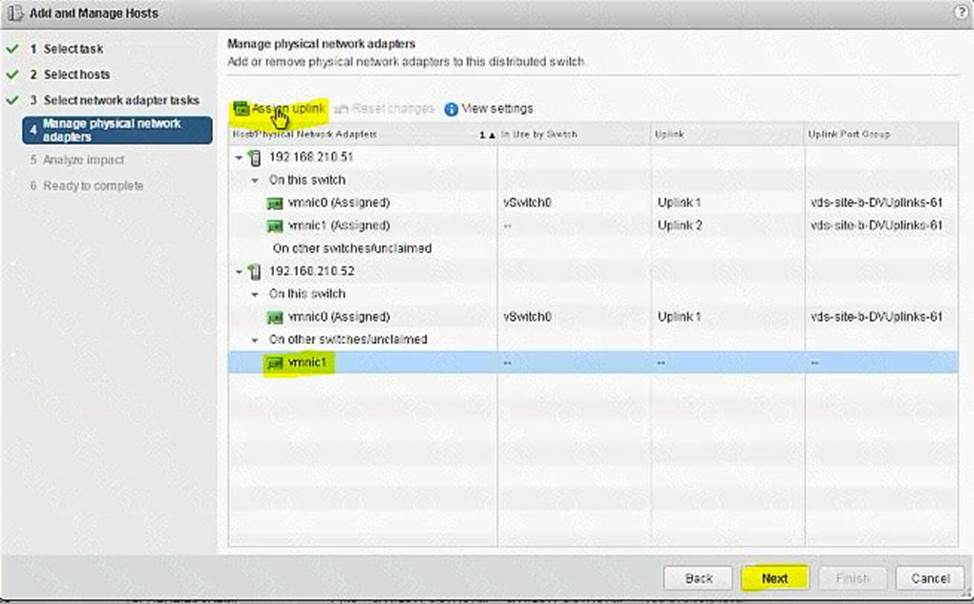
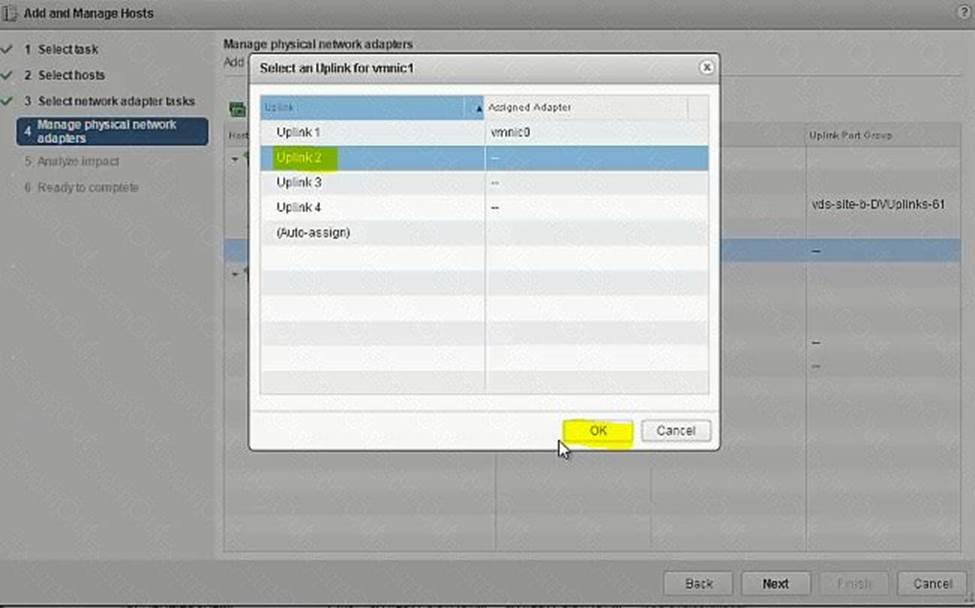
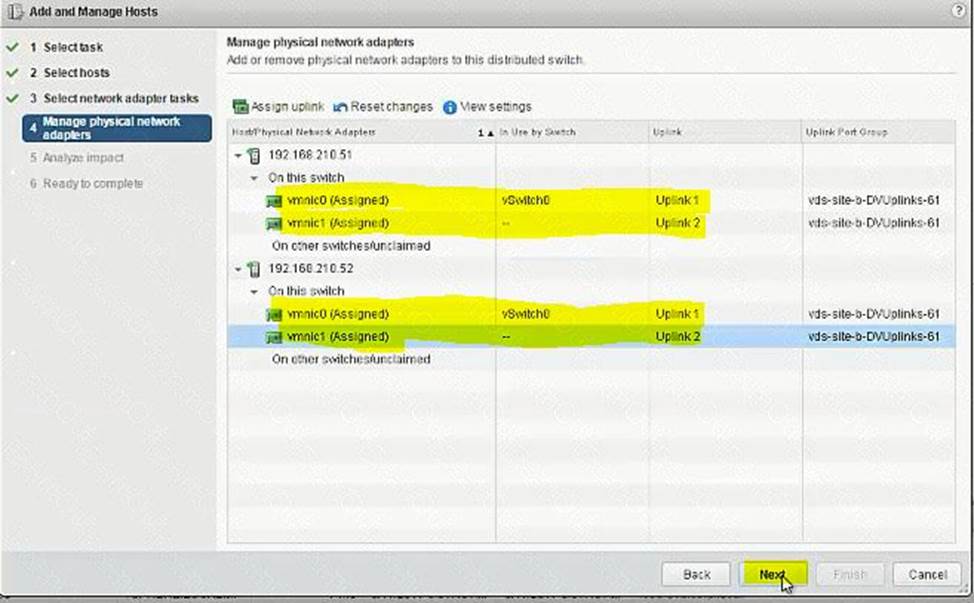
*Assign the remaining two used vmnics for the ESXi hosts to the newly imported vDS.
NOTE:
Do not migrate VMkernels from the standard switches on the hosts.
HOL LAB for Practice:
a http://docs.hol.vmware.com/hol-isim/HOL-2019/hol-1903-01-nsxinstall-p1.htm
HOL-1903-01 Page 16 or you can directly Open a NSX manager in
the lab and edit the existing settings
bOpen PSC and NSX manager in HOL-1903-01 and look for NTP Server
loand cation
cExport existing vDS config and Import back the config for practice in
HOL-1903-01
dNo Lab Module available
See the explanation part for complete solution.
正解: SOLUTION:
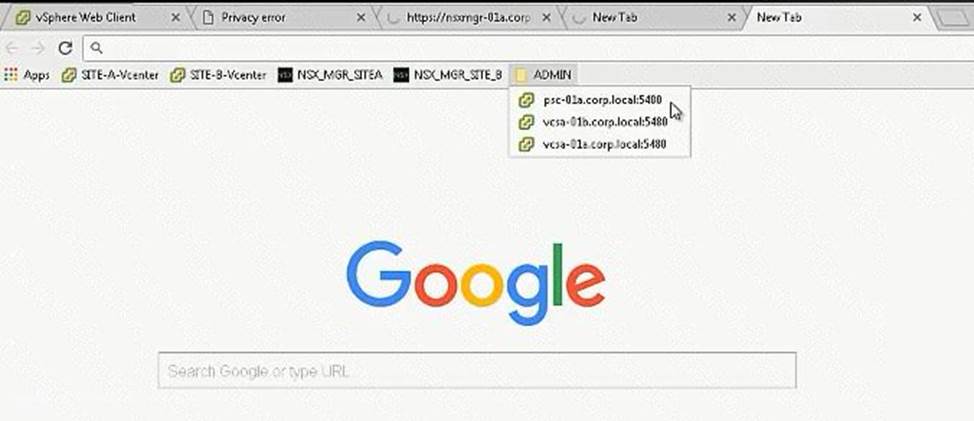
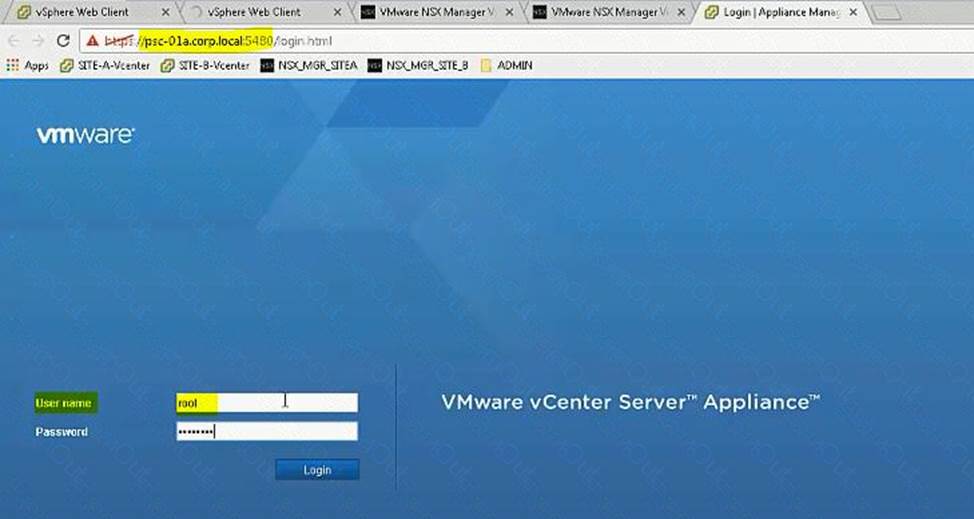
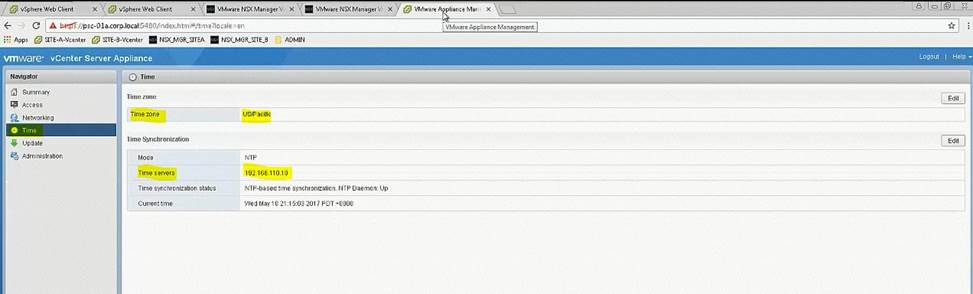
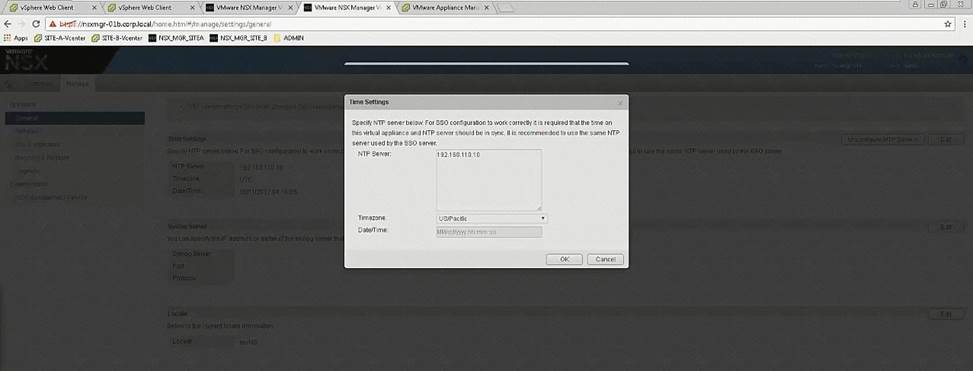
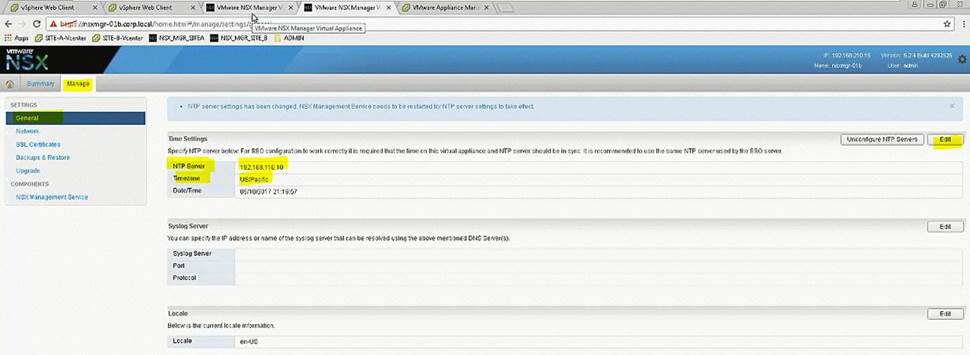
Step 1: Login to PSC using VAMI credentials and note down the time zone and server details and use the same in SiteB NSX Manager time settings.
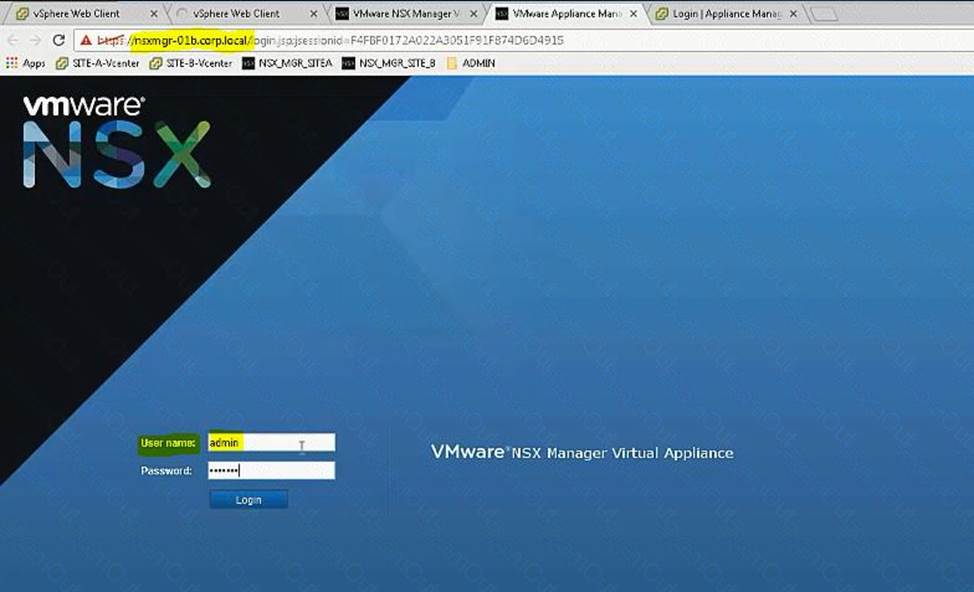
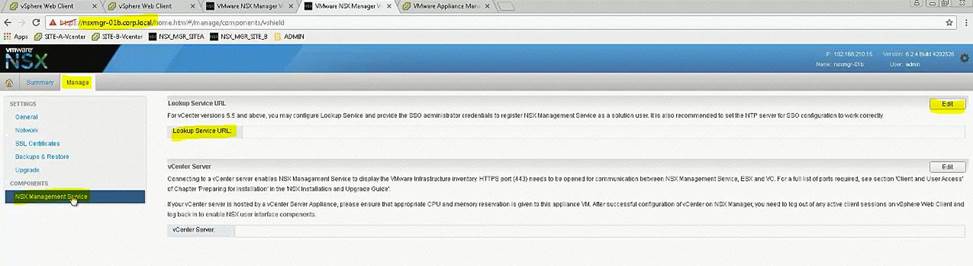
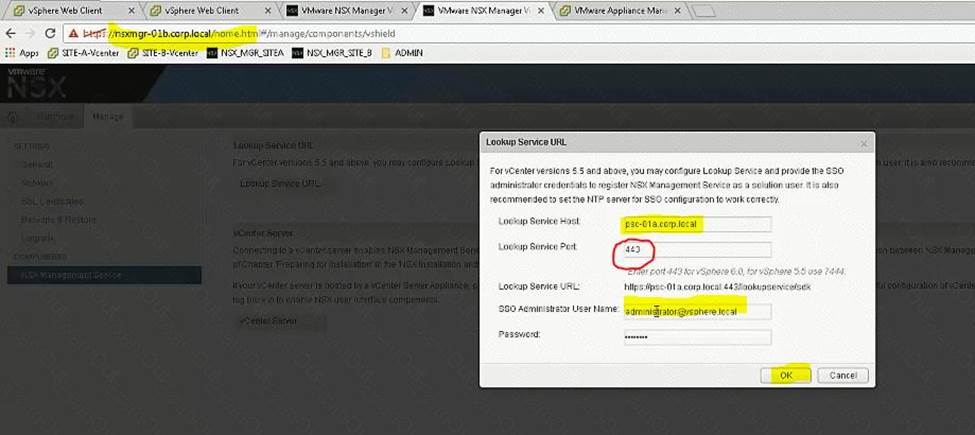
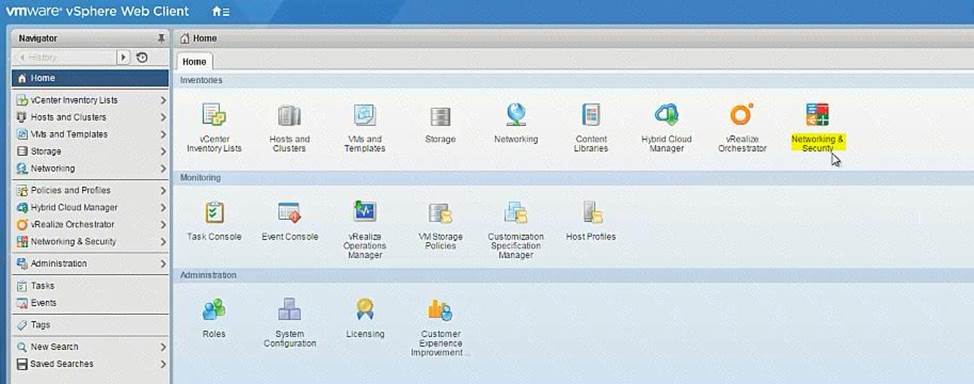
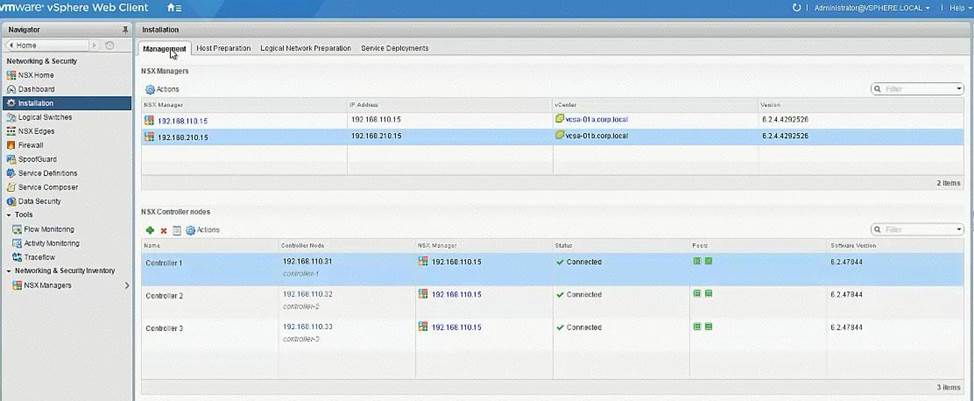
Step 2: Update the time settings, complete lookup service configuration, associate SiteB NSX manager to SiteB vCenter. Check the status from SiteA vCenter Webclient -> Networking & Security -> Installation -> Management.
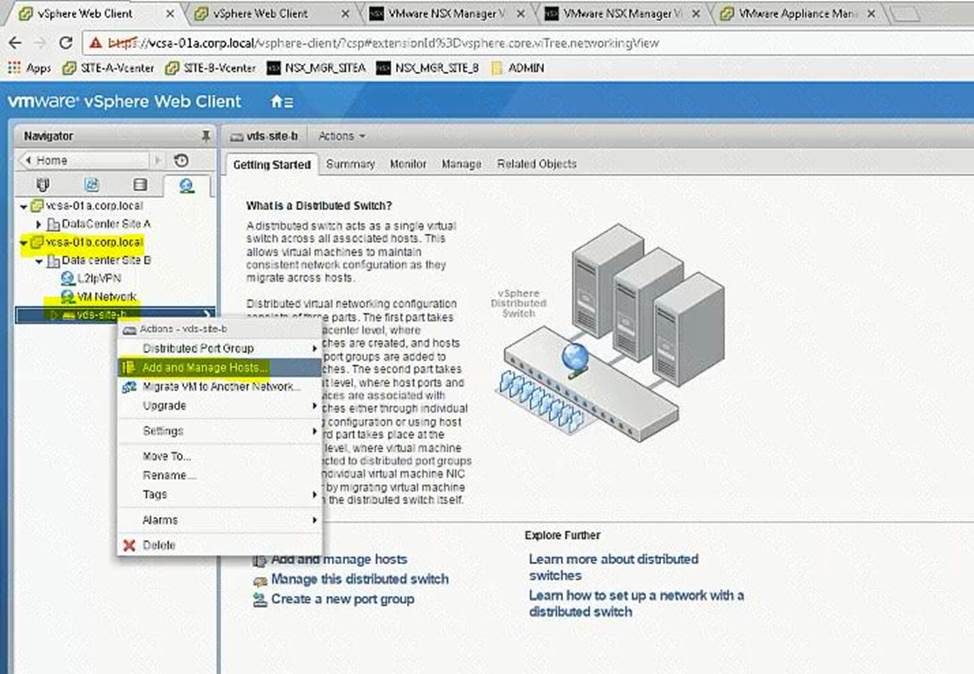
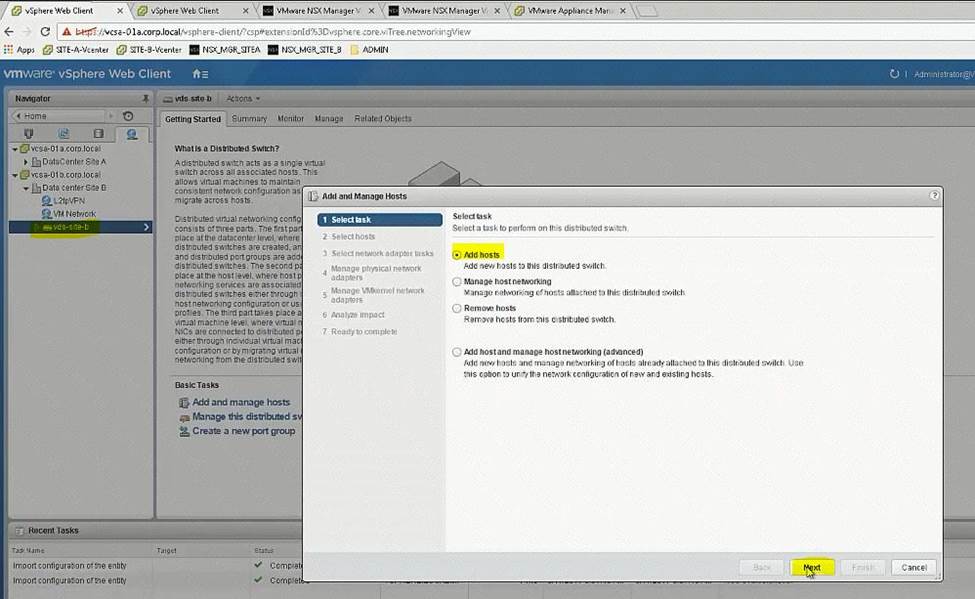
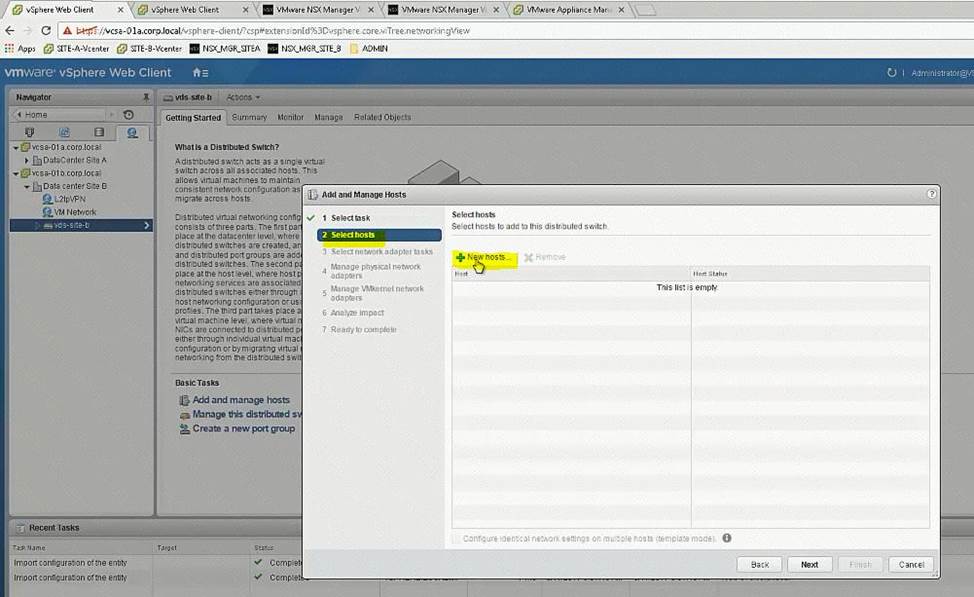
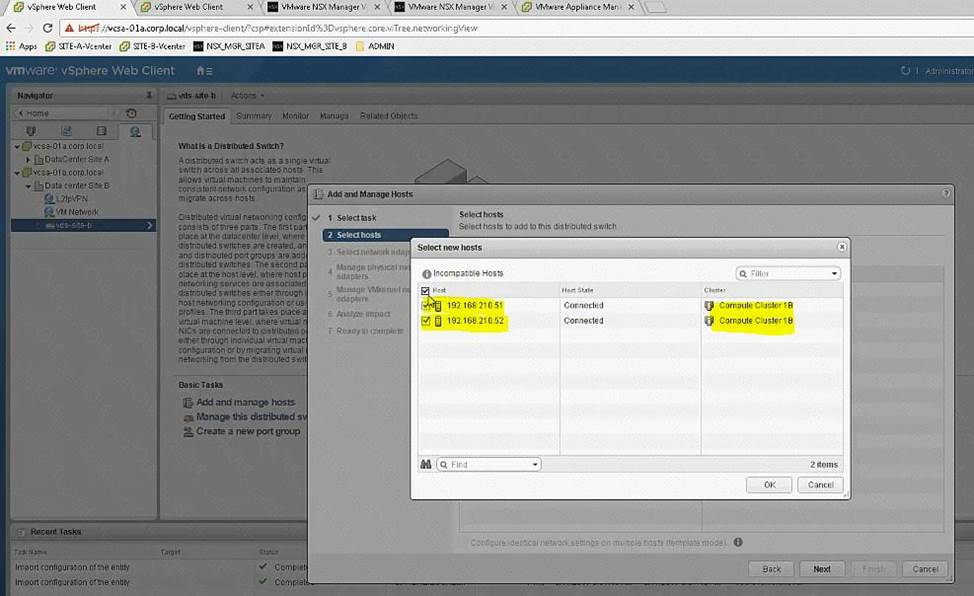
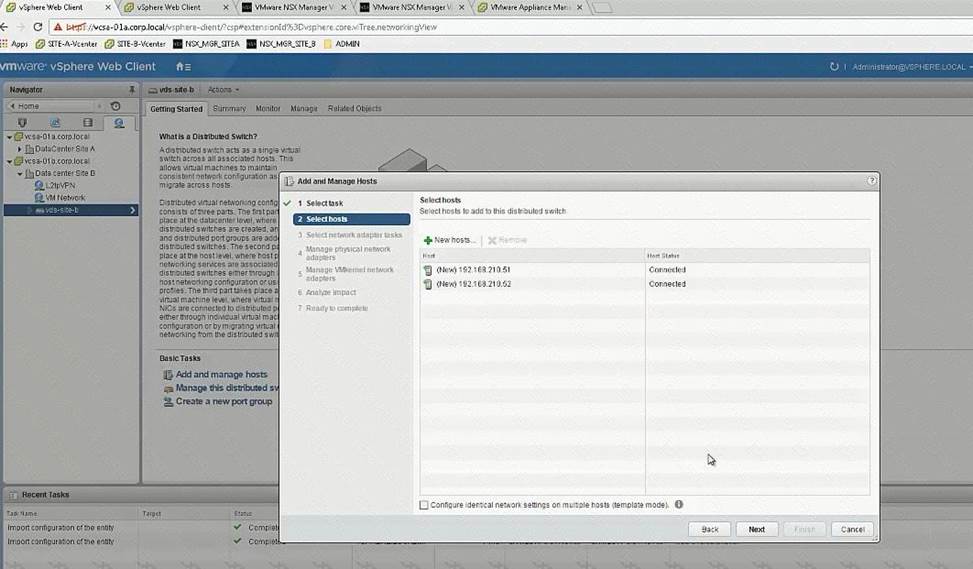
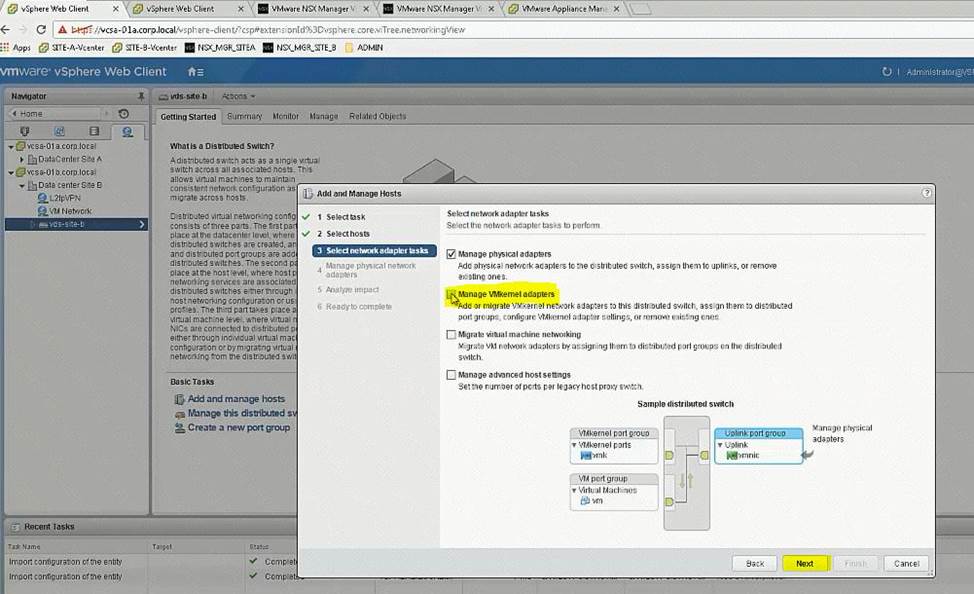
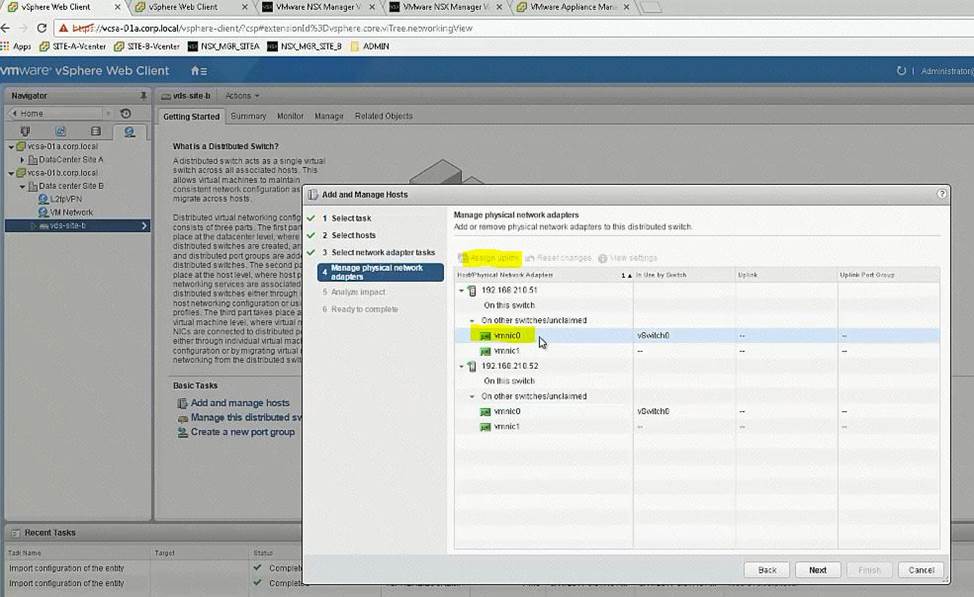
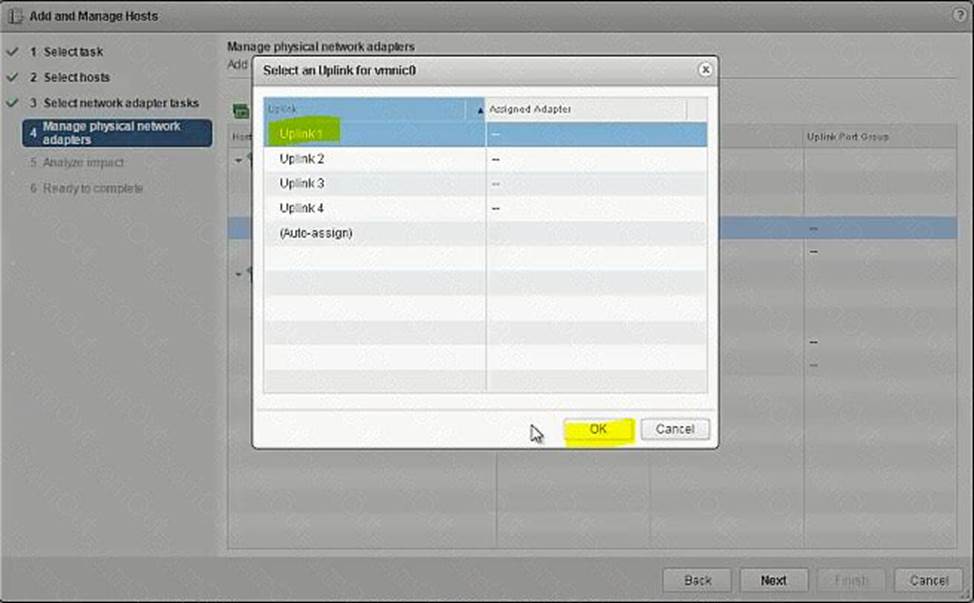
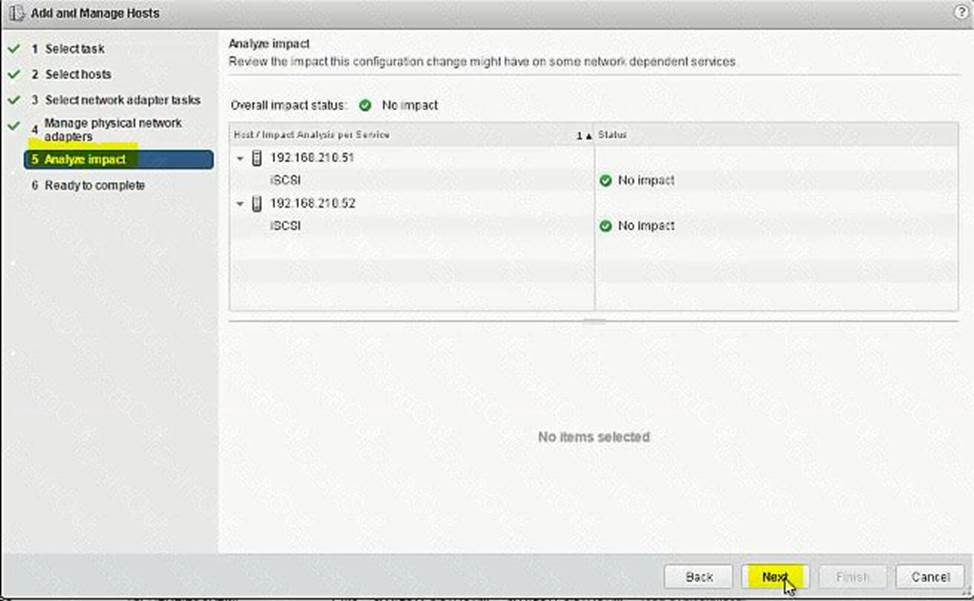
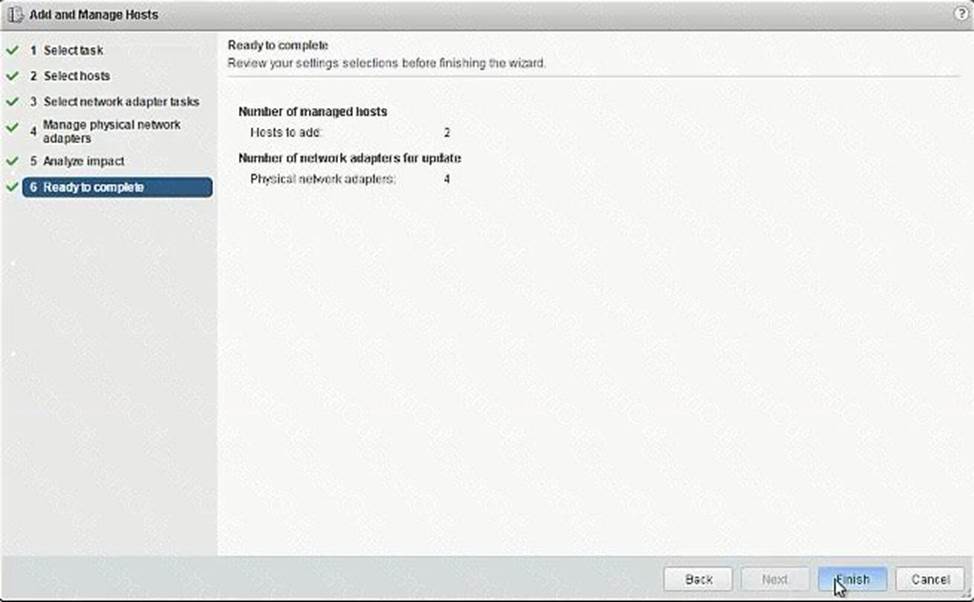
Step 3: Import the Distributed switch to Cluster B, add the hosts & assign the interfaces.
Login to https://psc-01a.corp.local:5480/ to check the NTP server details and note it down. Use the VAMI credentials given to login. Need to click on Edit to see the server details in here as it is not showing up in the main page (In exam, it is showing in the main page itself).
Important NOTE:
In exam change Lookup Service Port according to NSX Manager of Site A which is working one.
It’s 7444 in exam.
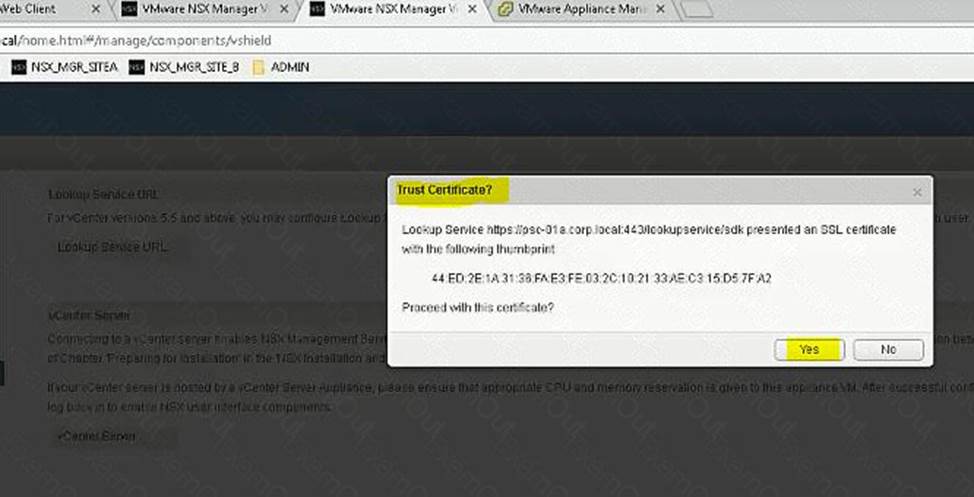
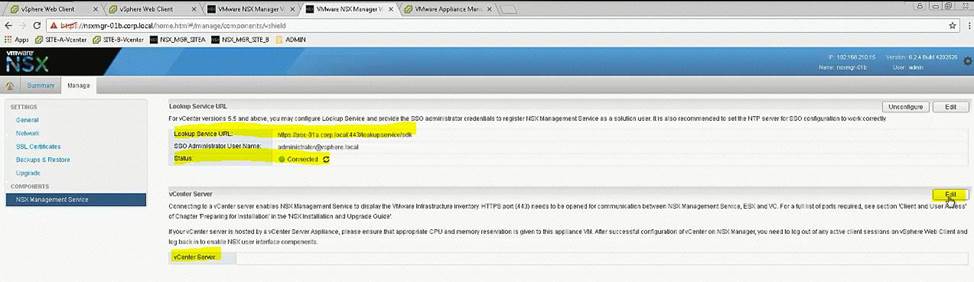
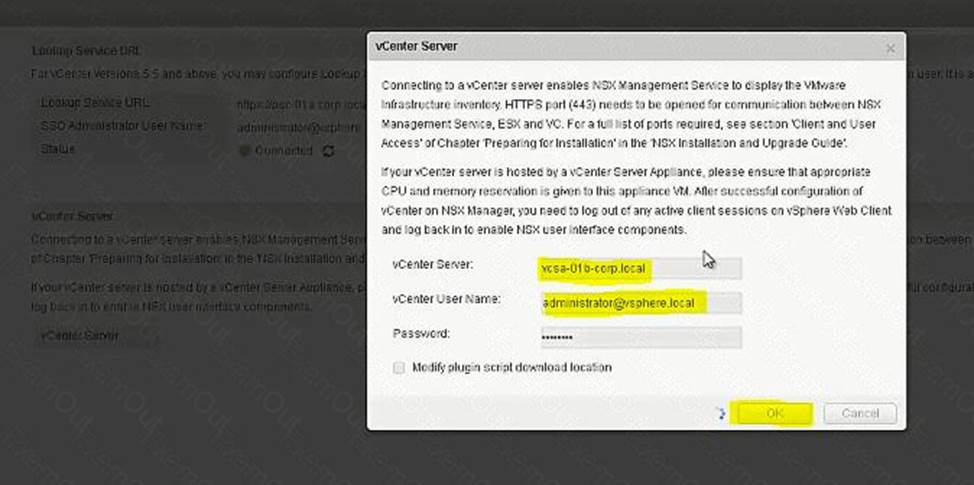
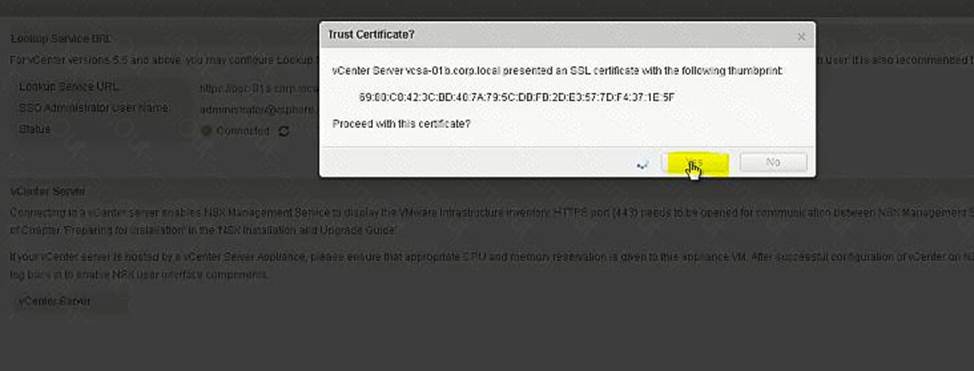
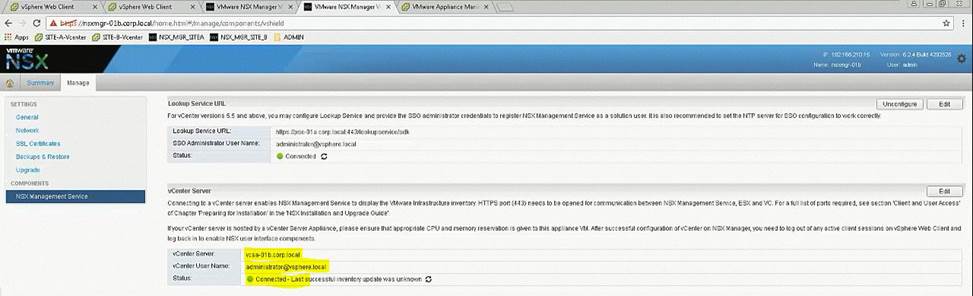
Click refresh if in case it shows as disconnected.
Login to SiteA vCenter using Web Client and confirm the status of both the NSX Managers: Installation -> Management.
Question No : 6
Topic 1, Main Questions
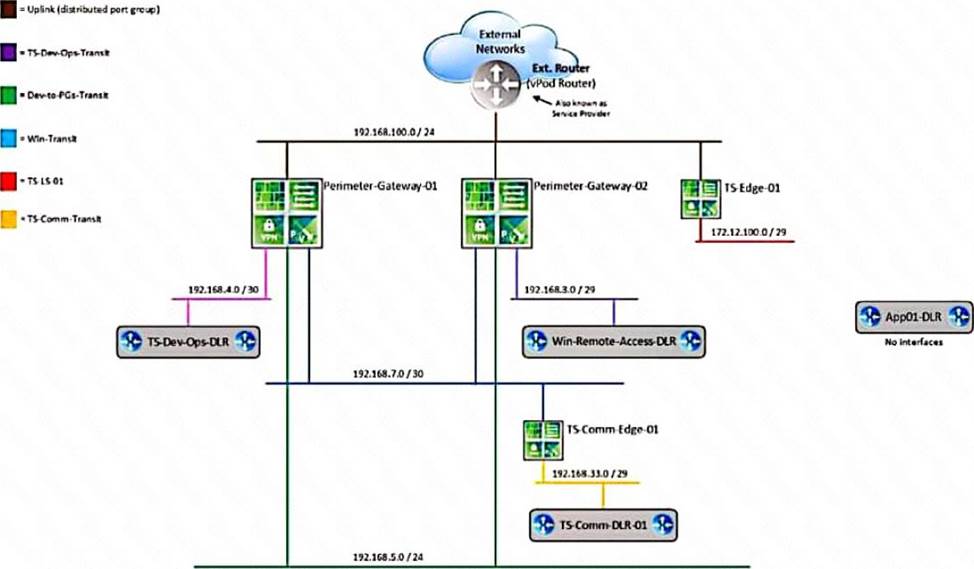
Questions HOL LAB Modules and Pages for practice
1
http://docs.hol.vmware.com/hol-isim/HOL-2019/hol-1903-01-nsxinstall-p1.htm
HOL-1903-01 Page 16 or you can directly Open a NSX manager in the lab and edit the existing settings
bOpen PSC and NSX manager in HOL-1903-01 and look for NTP Server
loand cation
cExport existing vDS config and Import back the config for practice in
HOL-1903-01
dNo Lab Module available
2
http://docs.hol.vmware.com/hol-isim/HOL-2019/hol-1903-01-nsxinstall-p2.htm
and LAB - HOL 1903-01 Page 26-36
3LAB - HOL 1903-01 Module 2 - Page 37-38
4LAB - HOL 1903-01 Module 4 C Practice and understand whole module Bridging and other questions 7, 8, 9 and LAB - HOL-1925-02 Module 1
5LAB - HOL 1903-01 Module 4 - shows how to deploy NSX Edge, you can also deploy Distributed logical router DLR in the same way the lab.
6LAB - HOL 1903-01 Module 3 C Practice and understand the whole module, it will be use full for other question like 20 and 22
7LAB - HOL 1903-01 Module 4 C Practice and understand whole module Bridging and other questions 7, 8, 9
8LAB - HOL 1903-01 Module 4 C Practice and understand whole module Bridging and other questions 7, 8, 9
9LAB - HOL 1903-01 Module 4 C Practice and understand whole module Bridging and other questions 7, 8, 9
10LAB - HOL-1903-02 Module 1 and 2
11LAB - HOL-1903-02 Module 1 and 2
12LAB - HOL-1903-02 directly follow the steps in this document for practice
13LAB - HOL 1903-01 - open an NSX manager in LAB and directly follow the steps in this document.
14LAB - HOL 1903-01 - open postman in the lab and directly follow the steps in this document.
15LAB - HOL 1903-01 - directly follow the steps in this document for practice.
16LAB - HOL 1903-01 - directly follow the steps in this document for practice.
17LAB - HOL-1925-02 Module 1
18LAB - HOL-1925-02 Module 1
19 LAB - HOL-1925-02 - directly follow the steps in this document for practice.
20LAB - HOL 1903-01 Module 3 C Practice and understand the whole module.
21No Lab Module available
22LAB - HOL 1903-01 Module 3 C Practice and understand the whole module.
23LAB - HOL 1903-01 - open postman in the lab and directly follow the steps in this document.
(Exam Topic 1)
Two administrators (John and Chris) share admin responsibilities for an NSX deployment that is leveraging Centralized CLI as part of their management. Security requirements prohibit use of shared admin accounts in Site A.
Requirements:
NSX Manager: nsxmgr-01a.crop.local
New administrator accounts: “John” and ”Chris”
Default password: VMware1!
Create accounts for John and Chris.
Use one of the newly created accounts to display all clusters enabled for the distributed firewall.
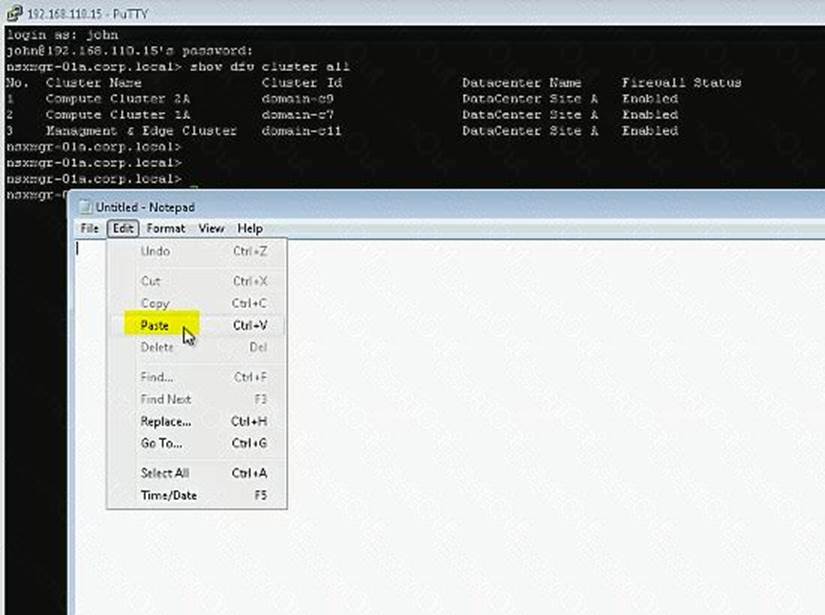
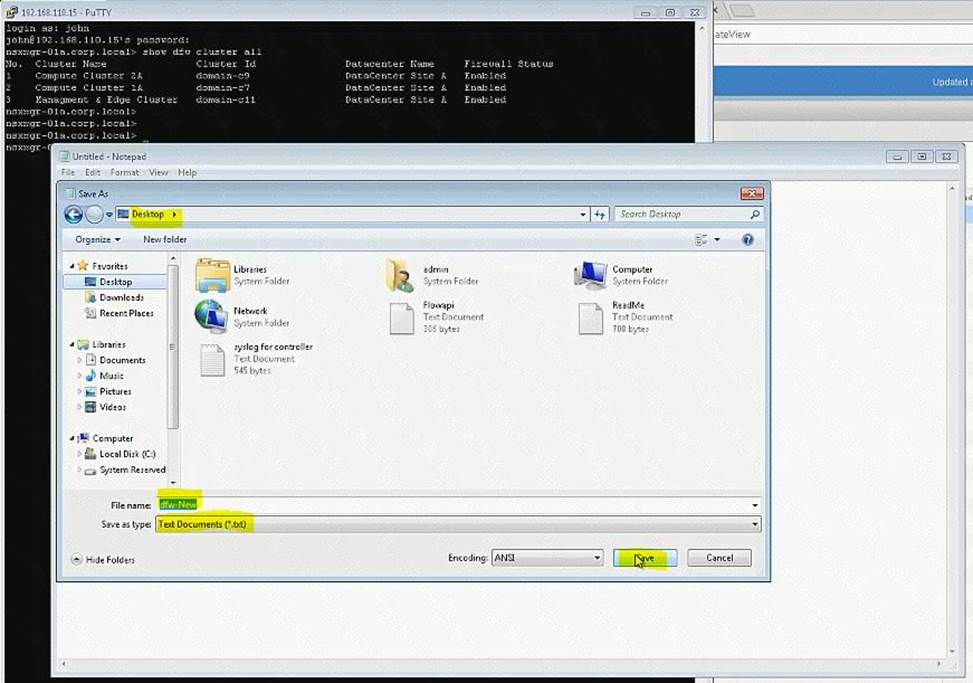
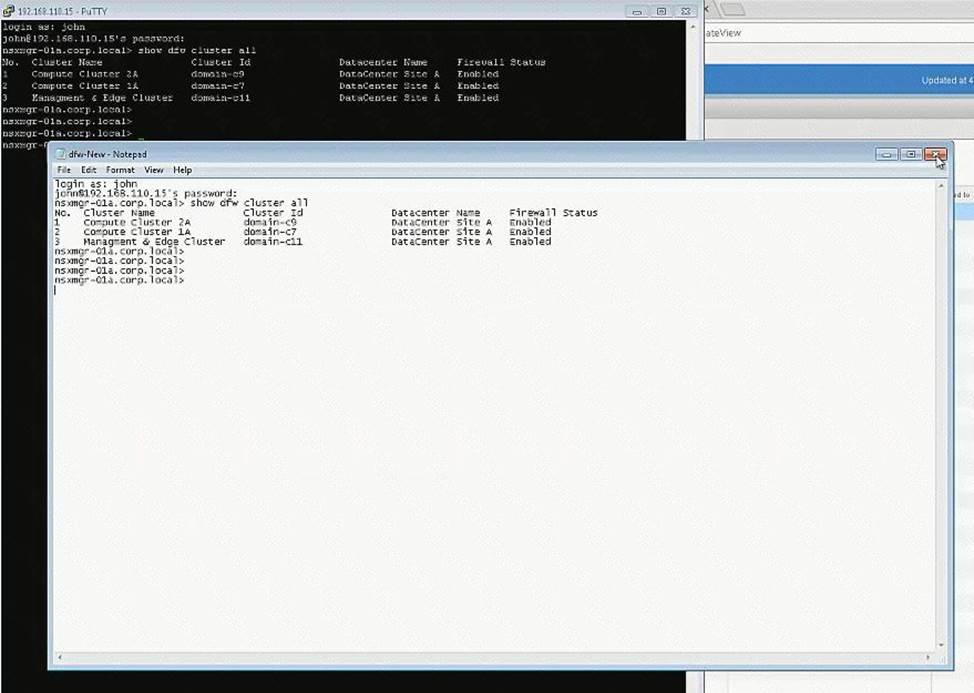
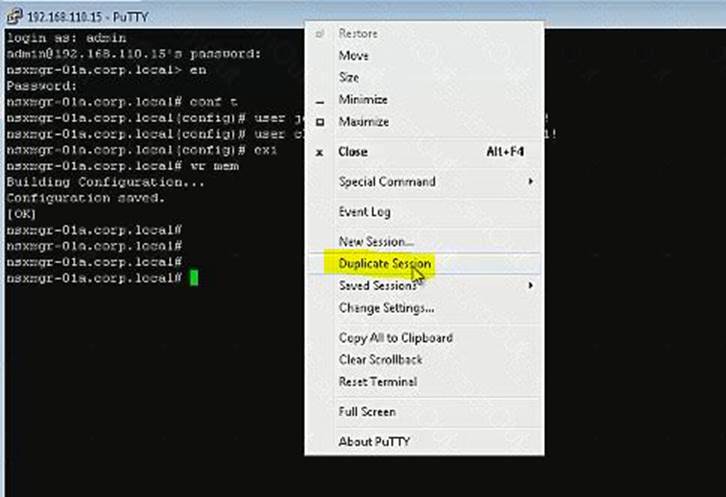
Use Putty’s “Copy All to Clipboard” feature to paste the command and output to a text file
dfw-NEW.txt on the ControlCenter desktop.
NOTE:
Screenshot is shown on how to use Putty’s Copy all to Clipboard feature.
HOL LAB for Practice:
See the explanation part for complete solution.
正解: SOLUTION:
13:(1) select vccenter - a. select datacenter A and click right mouse button select administrator. select user and groups click on + sign. select user tab enter user name john password VMware1!. click ok . do same for chris.
(2) select datacenter A. select manage tab. select permission. click + Sign. select Read Only from Assign Role. select All Privileges click on Add. select John and chris.checked Propagate to childern and click on OK.
(3) go NsX Manager. select Nsx Manage-a. select manage select user from tab. click + sign. select identity user. check specify vcenter user. enter user name [email protected] click next. select role Nsx Administrator. click finish. do same for chris. but use [email protected] and assign role of NsX administrator click finish.
6 of 336
Enable
VMware1!
Conf t
User john password plaintext VMware1!
User chris password plaintext VMWare1!
Exit
Write memory
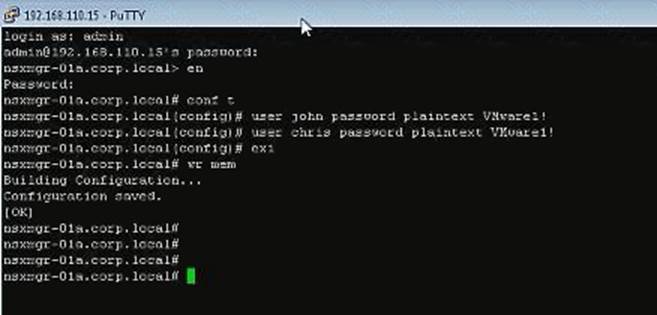
Open new Putty session or Duplicate Session:
john
VMware1!
Show dfw cluster all
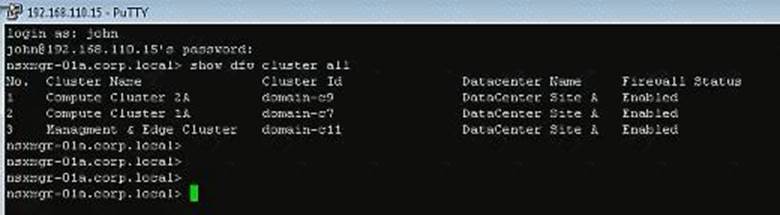
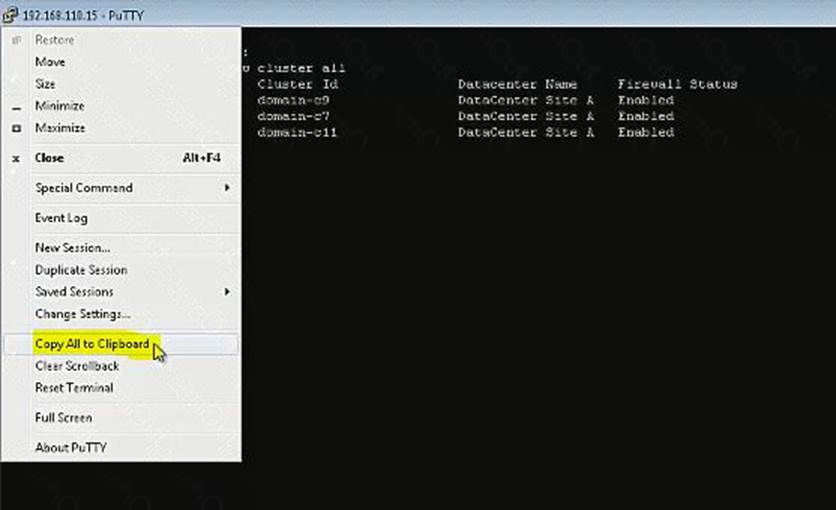
Ctrl+V don’t work in exam.